Web development — lecture 2 — HTML & CSS
This post will focus on HTML and CSS in bigger details. We will start with HTML. What role HTML is doing in web development. What the syntax is and how to use it. After that we’ll cover special cases like self-closing tags and HTML attributes. Once we are done with HTML, we will cover CSS in similar fashion. Initial part will be familiar, as it will repeat some content covered in last post, but it will be just an intro to more advanced, and more interesting parts.

HTML
As mentioned in previous post, HTML is markup language which is used for structuring of content.
While that might not sound meaningful, I’ll cover example that hopefully will make more sense. So, let’s start with Lego. One of best things and selling points for Lego is that we can build anything with it.
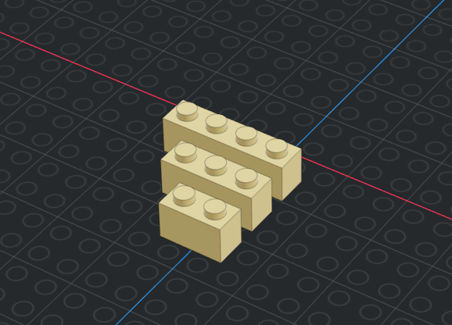
Base elements are basic. Different in size but very similar. However, aligning them in different combinations we can build something complex and awesome. One of those might be Star Wars X-Wing jet plane.

Looking at the picture of completed solution we see final plane, but if we take a close look, we can see individual simple pieces. Pieces combined making nose of plane, each wing and pilots’ cabin. With further connecting them we get our plane.
Let’s take this example step forward to example of imaginary blog site.
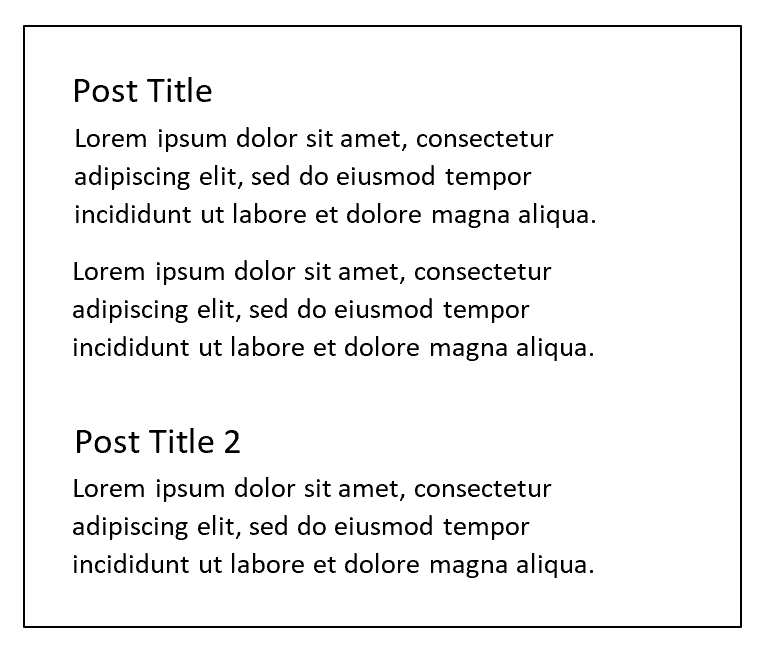
In the example above we can look at the web site as one element containing all posts. That page has different posts and we could view each post as different element. Inspecting further each post, we can see it containing title and post text. Splitting into small pieces we are structuring our web application in a way we would do it in HTML.
HTML syntax
We write HTML by writing something we call tags, and each element, other than few exceptions, has both opening and closing tag. Opening is written by wrapping tag name in an angle brackets (<>), and closing tag is done in a same fashion with a difference that before tag name we add slash sign (/).
<tagname></tagname>
On a typical web page, we will have may elements. First element, one containing all is called root element. Reason for this name is because we look at HTML like a tree. Each element can have one or more children, and children at same level are siblings. For each sibling, element that contains them is their parent element. This might not be clearest to understand but hopefully, next code example will help.
<root>

    <firstChild>

        <moreChildren></moreChildren>

    </firstChild>

    <secondChild></secondChild>

    <thirdChild></thirdChild>

</root>
In this example we can see first element containing all others. Just to make this example more understandable, I called it root because here, it is root element. This element contains three direct child elements, firstChild, secondChild and thirdChild. While not direct, moreChildren element is also child element of root. Elements first, second and third are sibling elements that share parent element, root.
Earlier, I said that elements are written by adding their names between angle tags. That is true, but they can also have attributes. Attributes give modification to the element and they are written in opening tag after tag name but before end angle bracket.
<element attr1="some value" attr2></element>
When it comes to display, elements can be block or inline. Difference between is that each block element takes full row and its width and height can be modified. Adding another block element after it would render it in separate row. Inline element would show next to each other, and those would take only enough space to show their content.
Common HTML elements:
Title
<h1>Title 1</h1>

<h2>Title 2</h2>

<h3>Title 3</h3>
Paragraph
<p>

  Some text

</p>
List
<ul>

  <li>item 1</li>

  <li>item 2</li>

  <li>item 3</li>

</ul>
Table
<table>

  <tr>

    <td>row 1 cell 1</td>

    <td>row 1 cell 2</td>

  </tr>

  <tr>

    <td>row 2 cell 1</td>

    <td>row 2 cell 2</td>

  </tr>

</table>
Grouping block element
<div>

  <h1>Title</h1>

  <p>Some text</p>

</div>
Link
<a href="www.google.com">Google</a>
Image
<img src="image.png" />
Input
<input type="text" />
CSS
Just adding elements around would not be enough to create web pages. They should also look nice. This is what we use CSS for. With it, we can define color, size, spacing, font and many other.
CSS syntax
This is being done by first writing selector rule which defines to which elements styling will be applied to. Then, between curly brackets, we add all styling rules we wish to apply to them. There can be one or more rules, and each one is ended with semicolon(;).
p {

  color: blue;

  background: lightgrey;

  font-size: 24px;

}
Selectors
Selectors are rules we write to tell which elements we want to apply style to. We style all elements of type by writing tag name. But also, we can select using attributes.
p[attr1=value] {

  color: blue;

}
There are two special case attribute selector, id which should be unique, and class which can be common for multiple elements.
p.className {

  color: blue;

}

p#uniqueKey {

  color: blue;

}
Children selector
div ul {

  color: blue;

}

div>ul {

  color: blue;

}
Sibling selector
div~ul {

  color: blue;

}
Pseudo-selectors
Pseudo-selectors are special rules that work in combination with any of previous ones.
p:first-child {}

p:first-of-type {}

p:nth-child(2) {}

p:nth-of-type(2) {}

p:hover {}

p:focus {}
About this series
This series of articles is done as part of my volunteer work at Citywise Education where I am giving lectures on web development with ReactJS. More details and other learning materials can be found at my course page grumpy-dev.com.

Top comments (0)