Deploying Sagemaker Endpoint on Lambda
To deploy a SageMaker endpoint on AWS Lambda, follow these steps:
Log in to your Amazon Web Services (AWS) account and search for "Lambda" in the search bar. Click on the "Lambda" service to access the Lambda console.
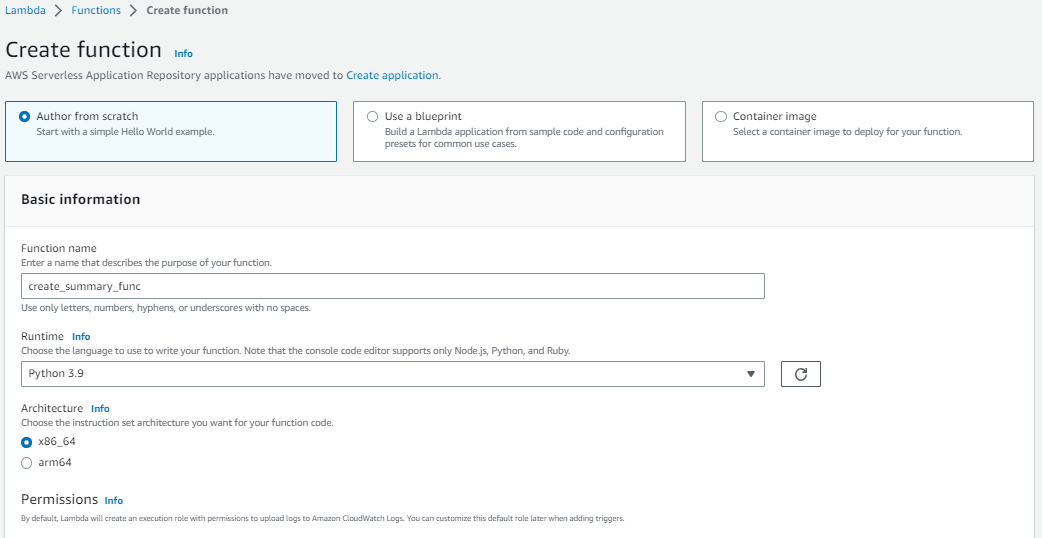
On the Lambda console, click on the "Create function" button to create a new function.

Create two functions as follows:
a. Function 1: This function will interact with your stable diffusion endpoint by sending text and receiving image outputs. You can choose any name for this function, such as "create_image_func".
b. Function 2: This function will interact with the flan-T5 XL model endpoint to produce a summarized text of the initial input text. Name this function "create_summary_func" or any other name you prefer.
On the "Create function" page, leave the defaults as they are.
Under the "Basic information" section, provide a name for your function.
Next, select the runtime for your function. In this case, choose Python 3.9.
Proceed with the remaining steps and configurations required to complete the creation of your Lambda function.

Creating an IAM Role for Lambda
To allow the Lambda function to interact with other services, you need to create an IAM role. Follow these steps:
Go to the AWS Identity and Access Management (IAM) page. You can find it in the left navigation pane under "Access Management." Click on "Roles" to access the roles page.
On the roles page, click the "Create role" button.
Leave the Trusted entity type as "AWS service" and select "Lambda" under common use cases.
Click the "Next" button.

On the next page, add permissions to the role. Perform the following steps:
a. In the search bar, type "SageMakerFullAccess" and add the "SageMakerFullAccess" policy.

b. Click "Clear filters."
c. Search for "S3FullAccess" and select the "S3FullAccess" policy from the results.
d. Click "Clear filters."
e. Search for "IAMFullAccess" and select the "IAMFullAccess" policy.
f. Search for "AWSLambdaBasicExecutionRole" and select the "AWSLambdaBasicExecutionRole" policy.
g. Click the "Next" button.
Give the role a name in the "Role name" text box under Role details.

Review the policies you have added to the role.

Click the "Create role" button to create the role.
You will have successfully created an IAM role to be used by your Lambda function for interacting with other services.
Returning to the Lambda Function
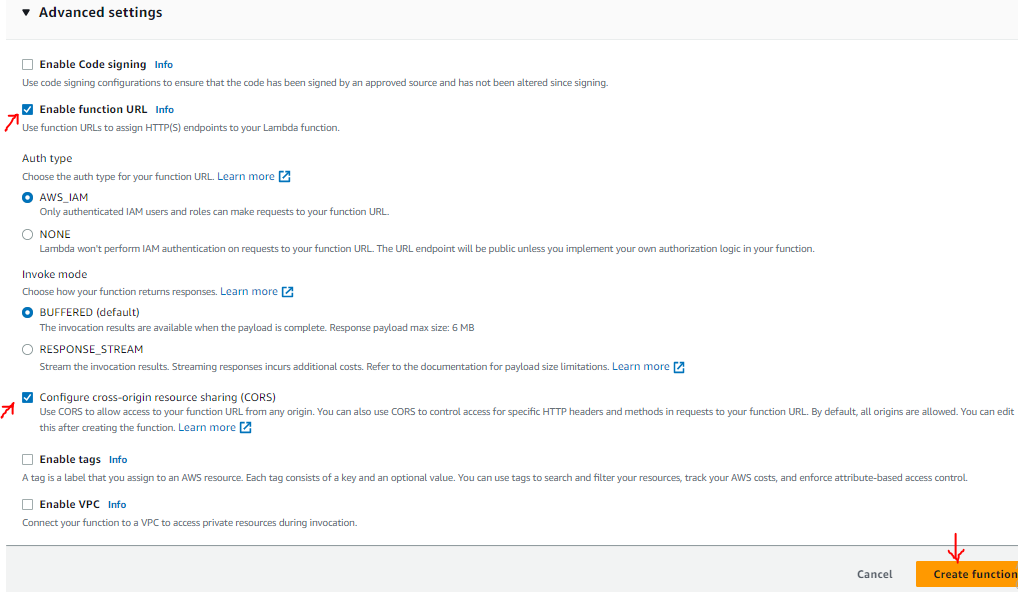
Scroll to the bottom of the page and select the "Enable function URL" option. This will generate a unique URL for your Lambda function to invoke it later.

Click the "Create function" button located below.

You will be redirected to the Lambda function page. On the left navigation pane, click on the "Code" tab.
In the "Code" tab, locate and click on
lambda_function.pyto open the file.

Erase the existing code in
lambda_function.py.Copy the code from the provided GitHub link GitHub link and paste it into the
lambda_function.pyfile.

import json
import boto3

def parse_response(query_response):
    """Parse response and return generated image and the prompt"""

    response_dict = json.loads(query_response)
    return response_dict["generated_image"], response_dict["prompt"]


def lambda_handler(event, context):

    client = boto3.client('sagemaker-runtime')

    data_string = event["body"]
    text = json.loads(data_string)["text"]

    encoded_text = text.encode("utf-8")


    CONTENT_TYPE = 'application/x-text'
    endpoint_name = # "YOUR_MODEL_ENDPOINT" # Replace with your model endpoint

    response = client.invoke_endpoint(EndpointName=endpoint_name,
                                  ContentType=CONTENT_TYPE,
                                  Body=encoded_text)

    print(response)

    response_payload = json.loads(response['Body'].read().decode("utf-8"))
    print(text)

    resp = json.dumps(response_payload)

    return {
        'statusCode': 200,
        'body': resp
    }
Once you have completed these steps, you will have returned to the Lambda function and updated the code with the new content.
Copying the Stable Diffusion Endpoint Name
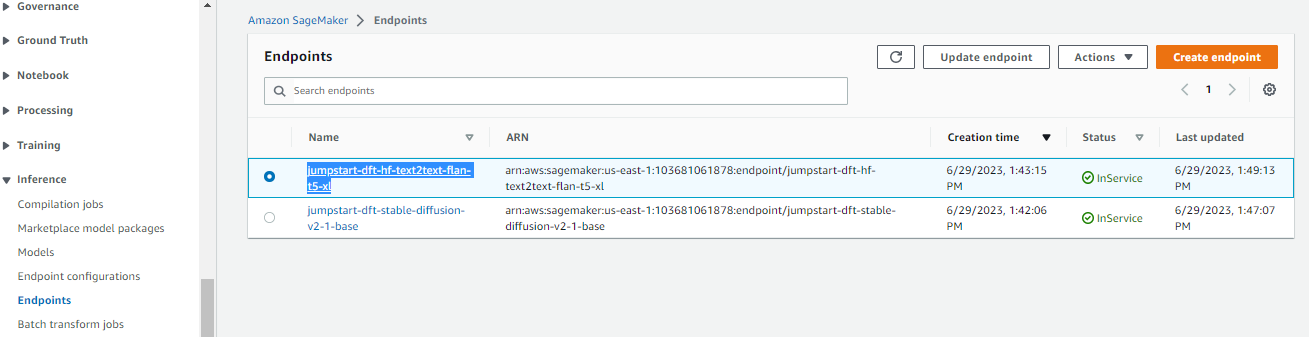
Go to the Amazon SageMaker console to find the name of the stable diffusion endpoint you want to use.
Scroll down to "Inference" on the left menu and click on "Endpoints".

Copy the endpoint name of the stable diffusion jumpstart (pretrained) model that was deployed in the previous tutorial.
(the image highlights flan 5 but copy the name of the stable diffusion image function)

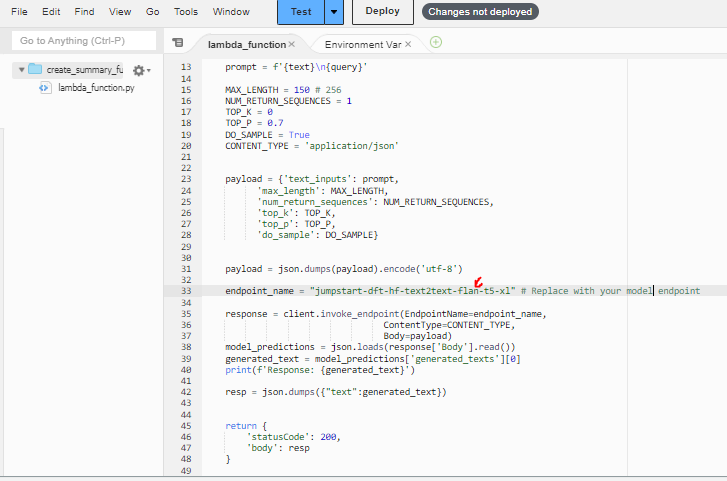
After Copying the endpoint name from the SageMaker console. You will need to paste it into your
create_image_funccode around line 22.
Click the "Deploy" button to save the changes in the function.

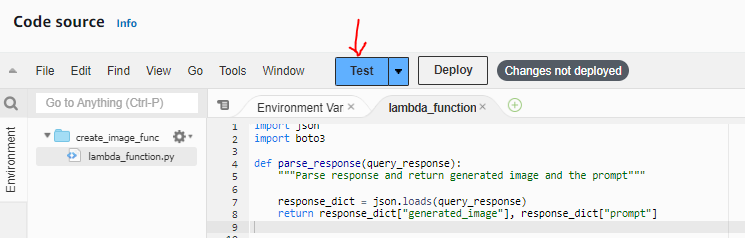
Testing the Function
Click the "Test" button to create a test for the function.

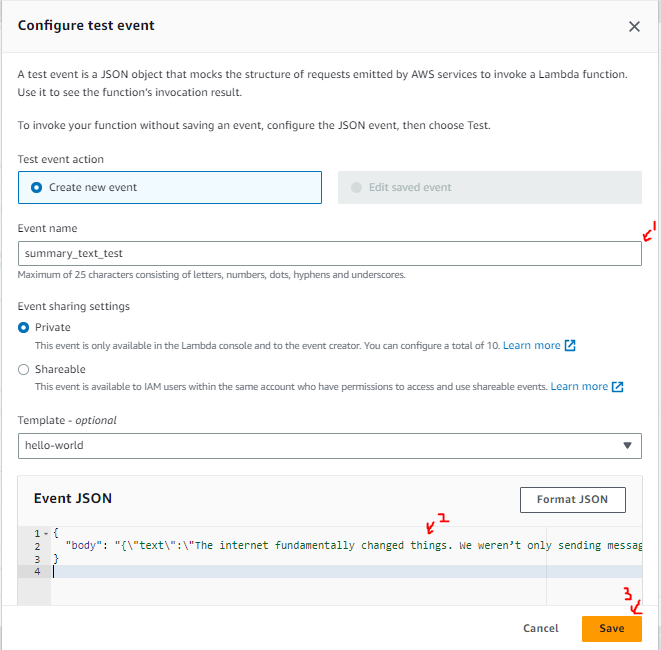
Give your test a name.
-
Paste the following JSON into the JSON box for the test:
{
"body": "{\"text\":\"clouds over the ocean\"}"
}
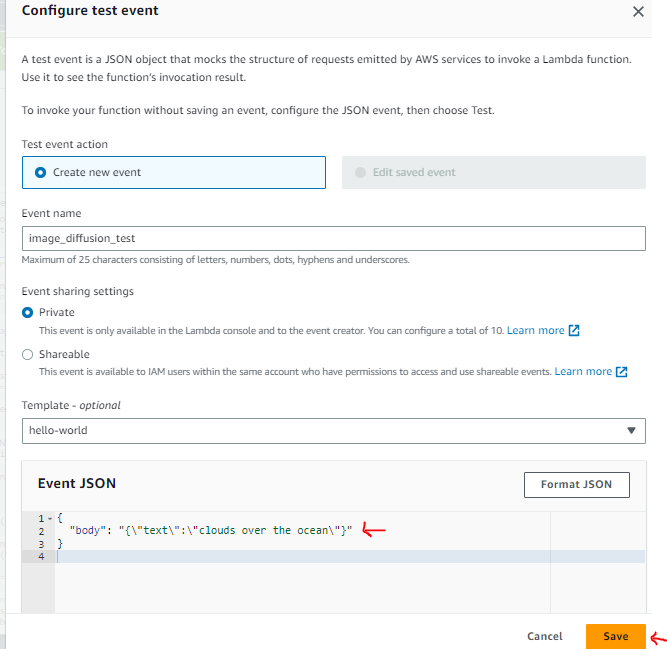
4. Click the "Save" button to create the test event.
5. Click the "Deploy" button to save the code changes in the function and then click the "Test" button to run the test. Note that the test may fail due to a timeout error in the function. We will address this issue in the next steps.
## Configuring Timeout
1. Under the Configurations tab, click on "General configurations".
2. Click the "Edit" button.

3. Increase the timeout value to a higher value to prevent the timeout error. Adjust it according to the requirements of your function.
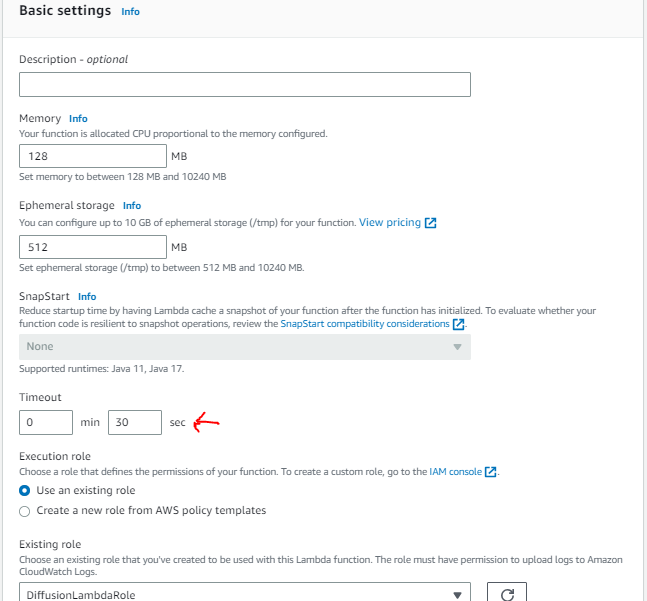
4. Click "Save" to save the changes.
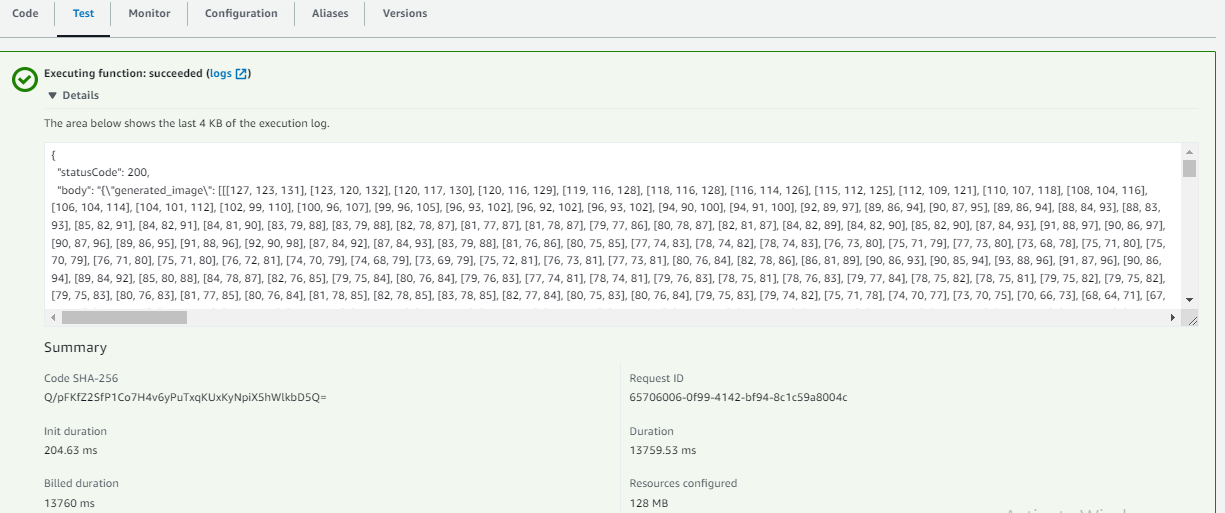
## Testing the Function Again
1. Proceed to test the function by clicking the "Test" button either on the "Test" tab or the "Code" tab. The output of the test should now run successfully without the timeout error.
## Configuring CORS (Cross-Origin Resource Sharing)
If your function doesn't have a URL. Under "Configuration", follow these additional steps:
1. Select "Function URL" from the left menu.
2. Click on "Create Function URL".
3. Under Additional Settings, select "Configure cross-origin resource sharing (CORS)".
4. Scroll down and click the "Save" button.
The Function URL should now appear under "Configuration".
Once you have completed these steps, you will have copied the stable diffusion endpoint name, updated the code in the Lambda function, tested the function, configured the timeout, and configured CORS.
## Creating the Summary Function
1. On the Lambda landing page, click on "Create function" to start creating a new function.
2. Repeat the steps used to create the image function (create_image_func) above to create the summary function. Give the function a name of your choice.

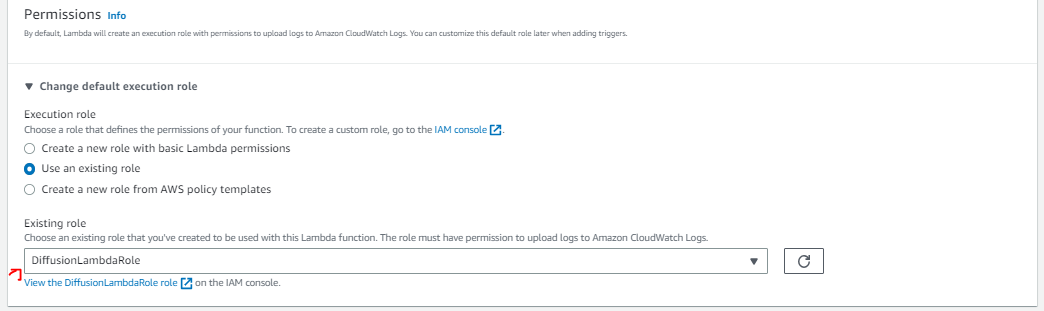
3. Under Permissions, select the execution role that was created for the Lambda function.
4. Under "Advanced settings," select "Enable function URL" to enable invoking the function using a URL. Also, select "Configure CORS" to configure cross-origin resource sharing for the function.
5. In the Code section, click on `lambda_function.py` in the left menu. Replace the code in `lambda_function.py` with the code from the provided GitHub [link](https://github.com/build-on-aws/building-gen-ai-apps-with-found-models-workshop/blob/main/fm_create_summary.py) or below.
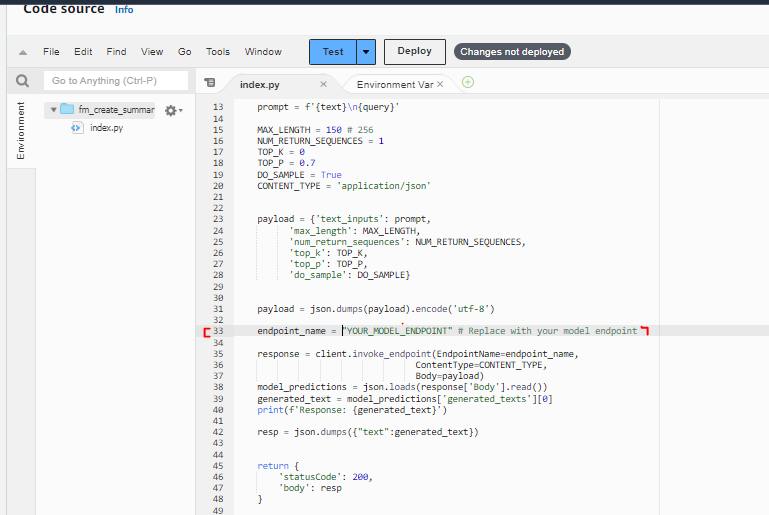
import json
import boto3
def lambda_handler(event, context):
client = boto3.client('sagemaker-runtime')

data_string = event["body"]
text = json.loads(data_string)["text"]

query = 'write a summary'

prompt = f'{text}\n{query}'

MAX_LENGTH = 150 # 256
NUM_RETURN_SEQUENCES = 1
TOP_K = 0
TOP_P = 0.7
DO_SAMPLE = True
CONTENT_TYPE = 'application/json'


payload = {'text_inputs': prompt,
      'max_length': MAX_LENGTH,
      'num_return_sequences': NUM_RETURN_SEQUENCES,
      'top_k': TOP_K,
      'top_p': TOP_P,
      'do_sample': DO_SAMPLE}


payload = json.dumps(payload).encode('utf-8')

endpoint_name = # "YOUR_MODEL_ENDPOINT" # Replace with your model endpoint

response = client.invoke_endpoint(EndpointName=endpoint_name,
                              ContentType=CONTENT_TYPE,
                              Body=payload)
model_predictions = json.loads(response['Body'].read())
generated_text = model_predictions['generated_texts'][0]
print(f'Response: {generated_text}')

resp = json.dumps({"text":generated_text})


return {
    'statusCode': 200,
    'body': resp
}
6. Replace line 33 in the code with the endpoint name of your Text Model endpoint. To find the endpoint name, follow these steps:
a. Go to the SageMaker console.
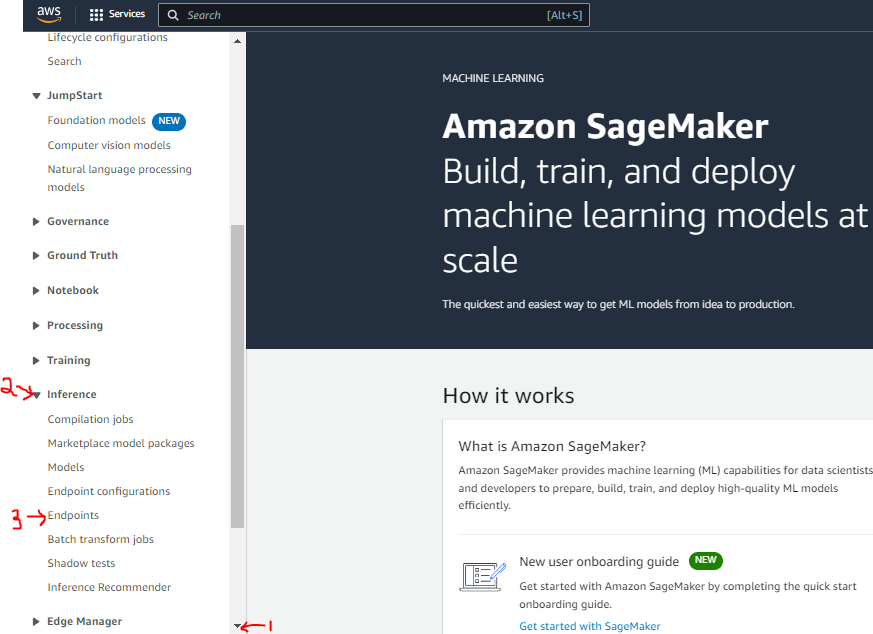
b. Scroll down to "Inference" on the left menu and click on "Endpoints".
c. Copy the endpoint name of the Text-to-text jumpstart (pretrained) model that was deployed in the previous tutorial.
7. After pasting the endpoint name into your code, it should look like the code snippet provided.
By following these steps, you will have created the summary function in AWS Lambda, updated the code with the provided GitHub link, and replaced the endpoint name with the one from your Text Model endpoint in SageMaker.
## Testing the Function
1. Click the blue "Test" button above to create a new test function.
2. Give your test a name.
3. Replace the default test values with the following JSON text (you can change the text to anything you want to summarize):
{
"body": "{\"text\":\"The internet fundamentally changed things. We weren’t only sending messages back and forth anymore; we were visiting digital locations called websites. These websites needed a place to store their text and images, and eventually they started doing more than displaying stored information; they began to facilitate sales, coordinate deliveries, and much more. All the storage and computing for these countless websites had to come from somewhere, and that somewhere was a server.\"}"
}
4. Click the "Save" button to create the test event.
## Deploying and Testing the Code
1. Click the "Deploy" button to save the code changes.
2. Click the "Test" button to test the function with the created test event.

Additionally, to avoid timeout errors, you can increase the timeout value to about 30 seconds. Configure the timeout as shown in the previous instructions.
After testing the function, the expected result should indicate successful execution, similar to the following:
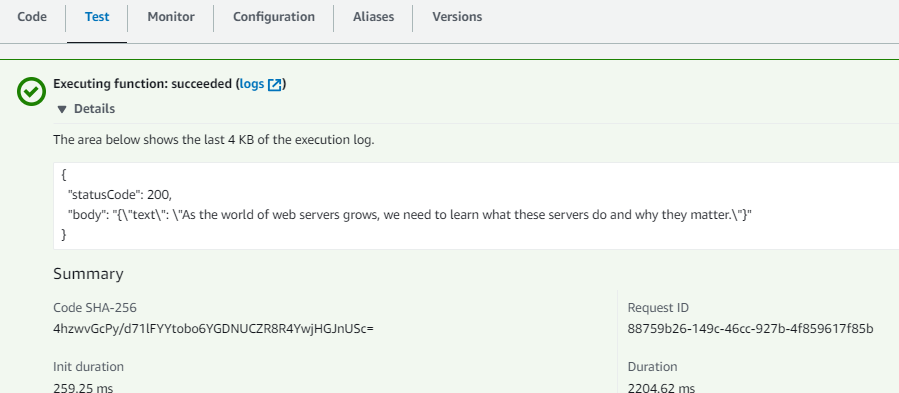
Please note that the actual output may vary based on the specifics of your Lambda function and the code you have implemented.
If you encounter a timeout error, it may be due to various factors such as the complexity of the task or insufficient resources. Increasing the timeout and configuring it appropriately can help resolve such issues.

Top comments (0)