
Modern websites are complicated beasts and there are many things you need to keep track of- the javascript that controls the functionality of the site, styling and layout considerations, and your backend api just to name a few broad topics. One aspect that can be a huge time suck is managing your deployment process- that is once you make updates to your code, how can you test that it works and get it deployed in a reproducible fashion that will scale with your user base on servers that have all the latest security patches and firewall and server settings properly set up.
Serverless deployments are increasingly becoming more popular because you can deploy your code and let your cloud provider handle all the tedious DevOps tasks of deploying your infrastructure, ensuring that it scales with load, maintaining backups for hardware failures, etc.
How AWS Amplify fits into our deployment process
In this post, we will go through how you can use AWS Amplify to automate your entire pipeline for you. It will do the following things:
- When new changes are made to the staging or master branch in Github we trigger AWS Amplify.
- An Elastic Compute instance will pull the new code from Github and run through any automated tests.
- The Elastic Compute instance will then build the code into an artifact which it deploys to an S3 bucket.

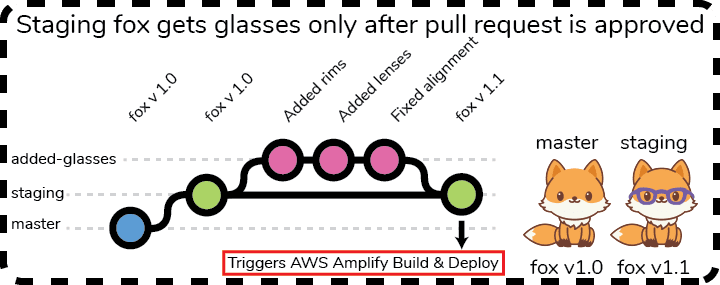
We can integrate this deployment pipeline with our own git repository management practices. Let’s take an example where we want to outfit a fox with a stylish new pair of glasses. We have a staging and master branch which initially have the v1.0 release of our fox, which is plain and unadorned.

Next, we create a new branch called added-glasses and we work on making some glasses. We do work on this branch by first making the frames, then the lenses and finally correcting the alignment. Finally, with the work done, we issue a pull request. Once approved, we have a new commit on our staging branch which is our new updated fox with her snazzy new glasses. Now our pipeline kicks into gear- AWS Amplify will build this new version and deploy it to staging.mydomain.com
Once the code is in the S3 bucket we can use Cloudfront, which is a global content delivery network to distribute our code to servers across the globe. Cloudfront will also add SSL certificate management which will allow our websites to use https:// instead of http://. SSL encryption is necessary anytime sensitive information is exchanged with the user and it is also nice to have for SEO because it will give your boost a bump in your site’s search rankings. This stuff can be super tedious to set up so it is nice that AWS is taking care of this for almost essentially no added effort on our end.
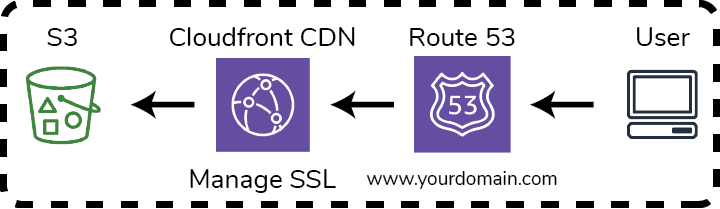
If you purchased your domain with AWS, you can automatically hook up the domain with Amplify. Behind the scenes Amplify will set up your Route 53 to route directly to your Cloudfront distribution.
What’s cool about Amplify is that we can set up the merge triggers for our staging and master branch and they will operate independently of each other. That means that you can have your staging branch deploy your staging code to staging.yourdomain.com while your master branch will deploy to your www.yourdomain.com and yourdomain.com only when new commits are issued to the master branch. This creates two totally separate build environments that can allow us to test out or code on staging before we even think about merging to master.
Why this is so great
The holy grail for a full stack developer is to just worry about writing frontend and backend code and having everything else, the manual testing, deployment, and scaling of a system be totally automated and abstracted away. Amplify provides several main features that make this possible:
- It sets up an automated continuous integration / continuous deployment (CI/CD) pipeline, to automatically test, build and deploy your code.
- Amplify can maintain separate environments so you can keep your testing and production separate.
- It deploys the code to an S3 bucket behind a CDN, which will be essentially infinitely scalable. It also manages SSL certificates.
- While beyond the scope of this blog post, Amplify can do a whole host of other things such as user authentication / authorization, user analytics, error reporting and database deployment. Nader Dabit has put out several excellent examples of these features in action with Gatsby.
Automated Deployment of Gatsby with AWS Amplify a step-by-step guide
In this video series below I take you through a step-by-step guide for how to get your own Gatsby project set up with both staging and master branches. This goes over the AWS Amplify deployment pipeline we use for our Gatsby project. This serverless approach automates all the deployment steps so you only have to worry about your code.
Part 1: Overview
Part 2: Setup your Project
We will create an empty repository on Github and then clone it locally in order to make our code changes. Then, we create a starter Gatsby project, commit it to staging via a feature branch, before finally merging our staging with our master branch.
Part 3: Setup AWS Amplify
Our codebase is looking in great shape- we have a working project in both our staging and our master branches. Now it is time to hook up both branches to a AWS code deployment pipeline.
Part 4: Verify the Pipeline
Now that the pipeline is set up, we need to verify it works. Here, we will show that we can make a new change and commit it to staging and that our staging environment will rebuild, but not our production environment.
Part 5: Set up Custom Domain
This video shows you how to add your own domain name to your two environments. By the end of this, you will have your staging environment located at staging.yourdomain.com while your production will be located at www.yourdomain.com. It will go through redirects as well so that we make sure all http:// traffic gets routed to https:// and that our apex yourdomain.com domain gets redirected to www.yourdomain.com. It makes things much easier when everyone is directed to a single endpoint, especially for analytics purposes, so it’s nice that Amplify provides this for us right out of the box.
There is more where that came from!
Click here to give us your email and we'll let you know when we publish new stuff. We respect your email privacy, we will never spam you and you can unsubscribe anytime.
Originally posted at codemochi.com

Top comments (0)