
What is Airtable
If you're not familiar with it, Airtable is like Google Sheets meets relational DB. Best of all it's free, has a simple-to-use GUI (for no-coders) and an API for your data!
Creating your database is a simple matter of adding a "sheet" in Airtable. For example, here's an Airtable named "Somedata", with a single table name "Example"...

Add whatever columns/fields you need using the variety of data types Airtable offers.
Every Airtable has an API😎
Once you add the sheet and a few columns, click the ? (help) icon in the upper right corner of the Airtable UI, and select 'API Documentation'. You'll see the Docs for your Airtable's API...
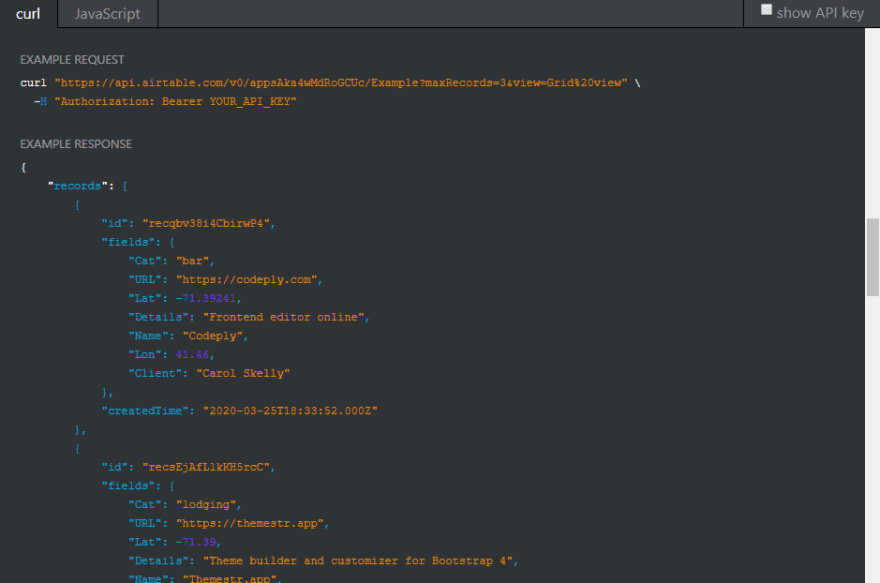
As you'd expect for a simple CRUD API, there are API methods for List, Read, Create, Update and Delete. Each API endpoint is a URL consisting of the Airtable id (A.K.A. "app id") and the table name. API requests also require a unique API key which you can also find the API Docs.
For example, here's the API URL for my "Somedata" (app id: appsAka4wMdRoGCUc) table named "Example":
Example URL for API endpoint
https://api.airtable.com/v0/appsAka4wMdRoGCUc/Example
Vue App with Vuetify
Using Vuetify's awesome component framework, let's create the Vue App. I've added some constants to keep my Airtable settings (we'll use those later):
<script>
const apiToken = "keyZoaskXXXX" // use your own key!
const airTableApp = "appXJzFFs2zgj4X5C"
const airTableName = "Example"

new Vue({
  el: '#app',
  vuetify: new Vuetify(),
})
</script>

<template>
<div id="app">
    <v-app>
        <v-content>
            <h2>
                Vuetify CRUD Example
            </h2>
        </v-content>
    </v-app>
</div>
</template>
Axios & Vuetify DataTable
We'll use Vue Axios for comms with the Airtable API. Vuetify's DataTable component is used to display the data, and give us built-in pagination, sorting and searching.
We use a dual-purpose Dialog component to Create or Edit records.

Everything up to this point is standard Vue, Veutify, Axios boilerplate. Now let's get into the guts of the CRUD app...
1. First let's setup the v-data-table in our template markup:
<div id="app">
    <v-app>
        <v-content class="container align-center px-1">
            <h2 class="font-weight-light mb-2">
                Vuetify CRUD Example
            </h2>
            <v-card>
                <v-data-table
                :headers="headers"
                :items="items">
                </v-data-table>
            </v-card>
        </v-content>
    </v-app>
</div>
2. Add the Vue data() for items and headers used by the Vuetify DataTable. Notice the headers correspond to the Airtable Example columns.
new Vue({
  el: '#app',
  vuetify: new Vuetify(),
  data () {
    return {
        headers: [
            { text: 'Id', value: 'id' },
            { text: 'Name', value: 'Name' },
            { text: 'Details', value: 'details', sortable: false, width:"100" },
            { text: 'URL', value: 'url', name:'url', width:"180" },
            { text: 'Action', value: 'actions', sortable: false },
        ],
        items: [],
        dialog: false, // used to toggle the dialog
        editedItem: {} // empty holder for create/update ops
    }
  },
})
Reading from Airtable API
3. Next, we'll use Axios to make a GET request (fetch) to the Airtable API. Here's the method loadItems() that reads all records (rows) in 'Example'. We call this when the Vue component has mounted()...
  ...
  mounted() {
    this.loadItems()
  },
  methods: {
    loadItems() {
        this.items = []
        axios.get(`https://api.airtable.com/v0/${airTableApp}/${airTableName}`,
            { headers: { Authorization: "Bearer " + apiToken }})
        .then((response) => {
            // load the API response into items for datatable
            this.items = response.data.records.map((item)=>{
                return {
                    id: item.id,
                    ...item.fields
                }
            })
        }).catch((error) => {
            console.log(error)
        })
    },
Notice above that we've now made use of the Airtable const's created earlier.
Handle the Response from Airtable API
The API response data looks like this...
List records response from Airtable API
{
    "records": [
        {
            "id": "recqbv38i4CbirwP4",
            "fields": {
                "Cat": "bar",
                "URL": "https://codeply.com",
                "Lat": -71.39241,
                "Details": "Frontend editor online",
                "Name": "Codeply",
                "Lon": 41.46,
                "Client": "John Doe"
            },
            "createdTime": "2020-03-25T18:33:52.000Z"
        },
        {
            "id": "recsEjAfLlkKH5rcC",
            "fields": {
                "Cat": "lodging",
                "URL": "https://themestr.app",
                "Lat": -71.39,
                "Details": "Theme builder and customizer for Bootstrap 4",
                "Name": "Themestr.app",
                "Lon": 41.67,
                "Client": "Mary Janes"
            },
            "createdTime": "2020-03-25T18:33:52.000Z"
        },
        ... more rows...
    ]
}
It's important to notice above that the table data is contained in the records Array, and row data is nested in the fields property. Which is why the loadItems() method assigns to the data this.items like this:
         this.items = response.data.records.map((item)=>{
             return {
                 id: item.id,
                 ...item.fields
             }
         })
Now the this.items Array has a flattened structure that's easy for the v-data-table to iterate:
   [
        {
            "id": "recqbv38i4CbirwP4",
            "Cat": "bar",
            "URL": "https://codeply.com",
            "Lat": -71.39241,
            "Details": "Frontend editor online",
            "Name": "Codeply",
            "Lon": 41.46,
            "Client": "John Doe".
            "createdTime": "2020-03-25T18:33:52.000Z"
        },
        ... more rows...
   ]
Sending Data to Airtable API (POST and PUT)
4. Continue on with methods for saveItem (create or update) and deleteItem:
  ,
  methods: {
    loadItems() {
        ...
    },
    saveItem(item) {
        /* this is used for both creating and updating API records
         the default method is POST for creating a new item */

        let method = "post"
        let url = `https://api.airtable.com/v0/${airTableApp}/${airTableName}`
        let id = item.id

        // airtable API needs the data to be placed in fields object
        let data = {
            fields: item
        }

        if (id) {
            // if the item has an id, we're updating an existing item
            method = "patch"
            url = `https://api.airtable.com/v0/${airTableApp}/${airTableName}/${id}`

            // must remove id from the data for airtable patch to work
            delete data.fields.id
        }

        // save the record
        axios[method](url,
            data,
            { headers: {
                Authorization: "Bearer " + apiToken,
                "Content-Type": "application/json"
            }
        }).then((response) => {
            if (response.data && response.data.id) {
                // add new item to state
                this.editedItem.id = response.data.id
                if (!id) {
                    // add the new item to items state
                    this.items.push(this.editedItem)
                }
                this.editedItem = {}
            }
            this.dialog = !this.dialog
        })
    },
    deleteItem(item) {
        let id = item.id
        let idx = this.items.findIndex(item => item.id===id)
        if (confirm('Are you sure you want to delete this?')) {
            axios.delete(`https://api.airtable.com/v0/${airTableApp}/${airTableName}/${id}`,
                { headers: {
                    Authorization: "Bearer " + apiToken,
                    "Content-Type": "application/json"
                }
            }).then((response) => {
                this.items.splice(idx, 1)
            })
        }
    },
5. Now we'll hook up the dialog that contains form inputs for editing the data. It also contains a 'New' button for creating records. Add the v-dialog markup right below the v-data-table...
       <v-card>
            <v-data-table
             :headers="headers"
             :items="items"
             >
             </v-data-table>
             <!-- this dialog is used for both create and update -->
             <v-dialog v-model="dialog">
                  <template v-slot:activator="{ on }">
                    <div class="d-flex">
                        <v-btn color="primary" dark v-on="on">
                            New
                        </v-btn>
                    </div>
                  </template>
                  <v-card>
                    <v-card-title>
                        <span v-if="editedItem.id">Edit {{editedItem.id}}</span>
                        <span v-else>Create</span>
                    </v-card-title>
                    <v-card-text>
                        <v-row>
                          <v-col cols="12" sm="4">
                            <v-text-field v-model="editedItem.Name" label="Name"></v-text-field>
                          </v-col>
                          <v-col cols="12" sm="8">
                            <v-text-field v-model="editedItem.Details" label="Details"></v-text-field>
                          </v-col>
                          <v-col cols="12" sm="12">
                            <v-text-field v-model="editedItem.URL" label="URL"></v-text-field>
                          </v-col>
                        </v-row>
                    </v-card-text>
                    <v-card-actions>
                      <v-spacer></v-spacer>
                      <v-btn color="blue" text @click="showEditDialog()">Cancel</v-btn>
                      <v-btn color="blue" text @click="saveItem(editedItem)">Save</v-btn>
                    </v-card-actions>
                  </v-card>
            </v-dialog>
       </v-card>
6. Then, add a method to toggle display of the dialog:
 methods: {
    showEditDialog(item) {
        this.editedItem = item||{}
        this.dialog = !this.dialog
    },
    loadItems() {...},
7. Next, customize the v-data-table item.actions slot template to hook into the showEditDialog() method for editing existing records. Also add an icon/button for deleteItem().
 <v-data-table
    :headers="headers"
    :items="items">
        <template v-slot:item.actions="{ item }">
            <div class="text-truncate">
              <v-icon
                class="mr-2"
                @click="showEditDialog(item)"
                color="primary"
              >
                mdi-pencil
              </v-icon>
              <v-icon
                @click="deleteItem(item)"
                color="pink"
              >
                mdi-delete
              </v-icon>
          </div>
        </template>
    </v-data-table>
The finished product 😏is the working Vuetify + Airtable CRUD example.
Let me know in the comments your thoughts on this, and grab the full source code here: https://codeply.com/p/Vx4dDt5c9G/vuetify-crud-example


Top comments (1)
Hi Carol thanks a lot for your smart application and clear connection between vuetify, airtable and axios. I've a question regarding axios call "post": you are writing: "axios[method](url," . Also if it runs I did not understand why. From axios official site we have axios.method. Can you help to understand this little tricks? thanks