Remix is a new full stack JavaScript framework that gets rid of static site generation and also in other areas, does a few things differently than what we're used to from other frameworks. It relies on React to render the UI and if you're familiar with Next.js you can certainly spot a lot of similarities. However, there are also clear distinctions, like nested routes, handling of data fetching and data saving as well as error handling. Let's take a look at those concepts and how they compare to other techniques, currently used in popular frameworks.
Application structure and routes
The easiest way to get started with a new Remix project is by installing it through npx and following the interactive prompts:
npx create-remix@latest
Once we're done with that, our project's structure is already set up for us and we're good to go. If we compare Remix to Next.js, we'll see that with Remix we're also
writing client side and server ide code inside our route files. However, Remix gives us a little more control to fine-tune things like caching and this also shows in having two separate files for handling requests — entry.client and entry.server that represent our entry points and therefore determine what's run first on the server and client respectively. We also get a root.tsx which holds the root component to our app and renders the <html>, first <meta> tags, and so on.
├── ...
├── app
│   ├── entry.client.tsx
│   ├── entry.server.tsx
│   ├── root.tsx
│   ├── routes
│   │   └── index.tsx
│   ├── styles
│   │   └── global.css
│   └── utils.server.tsx
├── jsconfig.json
├── package.json
├── public
├── remix.config.js
We also see a framework-specific remix.config.js which allows to to configure a lot off different details about oour application, such as the default public directory, development ports and much more.
Nested routing
A very neat mechanism in Remix is the ability to render parts of a page based on the route we're on. When thinking of other frameworks, this would come down to either a separate route with its own index file or specifically matching a route to one or more components. We're used to binding parts of our URL to different routes or components already — the way Remix does it, is best described as nested layouts, where each part of the URL is by definition bound to a route file. Here's an example from their official site.
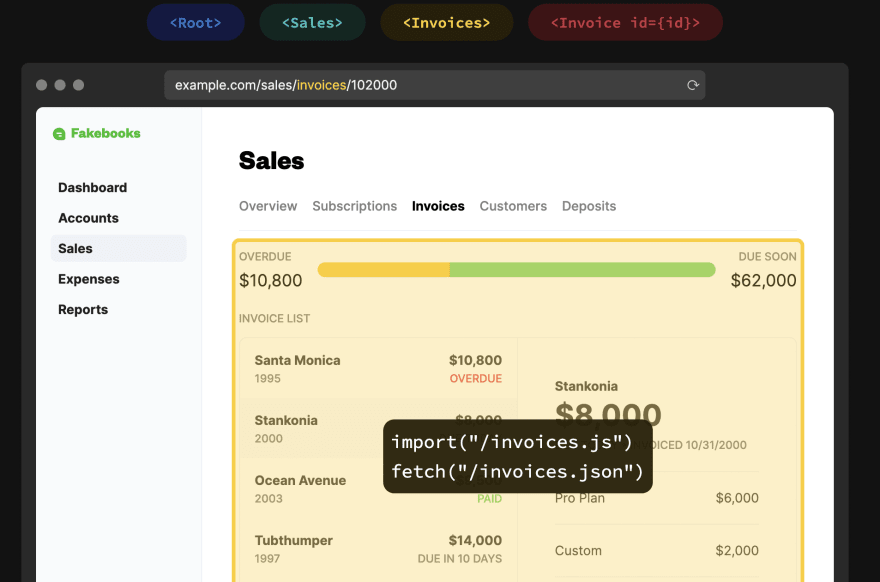
The route shown above (/sales/invoices) would therefore be represented by three files
routes/sales.jsxroutes/sales/index.jsxroutes/sales/invoices.jsx
Our first file is the wrapper that gets called first and based on the rest of the URL decides which "sub-components" should be rendered. The initial state
would be routes/sales/index.jsx and when navigating to /invoices, our wrapper pulls in the code from routes/sales/invoices.jsx. The way this is realized in code is not through regular components, but through an <Outlet /> which is part of react-router-dom and allows for this mapping of nested layouts to routes (route components) rather than regular components.
Under the hood this allows Remix to preload the different parts on a page, which makes it really fast and lets us eliminate loading states as much as possible. There are probably some more interesting things we can do here that I haven't fully explored yet.
Styling pages and components
Styling components is fairly straightforward with Remix, because it's very close to how it works on the web since forever. Remix brings its own LinksFunction which can be used to import CSS files on a per-route basis. That's also where we have to be a little careful and separate our CSS into global CSS that should be available to every route and specific CSS that will not be loaded outside a certain route at all.
import stylesUrl from "../styles/index.css";

export let links: LinksFunction = () => {
  return [{ rel: "stylesheet", href: stylesUrl }];
};

export default function IndexRoute() {
  return <div>Index Route</div>;
}
Once again Remix relies heavily on how the web already works, so if we wanted to use preprocessors or frameworks like Tailwind, we'd want to pass the compiled resources paths to Remix, just like we would with vanilla CSS files.
Loading data
To get data inside a route component in Remix, we can use a loader, which is just an async function that returns the requested data. Inside our components, we can then access it through a hook called useLoaderData.
import { useLoaderData } from "remix";

export let loader = async () => {
  return getData(); // does the heavy lifting, DB calls etc. and returns data
}

// Component function starts here
export default function Component() {
    let allData = useLoaderData(); // data is now available inside our component
}
Note that the function is always called loader by convention and is only executed server-side, which means we also have access to all node features and libraries to connect to databases and fetch data, like we're used to on the server.
If we're passing parameters to our routes, like a dynamic URL often times requires, the loader also has access to that, by passing in the request parameters like this
export let loader = async ({ params }) => {
    return params.slug
}
Storing data
If we want to send new user-generated data back to the backend, to save it to a database for example, Remix lets us use so-called actions. Actions rely on forms for the actual data input and are also only executed server-side, despite being in your route file.
The functions are — again by convention — called action and can also trigger (return) a redirect. Let's look at an example.
export let action = async ({ request }) => {
  let formData = await request.formData()
  let title = formData.get("title")
  let slug = formData.get("slug")

  await createPost({ title, slug }) // actual call to store data...

  return redirect("/home")
}

export default function NewPost() {
  return (
    <Form method="post">
      <p>
        <label>Post Title: <input type="text" name="title" /></label>
      </p>
      <p>
        <label>Post Slug: <input type="text" name="slug" /></label>
      </p>
      <button type="submit">Create Post</button>
    </Form>
  );
We see that the action function takes the request as a parameter and thereby has access to everything our form sends over to the server. From there we're free to use any node code to store our data.
Handling errors
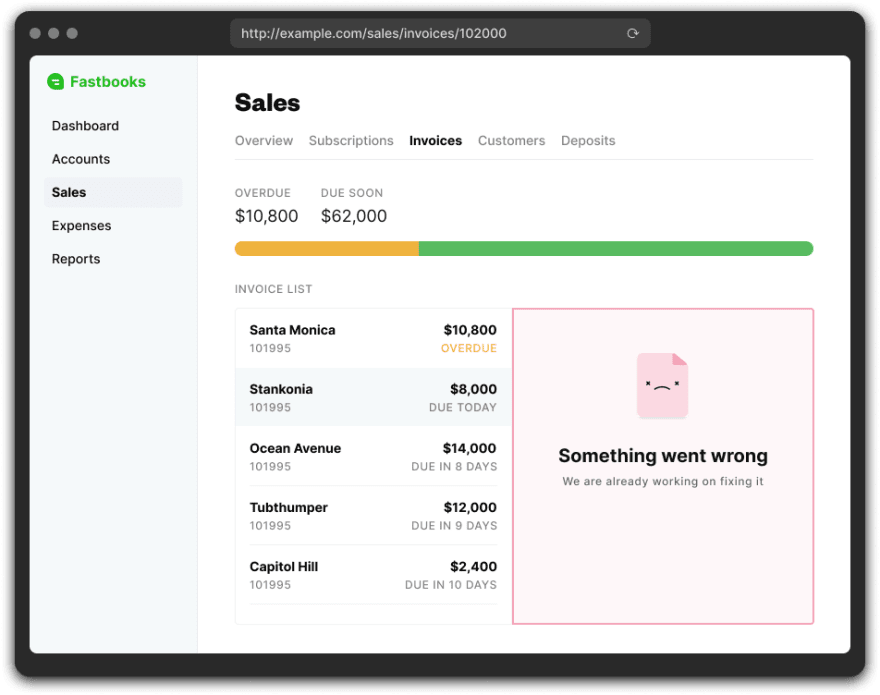
The way Remix handles errors is quite unique, as it allows us to create ErrorBoundarys that will be shown in case something with our route components didn't work as expected and an error is thrown. That way, if we're using Remix's nested routes, we might see a single throwing
and error, but not necessarily the whole page. The smart thing about error boundaries is that they bubble up (the routes) to the closest error boundary. So the easiest case would be having one error boundary at the root level, comparable to a full 404. However, the image below nicely
demonstrates how having multiple small error boundaries (one per route component for examaple) can leave the rest of an application intact.
export function ErrorBoundary({ error }) {
  return (
    <html>
      <head>
        <title>Something went wrong!</title>
        <Meta />
        <Links />
      </head>
      <body>
        ... anything we want to let the user know goes here
      </body>
    </html>
  );
}
Implementing an error boundary is as simple as adding an ErrorBoundary function to our route components as shown above.
Further reading
At the time of this writing, Remix has really only been released yesterday, so there is still a lot to learn and some things might even change drastically with newer versions.
If you're looking for more resources and want to dive deeper, there's a fantastic tutorial on building a blog and a small dad jokes applicaiton in the Remix docs.

Top comments (0)