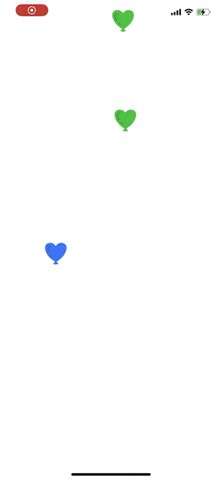
In this article, I'm going to create an animation like this using pure CAAnimation.

This animation is constructed by combining the following pieces:
- rocket animation: pushes the balloons up at a fast speed to simulate a rocket's taking off
- spring animation: rotates and scales the ballons to make it look like being pressed in a strong pressure
- bezier animation: moves the balloons up along a bezier path to make it look like being moved naturally
- 3d rotation animation: rotates the ballons 3D to make it look like being affected by wind
- opacity animation: goes away smoothly
We'll go through all of them in turn.
Rocket animation
This animation mimics the rocket's taking off effect in a small portion of the time.
It does nothing but moving the layer from the start point to the endpoint along a straight line.
Spring animation
This animation occurs simultaneously with the rocket animation above to make the animated object
more interesting by adding a bouncing animation. So basically, we are not going to move the layer
in this animation but just make it bigger and then smaller overtime.
To make the layer look like a rocket, we scale the layer horizontally to a very small value
in the beginning and then scale it back to a normal aspect at the end of the animation.
After combining this with the rocket animation above, our animation now looks like this:

Bezier animation
After reaching the endpoint of the rocket animation, we will move the object along a bezier path.
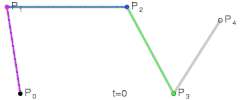
If you don't know what a bezier path is then you should take a look at this link.
In short, bezier paths are curves that are defined by a set of control points to create a smooth connection between the start and the endpoint. I'm not going to deep dive into the detail of Bezier paths because it's quite complicated and painful to explain so if you are interested, please read the link above. But you can look at the below images for easy to imagine what are they.

This time, we will use a bezier path animation to make the view less boring and more natural.
Create bezier animation is quite easy. All we have to do is create a bezier path then CAAnimation will handle the rest for us.
Create a Bezier path.
let path = UIBezierPath()
path.move(to: startPoint)

let endPoint = CGPoint(x: posX + CGFloat.random(in: ), y: 0)
let controlPoint1 = CGPoint(x: , y: )
let controlPoint2 = CGPoint(x: , y: )
path.addCurve(to: endPoint, controlPoint1: controlPoint1, controlPoint2: controlPoint2)
Then create CAAnimation like this:
let animation = CAKeyframeAnimation(keyPath: #keyPath(CALayer.position))
animation.path = path.cgPath
With this setup, your bezier animation looks like this:
3D rotation animation
We can easily create this effect by animating the transform property on CALayer which is also an animatable property. Since CAAnimation supports rotations over
all 3 axes but there is no depth of field effect so we will add scale factors
to somehow simulate that effect to make it more like real 3D rotation.
Here is the sample code:
let animation = CABasicAnimation(keyPath: #keyPath(CALayer.transform))

let angle = CGFloat.random(in: ) * CGFloat.pi
let rotation = CATransform3DMakeRotation(angle, 0, 1, 0)
let finalScale = CGFloat.random(in: 2...5)
let transoform = CATransform3DScale(rotation, finalScale, finalScale, 1)
animation.toValue = transoform
With this animation only, it looks like this:

Opacity animation
Probably, this is the easiest one. Just use animate a basic animation that controls the opacity value of the layer.
let animation = CABasicAnimation(keyPath: #keyPath(CALayer.opacity))
animation.toValue = 0
Combining all the animations together
CAAnimation allows us to group multiple animations into one and run them concurrently.
We'll do it by using a subclass of CAAnimation called CAAnimationGroup.
Configuring CAAnimationGroup is not that hard except for one thing that we have to configure
the beginning time and end time of all the sub animations properly in order to achieve what we want.
let animationGroup = CAAnimationGroup()
animationGroup.animations = [
  // put your sub animations here
]
Then control the whole animation's duration as usual:
animationGroup.duration = duration
You probably want to do something like cleaning after the animation completed. If so, you can use CATransaction:
CATransaction.begin()
CATransaction.setCompletionBlock {
  // perform cleaning here
}
iconView.layer.add(animationGroup, forKey: nil)
CATransaction.commit()
After combining all the animations above together, eventually, we'll get this final animation:
Check out the source code here: https://github.com/congnd/FunWithCoreAnimation

Top comments (1)
Hi @arashnrim
Thanks for your comment. I'm very happy to know that you like it. A Github link to the source code is located at the bottom of the article. You can get the full implementation there. And feel free to let me know if you found any issue.