
What is Azure IoT Hub
The Internet of Things (IoT) is a network of physical devices that connect to and exchange data with other devices and services over the Internet or other network.
Azure IoT Hub is a managed services hosted in the cloud that acts as a central message hub for communication between an IoT application and its attached devices.
In this guide we will be configuring an Azure IoT Hub in Azure portal and authenticating a connection to an IoT device using online Raspberry Pi device simulator, to read more about Raspberry Pi device simulator visit www.techrepublic.com/article/raspberry-pi-simulator-lets-you-start-tinkering-without-even-owning-a-pi/
Create an IoT Hub
Step 1:
Visit portal.azure.com, login or sign up if you don't have an account, you can get a free account at azure.microsoft.com/en-us/free/
Step 2:
From the search box, enter IoT Hub and select IoT Hub under services.

Step 3:
On the IoT Hub page select Create

Step 4:
On the basic tab of the IoT Hub, follow the following steps.
Resource Group
Create a new resource group by clicking create new option shown below the input bar, you can use any name of your choice.
IoT Hub Name
Enter any name of your choice
Region
Select a region where the IoT Hub will be located, in this example i will be using East US
Tier
Leave as default
Daily Message Count
Leave as default

Step 5:
Click Review+Create button as seen in the image below

Step 6:
Click Create button when validation passes to begin creating your new Azure IoT Hub instance.

Step 7:
When deployment is completed, click Go to resource

Add an IoT Device
Step 1:
To add a new IoT Device, under Device Management section click devices. Then click Add device

Step 2:
Enter any name of your choice for your new IoT device, in this example i will be using MyIoTDevice, leave every other settings as default and click save

Step 3:
If you do not see the new device click Refresh on the IoT device page.

Step 4:
Click the IoT device you just created and copy the primary connection string value
The string will be needed to authenticate a connection to the Raspberry Pi Simulator.

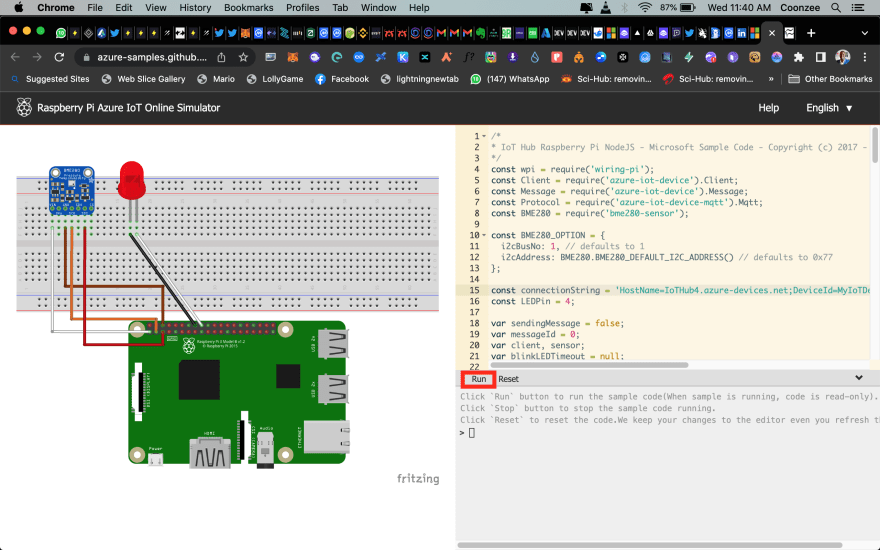
Testing the device using a Raspberry Pi Simulator
Step 1:
Visit azure-samples.github.io/raspberry-pi-web-simulator/#GetStarted to use Raspberry Pi Simulator Device.
Step 2:
In the code area on the top right corner, locate the line with "const connectionString="

Step 3:
Replace [Your IoT hub device connection string] with the connection string copied from Azure portal.

Step 4:
Click Run to run the application. The console output should show the sensor data and messages that are sent from the Raspberry Pi Simulator to the Azure IoT Hub. Data and Messages are sent each time the Raspberry Pi Simulator LED flashes.
Step 5:
Go back to Azure portal, click Overview on the Azure IoT hub page and scroll down, then under IoT Hub Usage you will see the numbers of messages sent from the Raspberry Pi Simulator.

Voila! that is all.

Top comments (0)