
The process of deploying a built application onto a live service can be intimidating for a lot of starting developers. This tutorial is going to walk-through the process of deploying a React application that was built with Create-React-App. Let's take a look at the steps required to accomplish this and how it's possible to combine both of these tools to create a great live application.
For this demo, we're going to use an application that I worked on as part of a team called National Park Pal, this is a full stack application that implements React on the front-end with a Nodes.js server using Express for the back-end. One of the best features of Create-React-App is that it takes care of the compiling of your static HTML files that will be served from your back-end server. So first let's set up our Google Cloud App Engine for deployment.
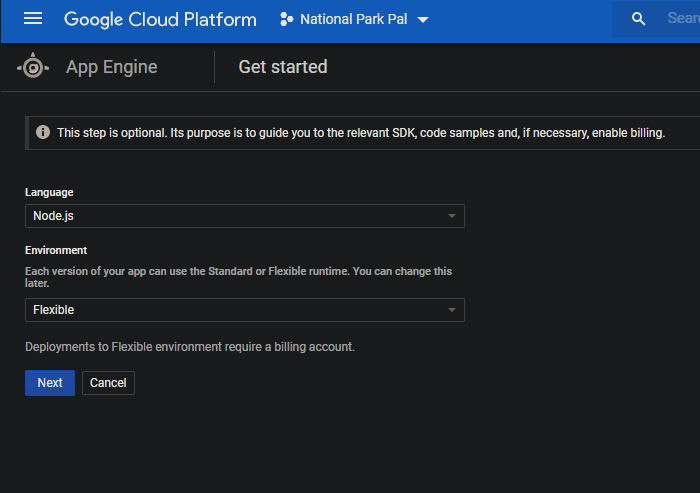
First, create a Google Cloud Platform account, thankfully Google provides new users with a $300 account credit to get your application up and running! After creating your account you'll be able to create a new project for your application. You can name your project whatever you'd like, but I recommend naming it what you plan on naming your website or application. It takes Google a minute to setup your project, but once it's finished you'll need to create your App Engine Instance. You'll be prompted to select a Region, Language, and Environment. For this demo, I went with US-Central Region, Node.js Language, and a Flexible Environment. Here's what that screen will look like for reference:
Once this step is complete, you're finished on the Google Cloud end, next we'll need to make some changes in our React App in order to successfully deploy.
An interesting part of the Create-React-App structure is that it allows your to create your front-end an host it locally while also creating a back-end and hosting that locally as well. This makes it useful for development because both your front-end and back-end are hosted on separate ports within your local device, but this becomes a major headache when you decide its time to deploy your application for the public. It's easiest to deploy your application on Google App Engine with your Node.js server and serving your static HTML files through express. Let's take a look at how you can accomplish this.
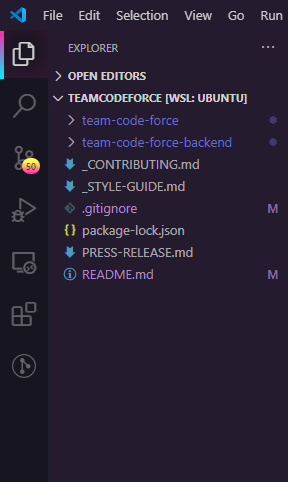
In order to setup your deployment version of your application, you'll need to make a few changes to the file structure in your React App. You'll want to create a separate back-end folder within the main directory of your project. From here you will need to move all of your back-end files into this folder. This will be the folder that will be deployed to the Google App Engine. Your file structure should be similar to the image below.
Fantastic, now we're onto the final few steps before we finally deploy the app. We'll need to add one additional line to our main server file to allow us to serve our files. Within that file after your require statements, add the following line to your code:
app.use(express.static(__dirname + '/public/build'));
Boom! Now we're really cooking! Create-React-App has a great built in feature that allows you to easily compile your React code into a build folder, we're going to be serving the static files from that build folder within our Node.js server through the line of code we added to our main server file above. Here's where it can get confusing so be sure to follow along. You'll want to run the following command in your terminal to compile your React code:
npm run build
Once you're build is finished compiling, the files will be stored in a folder called build.
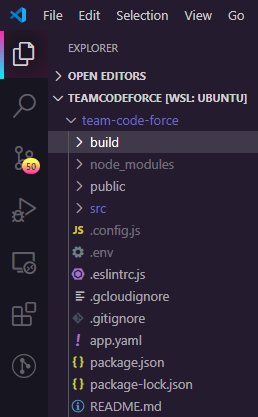
Now back inside your back-end folder you'll want to create a new folder called public. Once you've created that folder, copy the ENTIRE build folder into the newly created public folder. Once that's complete all we have left to do is add an app.yaml file within the main directory of our back-end folder, which is required for the Google App Engine. For this example the structure of the app.yaml file is as follows:
runtime: nodejs
env: flex

manual_scaling:
  instances: 1
resources:
  cpu: 1
  memory_gb: 0.5
  disk_size_gb: 10
Last, but certainly not least you'll want to run the following command in your terminal
gcloud app deploy
It can take quite awhile for your application to deploy for the first time. Just be patient and follow the directions within the terminal from Google. Once everything is finished, you'll be given the new URL for your application. Navigate to the URL in your browser and check out your freshly deployed app!
I hope this blog post has given you some insight on how Create-React-App and Google Cloud Platform can be used together to create and deploy a fantastic application. If you have anymore question feel free to ask, this can be a confusing process when you're first starting out, but after a few deployments you'll be feeling like a pro!

Latest comments (0)