1. Getting started with Progress Chef
This article will help you get started using the tools in Progress Chef (Referred to as Chef from now on). The article will go through the individual Chef products, showing you how to install and use them. To help demonstrate the usage and synergy of these products, we will use a representative example case.
Before diving in, we will give a brief explanation about the products in the Chef ecosystem to give you a better understanding of Chef. Chef has multiple products that help you automate the deployment of applications alongside the management of your IT infrastructure.
Chef Infra
A big part of Chef is centered around managing and scaling your IT infrastructure. Chef Infra allows you to automatically configure your machines using code. This applies to both on-premise as well as cloud infrastructure. Because the configuration is defined and stored as code, scaling your infrastructure will be easy. Besides this, it also ensures consistency and (security) compliance throughout your infrastructure.
Chef InSpec
To verify the compliance of your infrastructure, Chef provides a product called Chef InSpec. This tool provides a way to describe compliance rules as code, which are then run against your infrastructure. If a compliance issue is found, it shows up in the report produced by the tool. This really benefits compliance auditing and security automation.
Chef Automate
Lastly, Chef Automate provides you with a dashboard, giving insight into your operations. From applications to security to infrastructure, the dashboard is a single source of truth for your entire environment. Chef Automate ties together all other Chef products in a neat way.
In this guide we will not be mentioning Chef Habitat. This is because Habitat is a complicated and broad topic, that is too big for the scope of this article. Additionally, our use case does not require us to incorporate Habitat, therefore it would be difficult for us to explain the tool properly. More information about Habitat can be found here.

The case
At a Minecraft hosting company, we run servers on our on-premise hardware. These servers are almost at maximum capacity and for further expansion, we are looking into moving new users to the cloud. Using IaaS we can mimic our on-premise servers in the cloud. However, while we are scaling up we need to keep a clear overview of all our servers, on-premise and in the cloud. To achieve this, we will be using Progress Chef. In these next chapters, we will show you how you can use Chef to make your workflow easier.
In the Chef ecosystem, we use Chef Infra to manage our different Minecraft servers. On our servers, we will have to install Chef Infra clients which are connected and report back to the main Chef Infra Server. This main Infra server reports back to the Chef Automate dashboard, which gives us insights into the status of all our servers. We will use a Chef Cookbook to take care of the installation of new Minecraft servers including the required dependencies. Lastly, we will use Chef InSpec to check for vulnerabilities on our servers and whether the Minecraft server is running. This will all be managed from our local workstation.
Now, let's get started using these products in the following sections.
Glossary
Node: A node is any device that is under management by Chef Infra. The different types of devices can be virtual, physical, cloud, network device, a Raspberry Pi, etc.
Chef-repo: A Git repository containing your Infrastructure as Code, Cookbooks and Recipes, and InSpec files.
Cookbook: A cookbook is a collection of recipes as well as the holder of dependencies, libraries, and metadata.
Recipe: A recipe contains configuration code, written in Ruby, this is Chef’s implementation of Infrastructure as code.
FQDN: Fully Qualified Domain Name, the complete domain name for a server.
2. Setting up Chef Automate and Chef Infra
This section describes what Chef Automate and -Infra are, and how to get started with them.
As mentioned before, Chef Automate allows teams to work together effortlessly and deliver applications and infrastructures efficiently and at a fast pace. It visualizes all data and analytics for all Chef products. Automate does this by using Chef’s three core engines: Chef Infra, Chef InSpec and Chef Habitat.
Chef Infra consists of two parts:
- Infra Server This serves as the main hub for your infrastructure configuration.
- Infra Client Runs on the nodes making up your actual infrastructure. Communicates with the Infra Server to retrieve the required configuration to configure the node’s software.
We will now begin setting up Chef Automate and Chef Infra.
Installing Chef Automate and Chef Infra Server
For this example we’ll install Chef Automate and Chef Infra Server on a single machine for easier use. Be sure to check the system requirements prior to installation. A Chef Infra Server can also be installed on a separate machine but to get started we will be installing them both on one machine.
Note: for a large production environment, it is better to use multiple Infra Servers for high availability. We won’t go over this option in this article. Follow these instructions for more information and how to implement them.
Chef Automate requires an FQDN (Fully Qualified Domain Name) to operate. Make sure you have a domain pointed to the ip of the server, afterwards run the following commands to associate your machine with your domain name:
sudo hostnamectl set-hostname chef.yourdomain.com
-
Download the
chef-automatecommand line tool:
curl https://packages.chef.io/files/current/latest/chef-automate-cli/chef-automate_linux_amd64.zip | gunzip - > chef-automate && chmod +x chef-automate -
Adjust the machine’s environment settings. This is required for Chef Automate to work properly.
sudo sysctl -w vm.dirty_expire_centisecs=20000 sudo sysctl -w vm.max_map_count=262144 -
Install and deploy the Chef Automate and Chef Infra Server:
sudo ./chef-automate deploy --product automate --product infra-serverNote: There’s a chance the deployment can fail. Any unsuccessful checks will be reported to you, alongside the provided information to resolve the issue. Run the deploy command again after resolving any issues.
You should now be able to see your Chef Automate dashboard by navigating to the domain name you set at the beginning. The login credentials can be found in the automate-credentials.toml file.
After the initial login, you have to begin a 60-day trial in order to use Chef Automate.

The Chef Automate dashboard -
Next, we’ll create an organization alongside an administrator user on the Chef Infra Server. These are required to store our Chef content and securely communicate with the Infra Server. The name of the admin user will be "automate".
Note: A Chef Infra Server can manage multiple organizations. For this guide, we will only be using one.
sudo chef-server-ctl user-create automate automate automate <email> <password> --filename automate.pem

sudo chef-server-ctl org-create infra 'infra server' --association_user automate --filename infra-validator.pem
Store the names and
.pemfiles of the created user and organization. In the next sections, we’ll use these to authenticate with the Chef Infra Server.
2.2. Adding the Chef Infra Server to Chef Automate
To view information about our Chef Infra Server, such as the status of our nodes, we can add it to Chef Automate.
2.2.1. Adding a Chef Infra Server
- Navigate to your Chef Automate dashboard and go to the Infrastructure section.
- Click on Chef Infra Servers on the left-hand side.

- Click on the Add Chef Infra Server button, a modal with a form should open.
-
The form requires us to enter the name and FQDN for the Infra Server. The name can be anything you want, for the FQDN we can use the same domain as the Chef Automate, since both are hosted on the same machine.
Note: If your Chef Infra Server is set up on a different domain, you have to enter that instead.
Click on Add Chef Infra Server.
-
You should now see the created Infra Server on the overview.

The Infra Server is now visible in Chef Automate
2.2.2. Adding our organization
- Click on the name of the Infra Server on the overview, a page should open with details about the Infra Server.
- Click on Add Chef Organization, another form modal should open.
-
Here we have to enter the name of the organization and the credentials of an administrator within the organization. We can use the information of the organization we created in the previous section.
- Provide the name of the organization, this should match the name we used in the org-create command
- For the admin user, enter the name of the user specified as the
--association_user flag. The private key can be found in the*.pemfile created in thechef-server-ctl user-createcommand. Be sure to copy the whole key, including theBEGINandENDstatements.

After all fields are filled in, click on Add Chef Organization.
The Chef Infra Server has now been added to the Chef Automate dashboard.
Currently, there isn’t much to see, as we haven’t added any nodes yet. In the next section, we’ll do so using Chef Workstation on our local machine.
3. Adding nodes using Chef Workstation
Chef Workstation includes different tools, the main ones being the chef and knife command-line tools to work with items in a chef-repo or interact with nodes. Workstation also allows you to develop, test, and maintain cookbooks.
The knife command-line tool serves as the bridge between a local chef-repo and a Chef Infra Server. We’ll set up the connection information shortly.
To prepare your nodes to run Chef Infra Client and communicate with your Infra Server, Knife provides a handy command to bootstrap any node you specify. This process automatically downloads and installs the Chef Infra Client to the node, after which an initial Chef Infra Client run is performed. This configures the node and registers it with the Chef Infra Server.
3.1. Setting up Chef Workstation
-
Download the package for Chef Workstation
Note: This guide uses Ubuntu 20.04. Downloads for other Operating Systems can be found here.
wget https://packages.chef.io/files/stable/chef-workstation/21.10.640/ubuntu/20.04/chef-workstation_21.10.640-1_amd64.deb -
Install the package
dpkg -i chef-workstation_21.10.640-1_amd64.deb -
Verify that everything was installed correctly:
chef -vYou should get a similar output to the following:
Chef Workstation version: 21.10.640 Chef Infra Client version: 17.6.18 Chef InSpec version: 4.46.13 Chef CLI version: 5.4.2 Chef Habitat version: 1.6.351 Test Kitchen version: 3.1.0 Cookstyle version: 7.25.6 -
Configure Knife’s connection information so it can communicate with your Chef Infra Server. Initialize the config using the CLI tool.
knife configure init-configYou should be prompted for a Chef Infra Server URL. Enter the one created in step 4 of the previous section. The format should be
https://chef.yourdomain.com/organizations/<organization_name>Afterwards, you should be prompted for the name of an admin user within the organization. Fill in the name you specified in step 3 in the previous section.
-
To authenticate Knife with the Chef Automate server, we need to copy over the private key of the user we created in section 2. For us that file is named
automate.pem. Copy the contents of that file and paste it to the following file on your workstation (you may have to create it, if it doesn’t exist).
nano ~/.chef/<name_of_the_user>.pem -
Retrieve the SSL certificates from the Chef Infra Server so you can encrypt any further communication.
knife ssl fetch -
Check if the certificates are correct:
knife ssl check -
Bootstrap the node to the Chef Infra Server. This can be done in one of two ways:
-
Specify the domain name of the node, the
-Uflag indicates which user to connect as
knife bootstrap node1.example.com -U <username> -N <node-name> -y --sudo -
Specify the SSH credentials of the node
knife bootstrap <username>@<ip-address> -N node2 -y --sudo
-
The sudo flag instructs Chef Infra Client to run the commands as root on the node. This is needed as it will have to install certain packages on the system level to make the node interact with the Chef infra server.
4. Cookbooks
This section explains what cookbooks and recipes are, and how to set up your infrastructure as code. In this chapter, we will use the basic features from Chef cookbooks to set up a Minecraft server automatically. This will demonstrate most features like creating a file, downloading a remote file, executing a command, etc.
The Chef-repository is structured as follows. Cookbooks contain one or more recipes. All recipes are written in the programming language Ruby. They use a set of predefined functions to do the basic tasks. Because of this, some recipes can run on Windows, Linux, and macOS.
On the nodes, the Chef Infra Client is responsible for running the recipes it has been assigned. If nothing has changed within the system or recipe, the Chef Infra Client won’t change anything either. This makes the recipes idempotent and makes it easier to confirm your infrastructure is always in the desired state. Now let's get started creating our first cookbook
4.1. Creating a cookbook
-
Chef’s infrastructure as code is managed in the chef-repository. This includes the cookbooks and InSpec profiles that we will create in this and in the next section. We will generate our repository from the user's home directory. The path to our chef-repo is
~/chef-repo, yours may differ. To generate a repository, use the command:
chef generate repo chef-repoThe last argument (
chef-repo) is the name of the repository. After it has been created, navigate into it and initialize a Git repository. This is required by Chef so that any changes made by you or the Chef CLI, can be tracked by version history.
The final Git repository with all the steps completed can be found at https://github.com/ctmtutorials/chef-repo.
git init
echo ".chef/" > .gitignore
git add .
git commit -m "Initial commit"
The
.chefdirectory will contain sensitive information, such as credentials, which is why it should be excluded from version control. -
To create our cookbook, we can generate it using the Chef CLI. Navigate to your cookbooks directory and enter the following:
cd cookbooks chef generate cookbook minecraft -
We need to tell Knife where it can find our Cookbooks. While running
knife configurein step 4 of the last section, Knife created a configuration file inside the.cheffolder in your home directory. There should be a file calledcredentials. Edit this file and add the following line:
cookbook_path = ['~/chef-repo/cookbooks'] -
You can write the whole Cookbook yourself, but most of the time you can use the Chef Supermarket to avoid rewriting basic installations that have been written before by other people. To manage these external Cookbooks we can use a file called
Berksfile. This file describes the external sources and dependencies needed to run this cookbook and lives in the root of your cookbook’s directory (chef-repo/cookbooks/<cookbook>/Berksfile).
touch Berksfile -
Minecraft is built using Java. For our infrastructure, we need to make sure that all of our servers have Java 17 installed. In the
Berksfile, we have to add a cookbook dependency to install Java. TheBerksfilewill look like this:
source 'https://supermarket.chef.io' metadata cookbook 'java', '~> 11.1.0', :supermarket -
Install the cookbook dependencies we specified in the
Berksfilewith the berks CLI (this came with the workstation install):
berks install -
Now the dependencies are downloaded in the cache. From here we can push them straight to our Automate server. However, once you are writing your own recipes, it is useful to be able to test them locally. The newly downloaded dependencies have to be inside our cookbooks folder to run them. The following command will move them to the correct location:
berks vendor ../ cd ../ -
We need to tell the chef infra server what is needed to run our cookbook. This is sadly not possible with the
Berksfilesince this is only meant for managing your dependencies and downloading/uploading them to the Automate server. To tell the Chef Infra client which cookbooks it needs to run we need to add it to the metadata. Add the following line at the end of themetadata.rbfile inside the cookbook:
depends 'java' -
Generate the Metadata for the cookbook with Knife. This will create a
metadata.jsonfile from the information given in themetadata.rbfile.
knife cookbook metadata minecraft -
It’s time to create our first recipe. Here we will write a script that installs a Minecraft server. However, you can automate any manual installation work here:
Create a new file in the Minecraft cookbook.
touch cookbooks/minecraft/minecraft.rbFirst we will create a new user on the system, this can be useful for securing your server by giving fewer permissions to this new user.
We are using the
userkeyword, this is a function from Chef that creates a user with the given parameters. The benefit of using these functions from Chef is the multi-platform support. From now on, you can run this recipe on any platform.
user 'server' do
  comment 'The server user'
  uid 1234
  home '/home/server'
  shell '/bin/bash'
end
After creating the user we will need to create its home directory using the
directorykeyword.
directory '/home/server' do
  owner 'server'
  group 'server'
  mode '0755'
  action :create
end
Next up we will install a remote file. In our case, this is used to download a Minecraft server jar.
remote_file '/home/server/server.jar' do
  source 'https://piston-data.mojang.com/v1/objects/f69c284232d7c7580bd89a5a4931c3581eae1378/server.jar'
  owner 'server'
  group 'server'
  mode '0755'
  action :create
end
To install the third party cookbook that we previously downloaded using Berks, write the following line:
openjdk_install '17'To continue with the setup, we need to accept the end user’s license agreement to get the server running. Therefore we need to create a file where we accept the EULA. The following code will let us do this:
file "/home/server/eula.txt" do
  content "eula=true\n"
  mode 0644
  action :create
end
Next we make it so that your Minecraft server can be run and started on the host server on startup. This will ensure that your server will run as long as the host server is up or until you tell it to stop running. This piece of code tells the host to start the service as the user server, with the directory
/home/server/, and that the Minecraft server will be run with 1024MB of ram.
file "/etc/systemd/system/minecraft.service" do
  content "[Service]
User=server
WorkingDirectory=/home/server/
ExecStart= java -Xmx1024M -Xms1024M -jar server.jar nogui"
  mode 755
  action :create
end
The last part of our recipe is to tell the host to run the server with the first command, and to run the server on startup with the second command. It will do so by running the service we created in the last step.
execute 'Run server' do
  command 'sudo systemctl start minecraft.service'
end

execute 'Run server on startup' do
  command 'sudo systemctl enable minecraft.service'
end
The complete file can be found here.
Note: You may skip steps 11 and 12 if you don’t want to test your recipe locally.
-
Run:
mkdir /home/<YOUR HOME DIR>/.chef_cacheand create thesolo.rbfile in the root of the chef-repo. The contents of the file should look like this:
file_cache_path "/home/<YOUR HOME DIR>/.chef_cache" cookbook_path "/home/<YOUR HOME DIR>/chef-repo/cookbooks" -
To run the server locally, use this command:
sudo chef-solo -c solo.rb -o 'recipe[minecraft::minecraft]'And to stop the server:
sudo systemctl stop minecraft.serviceThe next steps will tell you how to test your Minecraft server on a node.
-
Normally you can upload your Cookbooks using the Knife CLI. However, we have a few dependencies, and the Knife CLI doesn’t know how to deal with those. Therefore, uploading multiple Cookbooks to our Chef Infra Server at once is easier with the Berks CLI:
cd cookbooks/minecraft
berks upload
This will upload our dependencies Java and its dependency line. Afterward, it uploads our own Minecraft cookbook.
You can view the available cookbooks on an Infra Server via Chef Automate:
https://chef.yourdomain.com/infrastructure/chef-servers/<infra_server_name>/organizations/<org_name>
The uploaded cookbooks are now visible in Chef Automate -
Lastly, bootstrap a node with this new cookbook:
knife bootstrap <username>@<ip-address> -N <node_name> -y --sudo -r 'recipe[minecraft::minecraft]'This will bootstrap and execute the recipe on one of our nodes.
You should now be able to see the recipe in the node’s run list on Chef Automate
The cookbook is listed under our node's run list
To check if everything is installed correctly, you could ssh into the server to see for yourself. However, Chef provides an easier way with Chef InSpec. In the next section, we’ll explore how to use it to automatically verify that the recipe has been executed successfully on our nodes.
5. Chef InSpec
Chef Inspec is a tool to test your infrastructure nodes using a predefined set of criteria. For example, you can test if a certain port is open or if a service is running. These criteria are defined in Ruby files. Chef InSpec will read these files and execute the tests one by one. The status is then reported back to the terminal and the Chef Automate server. You can also use predefined compliance profiles from the Chef Supermarket, like for example linux-baseline, which will download the profile from the supermarket and execute the tests inside of it.
5.1. Testing compliance with Chef InSpec
Chef Inspec is automatically included with Chef Workstation. This means we can immediately get started with creating a new testing profile.
-
The following commands have to be executed in the directory of the cookbook you want to create a profile for.
cd cookbooks/minecraft -
We can create a new profile with the inspec CLI, using the
init profilecommand. Our profile in this case will be calledtest. When we generated the chef-repo an empty test folder was already created, we can use--overwriteto overwrite it.
inspec init profile test --overwrite -
We can now create our own test file in the controls folder:
touch test/controls/default_spec.rb -
Place the following content in the default_spec.rb file:
title "Minecraft server check"

control "Minecraft" do # A control is like a wrapper for a set of related tests
  impact 1.0 # How critical a failure is, 1 is critical
  title "Running minecraft server" # Readable by a human
  desc "Check if the minecraft server is started successfully" # Optional description
  describe systemd_service('minecraft') do  # The actual test
    it { should be_installed }
    it { should be_enabled }
    it { should be_running }
  end
end
This test checks if a service called Minecraft is installed, enabled on startup, and is running.
The test will be run on the node you specify, or on the local machine if no node is specified.It is possible to have multiple describe statements in one test. These should all be related to the same control.
When a test fails on a node, it is reported back to the Chef Automate server. When you run the test via the Inspec CLI, it is also reported back to you via the terminal. See the documentation for more information about the syntax of the Chef InSpec language used to define tests.
-
You can run the test file locally with:
inspec exec cookbooks/minecraft/test/controls/default_spec.rb
5.2. Connecting Chef InSpec to Chef Automate
- To connect our InSpec CLI with our Automate server, we need an API token. We can get one by going to Settings > API Tokens on Chef Automate, or by visiting the following URL:
https://chef.yourdomain.com/settings/tokens -
Click on Create token, a modal should pop up.

Enter a name and select all the policies. Afterwards, click on Create Token.
-
Next, click on the three dots on the right of the newly created token to copy the token.

Use this token to authenticate the InSpec CLI with the Chef Automate server.
inspec automate login https://chef.yourdomain.com --user admin --insecure --token 'XXXX'Chef Automate by default uses a self-signed certificate. If you don't have it behind a reverse proxy (using Nginx for example), your client will mark this as insecure. We use the
--insecureflag to tell InSpec to ignore the self-signed certificate warnings. -
In your cookbook directory (in our case
cookbooks/minecraft) run:
inspec automate upload testThis will upload the profile to the Chef Automate server, where it can be periodically executed using a scan job.
-
After uploading your tests, visit
https://chef.yourdomain.com/settings/node-credentials
and click on Create Credential.
Fill in the name, preferably the name of the node, the SSH username, and the SSH password. Then click on Create Credential again.
-
Now navigate to the Compliance tab, go to Scan Jobs, and click on Nodes, click on Add Nodes. Fill out the IP and name of the node. At the bottom, click on the credential you just made, and move it to the right using the arrows. After that, enable sudo mode with the checkbox at the bottom. This is required as in this case our test has to execute some commands as root.

-
Now go back to the Scan Jobs tab.
Scan jobs are sets of inspec profiles that need to be run on a specific set of nodes. You can make many different Scan jobs that target different parts of the infrastructure for testing. To create a scan job, click "Create Scan Job". Since our nodes are managed by our Chef Automate server, select Automate, click Next.
-
Select your InSpec profile name, and click Next.

-
Give this scan job a name and add a schedule to your liking.
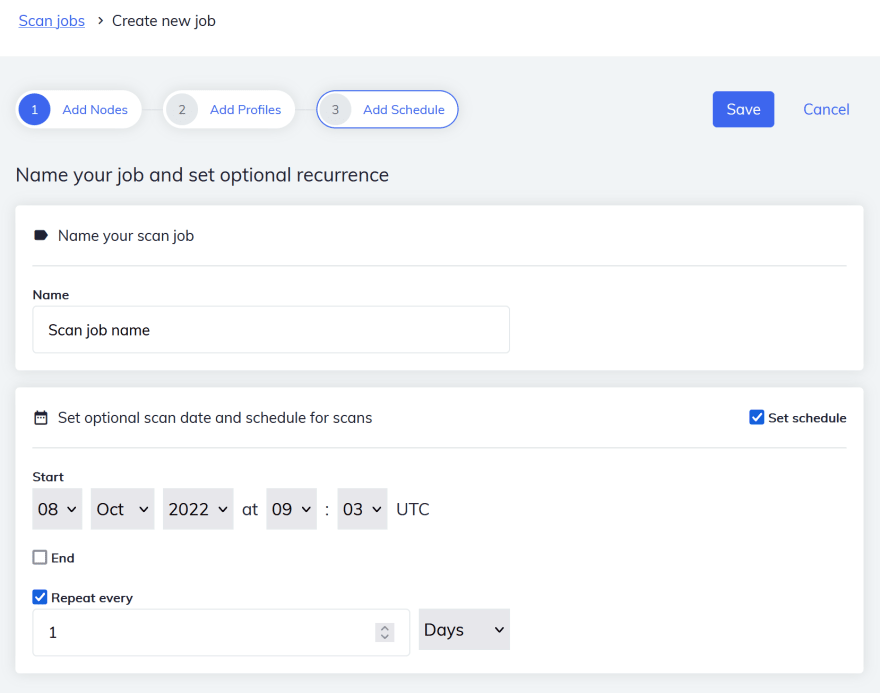
Click Save.
The job will now run the InSpec profile on every node according to the created schedule.
The run results from all the nodes are visible in the Reports tab.
5.2.1. Using publicly available InSpec profiles
-
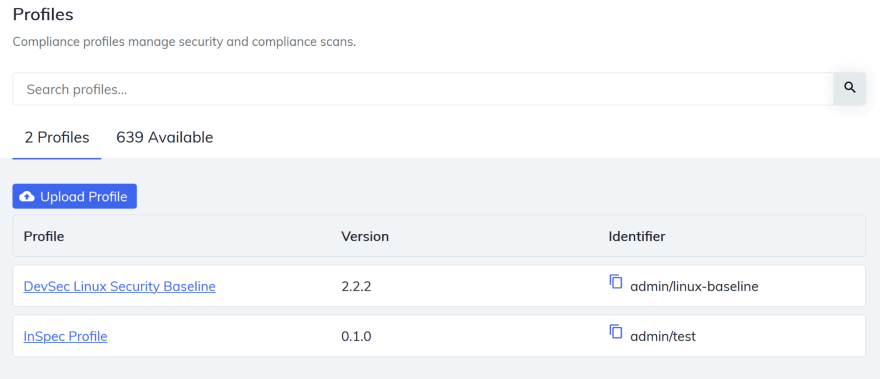
Visit your dashboard at
https://chef.yourdomain.com/compliance/compliance-profiles
Here you can see your own profiles. To use publicly available profiles click on the "Available" tab.This will give a large list of Inspec profiles, if you search, for example
linux-baseline.
This is an InSpec profile for "Test suite for best practice Linux OS hardening", -
Click on "get" on the right to retrieve it.

-
The profile can now be selected when creating a new Scan profile.
-
All the results of the scans will show up on the Reports tab
https://chef.yourdomain.com/compliance/reports/overview
The results of a node's scan
6. Conclusion
This article should’ve given you the information necessary to get started with the Chef suite of tools. We hope you found the article interesting and useful, and hopefully you have all the tools you need to use Chef.
The full Git repository used in this article can be found at https://github.com/ctmtutorials/chef-repo.
Before we end the article, we deem it fair to give you a quick list of positive and negative points we have about Chef.
The positives:
We found Chef’s products pretty easy to set up. With just a few installation scripts, we had all the tools installed. Configuring them correctly was a bit harder, but once we set it up properly, pretty much everything else was a one-click deploy and install. Lastly, we find InSpec a nice tool to use, and a good way to ensure compliance and adhere to security standards.
Some criticism on Chef:
The primary configuration language is Ruby, which in our opinion is not that easy to work with if you're not familiar with the language. Moreover, Ruby is also not very commonly used as a configuration language, so it’s harder to get into for beginners who are used to more common languages, such as YAML. We think it would be nice if Chef supported more configuration languages. This would make the ecosystem more accessible and flexible. Furthermore, while the documentation is quite vast, it contains quite a few deprecated things, like examples or functions that don’t exist anymore, or entire tools which have been replaced. This makes it difficult to find up-to-date information on how to use the Chef suite. This is especially true in regard to authentication and Tiered / High Availability installations for Chef Infra Server.
Further reading on Chef
Chef documentation: https://docs.chef.io/
Learn Chef: https://learn.chef.io/

Top comments (0)