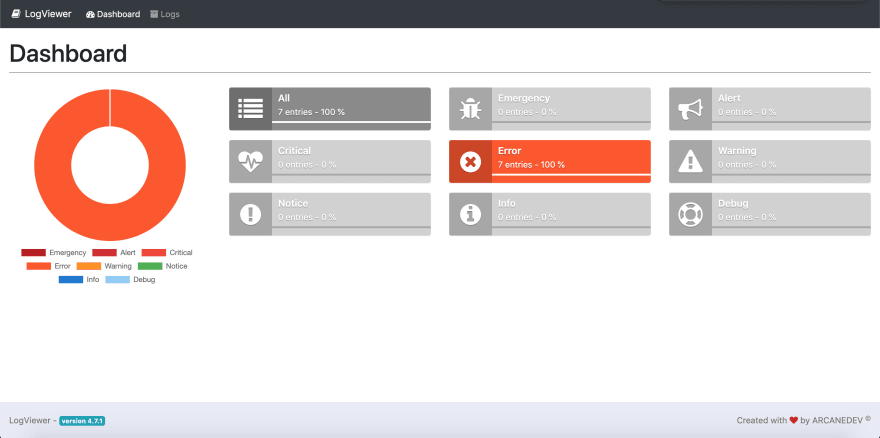
Laravel ships with a logging system that is easily utilized, these logs end up .txt log files within your project. Whilst in the text files, they are pretty useless and boring, but if you add a lovely little plugin named LogViewer, things become pretty awesome. LogView works with Laravel 5.0 all the way through to 5.8 so, most likely, you will be able to use it immediately.
So, let’s see what log viewer gives us.
The following text is generally what you will see in your log files –
From this, with LogViewer, it is transformed into the following –
Log Viewer Dashboard
Log Viewer Overview
Log Viewer Log Details
Which, frankly is pretty amazing, considering that all this data is stored in a boring plain text file. So, how can I start using Log Viewer you ask? Simply follow the rest of this tutorial, which will explain how to install the Log Viewer and in addition, go into how you can utilize your own custom logs throughout your code.
Installing LogViewer
Step 1
If you’ve got Laravel 5.8, then run the following command, this will install the LogViewer package and publish it automatically. Otherwise, check out the version compatibility table to find the matching version located on this page here.
composer require arcanedev/log-viewer:~4.7.0
Step 2
If your Laravel version > 5.5
- Open your .env file and change the LOG_CHANNEL value to
dailyrather thanstack. - Just to make sure it automatically published run the following command –
php artisan log-viewer:publish
If your Laravel version <= 5.5
- Open your .env file and add the following full line
APP_LOG=daily - Add the following line to your config/app providers
Arcanedev\LogViewer\LogViewerServiceProvider::class, - Then run the following command –
php artisan log-viewer:publish
Step 3
Navigate to your http://yourrooturl/log-viewer, In my case, for this tutorial it’s http://localhost/LaravelLogger/log-viewer.
You should now see the LogViewer dashboard.
Using Custom Logs
If you’ve only recently installed Laravel, you will notice that you don’t have many logs at all in the dashboard. As you can see from my screenshot earlier, I had a few error logs. (See below)
Log Viewer Dashboard
But notice all of those other potential logs,
- Emergency
- Alert
- Critical
- Warning
- Notice
- Info
- Debug
You can easily utilize these logs in your code, there’s actually a lot of documentation on how to use the logging system on the Laravel website.
But, I will quickly show you how easy it is to start using the logs immediately.
Step 1
To use the logging system, you will need to reference it, add the following at the top of your controller or file of choice –
use Illuminate\Support\Facades\Log;
Step 2
Make some logs! For this example, I will simply add the following commands inside one of my controller functions. Specifically, my home controller index function. You can repeat this into the file of choice where you’ve referenced the Log library.
    public function index() {

            // Lets add some logs.
            Log::alert("This is a new Alert!");
            Log::critical("This is a critical error message");
            Log::debug("This is a debug message");
            Log::emergency("There is an emergency! Help!?!?!?!");
            Log::error("Houston, we have an error");
            Log::info("An informative message");
            Log::notice("Notice!");
            Log::warning("Be warned, be very warned");
            return view('home.index');
        }
Step 3
Then, load up the page where the logs will be executed and navigate back to the log viewer. See the result below –
Now the dashboard is full of logs! Albeit beautifully colorful, we wouldn’t really want to see this all in production!
If you go into the logs page, you can see each of the logs have incremented by one.
Finally, we can click into these, for the screenshot below, I clicked into the emergency log to see the detail –
Of course, I’m just playing around here, but you get the gist of how useful these logs can actually be.
Another Example
Add the logs to some try-catch blocks in your code and execute it, this will deliver the exception message to your log viewer –
    try {
        // some code to throw an exception
        $divisionByZero = 5 / 0; // Divide 5 by zero
    } catch (\Exception $e) {
        Log::emergency("Exception Message: ".$e->getMessage()  . " File: " . $e->getFile() . " Line: " . $e->getLine());
    }
After executing the above code and going into the log viewer, something like the following will be shown –
Summary
LogViewer and Laravel logs have endless possibilities, whether it be an informative log that tells you people are logging off the website, registering, etc. Or of course, the many bugs we catch throughout our development lives. I hope you get as excited to use this as I first did!
- Many thanks to ARCANEDEV on GitHub for making logging glorious!
- Don’t forget to check out the logging documentation on Laravel’s website.
Cross Posted From: https://www.codewall.co.uk/


Top comments (1)
This is a really nice package, I have been using it in a long time.