
Full guide on working with Protobuf in Apache Kafka
Since Confluent Platform version 5.5 Avro is no longer the only schema in town. Protobuf and JSON schemas are now supported as the first-class citizens in Confluent universe. But before I go on explaining how to use Protobuf with Kafka, let’s answer one often asked question…
Why do we need schemas
When applications communicate through a pub-sub system, they exchange messages and those messages need to be understood and agreed upon by all the participants in the communication. Additionally, you would like to detect and prevent changes to the message format that would make messages unreadable for some of the participants.
That’s where a schema comes in – it represents a contract between the participants in communication, just like an API represents a contract between a service and its consumers. And just as REST APIs can be described using OpenAPI (Swagger) so the messages in Kafka can be described using Avro, Protobuf or Avro schemas.
Schemas describe the structure of the data by:
- specifying which fields are in the message
- specifying the data type for each field and whether the field is mandatory or not
In addition, together with Schema Registry, schemas prevent a producer from sending poison messages – malformed data that consumers cannot interpret. Schema Registry will detect if breaking changes are about to be introduced by the producer and can be configured to reject such changes. An example of a breaking change would be deleting a mandatory field from the schema.
Introduction to Protobuf
Similar to Apache Avro, Protobuf is a method of serializing structured data. A message format is defined in a .proto file and you can generate code from it in many languages including Java, Python, C++, C#, Go and Ruby. Unlike Avro, Protobuf does not serialize schema with the message. So, in order to deserialize the message, you need the schema in the consumer.
Here’s an example of a Protobuf schema containing one message type:
syntax = "proto3";

package com.codingharbour.protobuf;

message SimpleMessage {
    string content = 1;
    string date_time = 2;
}
In the first line, we define that we’re using protobuf version 3. Our message type called SimpleMessage defines two string fields: content and date_time. Each field is assigned a so-called field number, which has to be unique in a message type. These numbers identify the fields when the message is serialized to the Protobuf binary format. Google suggests using numbers 1 through 15 for most frequently used fields because it takes one byte to encode them.
Protobuf supports common scalar types like string, int32, int64 (long), double, bool etc. For the full list of all scalar types in Protobuf check the Protobuf documentation.
Besides scalar types, it is possible to use complex data types. Below we see two schemas, Order and Product, where Order can contain zero, one or more Products:
message Order {
    int64 order_id = 1;
    int64 date_time = 2;
    repeated Product product = 3;
}

message Product {
    int32 product_id = 1;
    string name = 2;
    string description = 3;
}
Now, let’s see how these schemas end up in the Schema Registry.
Schema Registry and Protobuf
Schema Registry is a service for storing a versioned history of schemas used in Kafka. It also supports the evolution of schemas in a way that doesn’t break producers or consumers. Until recently Schema Registry supported only Avro schemas, but since Confluent Platform 5.5 the support has been extended to Protobuf and JSON schemas.
If you worked with Avro and Kafka before, this section will not contain any surprises. Like with Avro, Schema Registry provides a serializer and deserializer for Protobuf, called KafkaProtobufSerializer and KafkaProtobufDeserializer.
The job of this serializer is to convert the Java object to a protobuf binary format before the producer writes the message to Kafka.
The additional job of the serialiser is to check whether the protobuf schema exists in the Schema Registry. If not, it will write the schema to Schema Registry and it will write the schema id to the message (at the beginning of the message). Then, when the Kafka record reaches the consumer, the consumer will use KafkaProtobufDeserializer to fetch the schema from the Schema Registry based on the schema id from the message. Once the schema is fetched, the KafkaProtobufDeserializer will use it to deserialize the message. This way the consumer doesn’t need to know the schema in advance to be able to consume messages from Kafka.
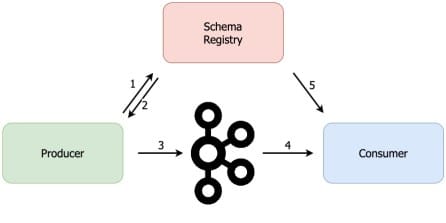
This is why, when using KafkaProtobuf(De)Serializer in a producer or a consumer, we need to provide the URL of the Schema Registry.
Code generation in Java
Ok, now we know how a protobuf schema looks and we know how it ends up in Schema Registry. Let’s see now how we use protobuf schemas from Java.
The first thing that you need is a protobuf-java library. In these examples, I’m using maven, so let’s add the maven dependency:
<dependencies>
    <dependency>
        <groupId>com.google.protobuf</groupId>
        <artifactId>protobuf-java</artifactId>
        <version>3.12.2</version>
    </dependency>
</dependencies>
The next thing you want to do is use the protoc compiler to generate Java code from . proto files. But we’re not going to invite the compiler manually, we’ll use a maven plugin called protoc-jar-maven-plugin :
<plugin>
    <groupId>com.github.os72</groupId>
    <artifactId>protoc-jar-maven-plugin</artifactId>
    <version>3.11.4</version>
    <executions>
        <execution>
            <phase>generate-sources</phase>
            <goals>
                <goal>run</goal>
            </goals>
            <configuration>
                <inputDirectories>
                    <include>${project.basedir}/src/main/protobuf</include>
                </inputDirectories>
                <outputTargets>
                    <outputTarget>
                        <type>java</type>
                        <addSources>main</addSources>
                        <outputDirectory>${project.basedir}/target/generated-sources/protobuf</outputDirectory>
                    </outputTarget>
                </outputTargets>
            </configuration>
        </execution>
    </executions>
</plugin>
The protobuf classes will be generated during the generate-sources phase. The plugin will look for proto files in the src/main/protobuf folder and the generated code will be created in the target/generated-sources/protobuf folder.
To generate the class in the target folder run:
mvn clean generate-sources
Note: All code examples from this blog post are available on Coding Harbour's GitHub.
Ok, now that we have our class generated, let’s send it to Kafka using the new Protobuf serializer.
Running a local Kafka cluster
Before we get started, let’s boot up a local Kafka cluster with the Schema Registry, so we can try our out code right away. We will run our cluster using docker-compose.
Don’t have docker-compose? Check: how to install docker-compose
I’ve prepared a docker-compose file with one Zookeeper, one Kafka broker and the Schema Registry. You can grab it from https://github.com/codingharbour/kafka-docker-compose
Navigate to single-node-avro-kafka folder and run:
docker-compose up -d
The output should look similar to this:
Starting sn-zookeeper ... done
Starting sn-kafka     ... done
Starting sn-schema-registry ... done
Your local Kafka cluster is now ready to be used. By running docker-compose ps , we can see that the Kafka broker is available on port 9092, while the Schema Registry runs on port 8081. Make a note of that, because we’ll need it soon.
$ docker-compose ps
       Name                    Command            State                     Ports
----------------------------------------------------------------------------------------------------
sn-kafka             /etc/confluent/docker/run   Up      0.0.0.0:9092->9092/tcp
sn-schema-registry   /etc/confluent/docker/run   Up      0.0.0.0:8081->8081/tcp
sn-zookeeper         /etc/confluent/docker/run   Up      0.0.0.0:2181->2181/tcp, 2888/tcp, 3888/tcp
Writing a Protobuf Producer
With Kafka cluster up and running is now time to create a Java producer that will send our SimpleMessage to Kafka. First, let’s prepare the configuration for the Producer:
Properties properties = new Properties();
properties.put(ProducerConfig.BOOTSTRAP_SERVERS_CONFIG, "localhost:9092");
properties.put(ProducerConfig.KEY_SERIALIZER_CLASS_CONFIG, StringSerializer.class);
properties.put(ProducerConfig.VALUE_SERIALIZER_CLASS_CONFIG, KafkaProtobufSerializer.class);
properties.put(KafkaProtobufSerializerConfig.SCHEMA_REGISTRY_URL_CONFIG, "http://localhost:8081");

Producer<String, SimpleMessage> producer = new KafkaProducer<>(properties);
Notice that we are using KafkaProtobufSerializer as the value serializer class. This is the new serializer available in Confluent Platform since version 5.5. It works similarly to KafkaAvroSerializer: when publishing messages it will check with Schema Registry if the schema is available there. If the schema is not yet registered, it will write it to Schema Registry and then publish the message to Kafka. For this to work, the serializer needs the URL of the Schema Registry and in our case, that’s http://localhost:8081.
Next, we prepare the KafkaRecord, using the SimpleMessage class generated from the protobuf schema:
SimpleMessage simpleMessage = SimpleMessage.newBuilder()
        .setContent("Hello world")
        .setDateTime(Instant.now().toString())
        .build();

ProducerRecord<String, SimpleMessage> record
                = new ProducerRecord<>("protobuf-topic", null, simpleMessage);
This record will be written to the topic called protobuf-topic. The last thing to do is to write the record to Kafka:
producer.send(record);
producer.flush();
producer.close();
Usually, you wouldn’t call flush() method, but since our application will be stopped after this, we need to ensure the message is written to Kafka before that happens.
Writing a Protobuf Consumer
We said that the consumer doesn’t need to know the schema in advance to be able to deserialize the message, thanks to Schema Registry. But, having the schema available in advance allows us to generate the Java class out of it and use the class in our code. This helps with code readability and makes a code strongly typed.
Here’s how to do it. First, you will generate a java class(es) as explained in Code generation in Java section. Next, we prepare the configuration for the Kafka consumer:
Properties properties = new Properties();
properties.put(ProducerConfig.BOOTSTRAP_SERVERS_CONFIG, "localhost:9092");
properties.put(ConsumerConfig.GROUP_ID_CONFIG, "protobuf-consumer-group");
properties.put(ConsumerConfig.AUTO_OFFSET_RESET_CONFIG, "earliest");
properties.put(ConsumerConfig.ENABLE_AUTO_COMMIT_CONFIG, false);
Here we’re defining a broker URL, consumer group of our consumer and telling the consumer that we’ll handle offset commits ourselves.
Next, we define deserializer for the messages:
properties.put(ConsumerConfig.KEY_DESERIALIZER_CLASS_CONFIG, StringDeserializer.class);
properties.put(ConsumerConfig.VALUE_DESERIALIZER_CLASS_CONFIG, KafkaProtobufDeserializer.class);
properties.put(KafkaProtobufDeserializerConfig.SCHEMA_REGISTRY_URL_CONFIG, "http://localhost:8081");
properties.put(KafkaProtobufDeserializerConfig.SPECIFIC_PROTOBUF_VALUE_TYPE, SimpleMessage.class.getName());
We use string deserializer for the key, but for the value, we’re using the new KafkaProtobufDeserializer. For the protobuf deserializer, we need to provide the Schema Registry URL, as we did for the serializer above.
The last line is the most important. It tells the deserializer to which class to deserializer the record values. In our case, it’s the SimpleMessage class (the one we generated from the protobuf schema using the protobuf maven plugin).
Now we’re ready to create our consumer and subscribe it to protobuf-topic :
KafkaConsumer<String, SimpleMessage> consumer = new KafkaConsumer<>(properties);
consumer.subscribe(Collections.singleton("protobuf-topic"));
And then we poll Kafka for records and print them to the console:
while (true) {
    ConsumerRecords<String, SimpleMessage> records = consumer.poll(Duration.ofMillis(100));
    for (ConsumerRecord<String, SimpleMessage> record : records) {
        System.out.println("Message content: " + record.value().getContent());
        System.out.println("Message time: " + record.value().getDateTime());
    }
    consumer.commitAsync();
}
Here we’re consuming a batch of records and just printing the content to the console.
Remember when we configured the consumer to let us handle committing offsets by setting ENABLE_AUTO_COMMIT_CONFIG to false? That’s what we’re doing in the last line: only after we’ve fully processed the current group of records will we commit the consumer offset.
That’s all there is to writing a simple protobuf consumer. Let’s now check one more variant.
Generic Protobuf Consumer
What if you want to handle messages in a generic way in your consumer, without generating a Java class from a protobuf schema? Well, you can use an instance of DynamicMessage class from protobuf library. DynamicMessage has a reflective API, so you can navigate through message fields and read their values. Here’s how you can do it…
First, let’s configure the consumer. Its configuration is very similar to the previous example:
Properties properties = new Properties();
properties.put(ProducerConfig.BOOTSTRAP_SERVERS_CONFIG, "localhost:9092");
properties.put(ConsumerConfig.GROUP_ID_CONFIG, "generic-protobuf-consumer-group");
properties.put(ConsumerConfig.AUTO_OFFSET_RESET_CONFIG, "earliest");
properties.put(ConsumerConfig.ENABLE_AUTO_COMMIT_CONFIG, false);

properties.put(ConsumerConfig.KEY_DESERIALIZER_CLASS_CONFIG, StringDeserializer.class);
properties.put(ConsumerConfig.VALUE_DESERIALIZER_CLASS_CONFIG, KafkaProtobufDeserializer.class);
properties.put(KafkaProtobufDeserializerConfig.SCHEMA_REGISTRY_URL_CONFIG, "http://localhost:8081");
The only thing missing is the SPECIFIC_PROTOBUF_VALUE_TYPE configuration. Since we want to handle messages in a generic way, we don’t need this configuration.
Now we’re ready to create our consumer and subscribe it to protobuf-topic topic, as in the previous example:
KafkaConsumer<String, SimpleMessage> consumer = new KafkaConsumer<>(properties);
consumer.subscribe(Collections.singleton("protobuf-topic"));
And then we poll Kafka for records and print them to the console:
while (true) {
    ConsumerRecords<String, DynamicMessage> records = consumer.poll(Duration.ofMillis(100));
    for (ConsumerRecord<String, DynamicMessage> record : records) {
        for (FieldDescriptor field : record.value().getAllFields().keySet()) {
            System.out.println(field.getName() + ": " + record.value().getField(field));
        }
    }
    consumer.commitAsync();
}
Without SPECIFIC_PROTOBUF_VALUE_TYPE configured in our consumer, the consumer will always return the instance of DynamicMessage in the record’s value. Then we use the DynamicMessage.getAllFields() method to obtain the list of FieldDescriptors. Once we have all the descriptors we can simply iterate through them and print the value of each field.
Check out the JavaDoc to find out more about DynamicMessage.
That wraps our Kafka Protobuf guide. Now you’re ready to start writing producers and consumers that send Protobuf messages to Apache Kafka with help of Schema Registry.
All the code from this blog post is available on Coding Harbour's GitHub.
Would you like to learn more about Kafka?
I have created a Kafka mini-course that you can get absolutely free. Sign up for it over at Coding Harbour.
Photo credit: Joshua Woroniecki

Top comments (0)