React developer tools you should add to your toolbox

JavaScript is famous for the number of frameworks and tools that are created around it every week, and React, being one of the most popular of those frameworks as of late, “suffers” a similar fate, causing new developers to get overwhelmed when they attempt to start delving into the technology.
So when it comes to picking the right IDE, the right visualizer or even the right stylesheet for your new React project, there are many options out there. Picking the right ones? That’s easier said than done.
In this article, I will be covering 11 (yes, you read right) tools around React to help you understand what your options are and how you can leverage them to help you get the most out of the framework itself.
1. React Developers Tools
We’ll start with the obvious pick, one of the most popular tools for React dev,** React Dev Tools for Chrome **that has recently released its 4th version 🚀


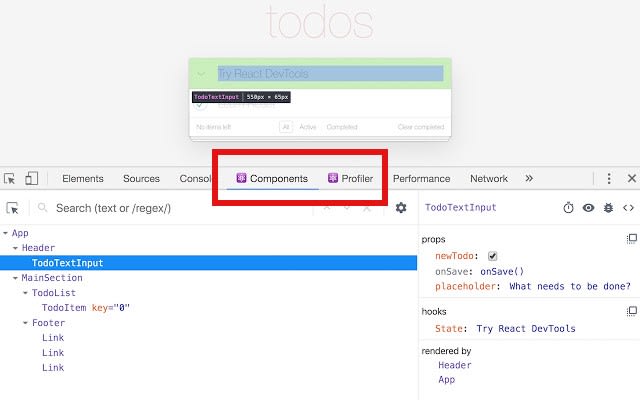
Looking at the dev tools, the components tabs will show you the list of components rendered on screen as well as the subcomponents spawning from others. You’ll be able to select them and inspect or even edit their state and props. With the profiler tab, you’ll also be able to measure app performance.
Both options are available on the standard tabs already included on the DevTools, however, they’re meant for vanilla JS, which means you won’t have the same amount of details and capabilities compared to the specialized ones added by the extension.
If you’re serious about your react-related development, this is a must-have extension.
To get make sure you’re not missing any hidden feature, try practicing with this interactive tutorial.
2. React Sight
In conjunction with the above extension, React Sight is yet another Chrome extension you can install to help you in your react-inspection related endeavors.
Let me explain:
Once you’ve installed React DevTools, you can go back to the list of extensions and look for React Sight. Install it just like with all extensions, use the big blue button.
After that, if you are running local file URLs, make sure to enable “Allow access to file URLs” in the extension settings for both React Dev Tools and React Sight. You can now run your React application, or open any website running React. Easy install process.
To use it you’ll find a new tab as part of the DevTools like before, called “React Sight”.

With this tool, you’re able to visualize the different components you’ve created in a tree-like fashion. This allows you to understand how they’re all connected, and by hovering over them, you can see their current state and props.
3. Bit
I’ve covered Bit (Github) with React in more detail in another article, but it’s part of this list because it’s definitely one of the best options available when it comes to creating and sharing your React components.
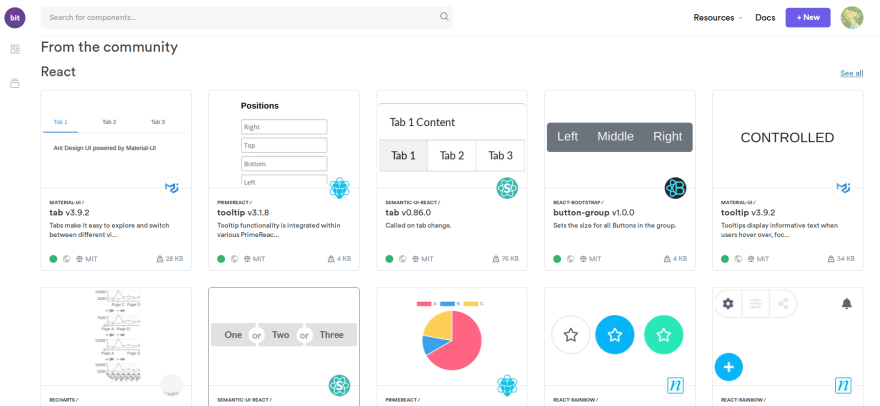
Without getting too much into it again, Bit provides a CLI tool and an online platform where you can both, publish your React components (after they’ve been isolated by Bit) and share them with others. It also allows you to search for components created and published by 3rd parties. Think of it as NPM meets Git, but for React Components.
Their 3rd party store allows you to browse through a full “marketplace” of components. These are even rendered for your own benefit, so you don’t have to just read some code to understand what they’re supposed to be doing:
You can even get a detailed view of each one, where you’re free to edit the code used to render the preview and make sure the component fits your needs before deciding to download it and add it to your project (or importing it using ‘bit import’, to further develop it on your local environment)
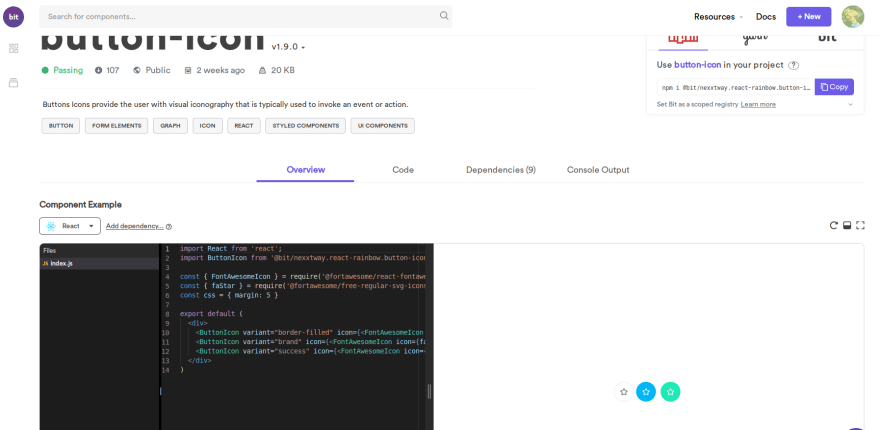
And if you’re interested in publishing rather than importing other’s work, you get a very simple command-line tool that allows you to individually track changes on each component without needing to have a separate project for each one. Click here if you want to know more about bits and how you can use it to create your own components library.
4. React Extension Pack (for VS Studio)
Visual Studio is probably one of the most popular IDEs for JavaScript developers as of late. True, you don’t really have to be using it to be a successful developer, there are **great **alternatives such as Sublime, IntelliJ and even Vim (big Vim fan right here folks!).
That being said, because of the strong community behind VS, I thought I’d share a few words about its React Extension Pack.
Essentially, this is a bundle of extensions designed to help you in your react-related tasks. By default VS does an amazing job in parsing and providing little tools and snippets for your generic JS needs, but this takes it to the next level. In this pack you’ll find:
- ReactJS Code Snippets: It provides 40 (yes, you read that number right!) snippets for all your generic needs and 34 propTypes-specific snippets. This, in case you’re too lazy to do the math for yourself, adds up to the whooping total of 74 snippets for you to stop wasting time writing so much and start being more efficient in your day-to-day tasks.
- ES Lint: This one adds support for the command line tool by the same name. It’ll integrate it into your IDE and help you improve your syntax, setup your own coding style and even find and (in some cases) automatically fix errors for you.
- npm: Having to jump from your IDE to the terminal every time you need to install a new dependency, restart the server or even run some npm-specific command can get a bit tedious, so this extension adds the ability to run npm commands right from the command palette.
- JS ES6 Snippets: More JS-generic snippets? Why not! This set of snippets will include another set of over 40 snippets. This time, they’re not specific but considering you’re working with JavaScript after all, it’s a definitive must-have in order to speed up your process.
- Search node_modules: How many times did you ask yourself if you had installed *that *module and had to double check? How many times did you find yourself going through a new extension’s code to understand why it’s not working the way you expected it to? With this extension you can easily find the module and open it in your editor. It might sound like a very specific use case but trust me, having it there that one time you need it, will save you a lot of time.
- npm IntelliSense: The name might not be the best description of the amazing time-saver this little extension is: it’ll help you auto-complete the name of your extensions whenever you’re trying to import them into your code. Big projects tend to have a lot of modules added, and if you’re not the only one working on them, you might not even be able to keep track of everything installed. With this one, you can easily list all installed modules, search through them quickly and insert the right snippet to import it into your code.
- Path intelliSense: Finally, inline with the previous extension, this one will help you auto-complete the path for your local imports. This is another time-saver especially when you’re not the only one working on a big project, and having to remember all paths and filenames becomes a massive headache.
That’s it, 7 quite small extensions that individually add some value to a project, but when combined pack a big punch. In order to install this extension pack, you can easily do so from VS’s command palette (open it with CTRL+P) using the following line:
ext install jawandarajbir.react-vscode-extension-pack
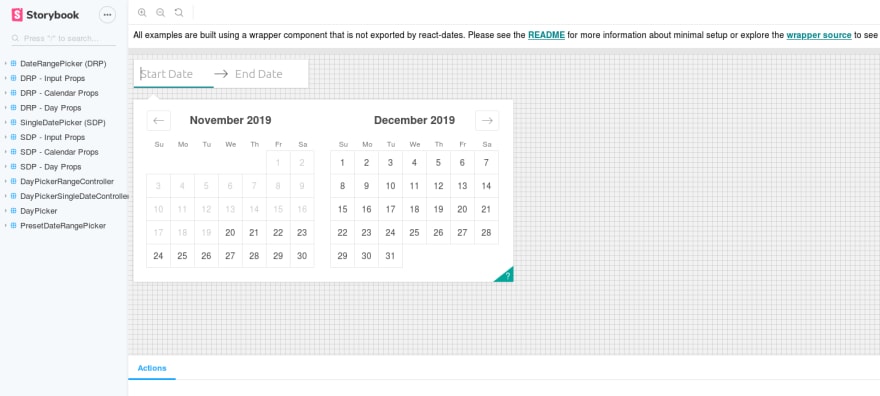
5. Storybook
React was created with the aim of helping you write UI in a very intuitive manner. Thus the concept of components, but having to write code in order to create a visual component is not really the most natural thing to do, which is why we’re normally jumping from code to browser and back to code.
Enter Storybook , an open-source tool you can use to develop your own UI components. This is not a code library, or should I say, it is *much more th*an just code, their online UI editor allows you to develop, inspect and eventually showcase in an interactive manner your creations (which is crucial when it comes to developing visual components).
In order to install Storybook into your already existing React project (because you can do that too, no need to start a project from scratch!) all you have to do is:
$ npx -p @storybook/cli sb init
That command will review your project’s structure and it’ll try to undertand which view layer you’re using (because Storybook supports others aside from React, such as Vue, Angular and others too).
Once the command is done, you can lunch Storybook by running:
$ npm run storybook
Have fun creating your components!
6. React Styleguideist
This one is another very interesting, interactive tool for you to create and showcase your UI components (starting to see a pattern here?).
Take a close look at the above image. On the right you can see the actual code, which generate UI on the left. You can showcase the UI that way, or even test it and edit it by changing the code directly on the rendered version.
In order to include this into your React projects, all you have to do is (asuming you already have webpack installed and that you created the project using Create React App):
$ npm install --save-dev react-styleguidist
Then start your style guide server by running:
$ npx styleguidist server
If you want to know more about using Styleguideist on your project, check out there full documentation and their demo page.
7. Create React App
This article by itself, should be a testimony to the popularity of React as a tool for the front-end community. So much so, that many of the tools described here expect you to follow some sort of standard project structure for them to properly work. After all, there are so many ways to do it, that if you don’t expect a standard, is hard to help.
And here is where Facebook’s Create React App comes into play. Essentially this tool allows you to bootstrap a brand new React project with a single command line. Forget about thinking about the best project structure, or which are the right support modules to add to it, this tool will do all that for you.
In order to make use of this app, you don’t have to install anything if you already have npx installed, all you need is the following line:
$ npx create-react-app my-app
Or, if for some reason, you’re not a fan of npx, you can just use npm or yarn as well:
$ npm init react-app my-app
Or
$ yarn create react-app my-app
In either case, you’ll need to have Node.js (either version 8.16.0 or 10.16.0 or higher) installed on your system.
And with either one of those commands, you’ll get a folder structure looking like this:
my-app
├── README.md
├── node_modules
├── package.json
├── .gitignore
├── public
│  ├── favicon.ico
│  ├── index.html
│  └── manifest.json
└── src
   ├── App.css
   ├── App.js
   ├── App.test.js
   ├── index.css
   ├── index.js
   ├── logo.svg
   └── serviceWorker.js
Congrats! You’re now ready to start your server and begin developing, no need to configure anything else! Just:
$ cd my-app$ npm start #or yarn start depending on what you prefer
This will start a dev server on http://localhost:3000 which will reload the code everytime you edit it, so you’re set!
Feel free to check out their full documentation if you’re planning on using it (and you should!), there is a lot more to it, you don’t want to miss it.
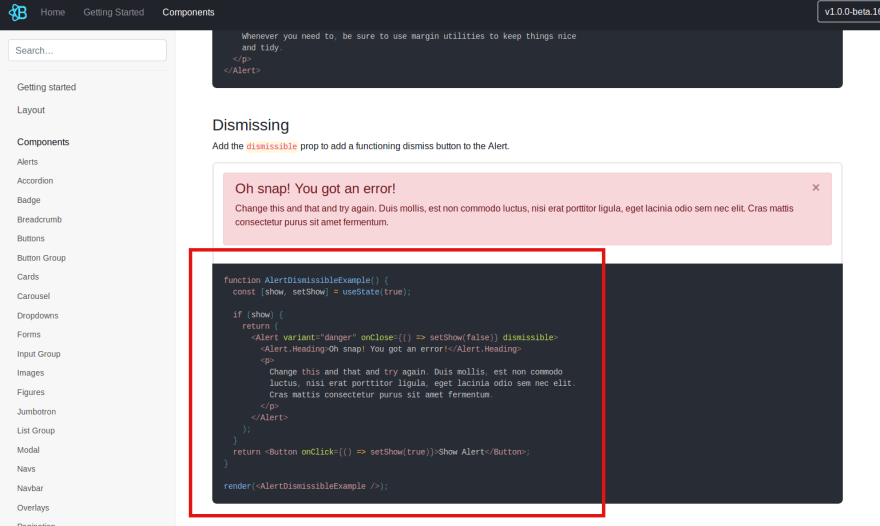
8. React Bootstrap
Ever heard of Bootstrap? It’s a popular (if not the most popular) CSS framework out there. Simply put, it provides a set of CSS classes and JavaScript functions that allow you to craft beautiful UIs without having to be an expert with either one of those technologies.
Now the creators of React Bootstrap have re-written the JS bits in order to make it compatible with React. So you’re now capable of using their components just as if they were React components (because, well, they are now):
In order to add this into your project, you can install it using npm
$ npm install react-bootstrap bootstrap
And once you’re ready you can add the stylesheet you need into your project’s App.js or src/index.js files (notice how again, we’re assuming there is a pre-defined project structure here).
9. React-Proto
If you’re less into code and more into visual design, then maybe React-proto is the tool for you. With it you can prototype UIs using drag&drop instead of having to write code for it.
Don’t get me wrong, you’re not creating a full UI without having to code at all, this is meant for prototyping the components you need. And to do so, you’ll start from an image (usually provided by your designer or creted by you), and with this tool you’ll mark all potential components, give them names, props and a hierarchy. Once done, you’ll be able to export them into actual auto-generated code which you can later customize.

Notice how the user on the above animation is selecting a section of the image and creating a component from it.
If you’re starting a new project that’s already been designed, this is definitely a very useful tool that will shave off a lot of time from the initial setup of the project.
The best part? This app is compatible with all three major systems, so there is really no excuse to not try it, is there?
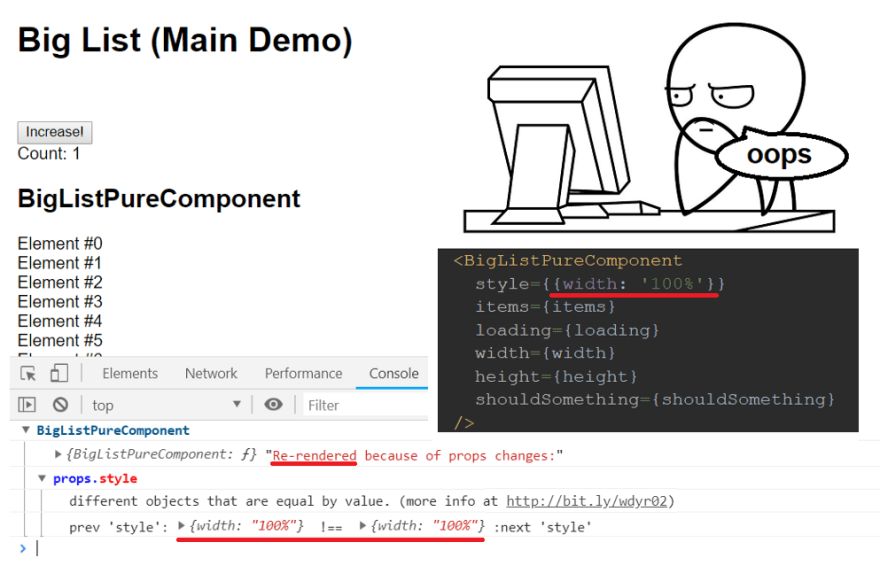
10. Why did you render
This is a particularly good tool when you’re trying to debug the behavior of your components. Trying to understand when they get rendered or re-rendered when they shouldn’t is not always straightforward, especially if you’re just starting with React.
So with this little library, you can monkey patch React itself, to tell you when avoidable renders start happening and why (which if you ask me, is the best part!).
You can install it with a simple:
$ npm install @welldone-software/why-did-you-render --save
Then, you can include it into your project with these lines:
Afterward, all there is left for you to do, is to mark which components you want to be notified about like so:
Once everything is set up and ready, here is the kind of output you can expect:
Check out their full documentation for more details, this is definitely one of those to keep an eye out for!
11. Proton Native
Finally, for the last tool I wanted to cover a way to create native desktop applications using React, because after all, thanks to project such as Electron, doing this with JavaScript has been possible for a while now.
And now, thanks to Proton Native, you can do it with React as well. You can define GUI elements by defining react components, and this tool is compatible with all Node.js modules (after all, it’s based on it), Redux and because of the nature of Proton, it’s completely cross-platform!
In order to install this into your system, all you need is to have npm already installed and do:
$ npm install -g create-proton-app
Notice however, that if you’re on Linux, you’ll need to first install the following requirements:
libgtk-3-dev build-essential python2 pkg-config
Finally, to create the app, simply do:
$ create-proton-app my-app # move to your project directory $ cd my-app # run your app $ npm run start
They have an available example already for you to check out here or feel free to review their full documentation if you want to understand how to use it for your own project.
Conclusion
Those were the top 11 tools for React-related projects, not all of them are web, not all of them are visual and not all of them are meant to help you code. But the point here, is that a lot of them can be used together to complement each other.
Now, let me turn this back to you: which ones did I miss? Are there any tools you use for your React-related needs daily and wasn’t showcased here? Leave a comment down below, I’d love to check it out!
Otherwise, see you on the next one!

Oldest comments (6)
Thanks for sharing, this is a great article. I would personally list react-cosmos above Storybook and React Styleguideist
There are WAAAAAAY too many options out there to try to do the same thing, only a little bit different, it's hard to make a list that encopases all of them, so thanks for leaving a comment, that way the list can organically grow!
Of course. Its just my personal preference :)
Thanks for sharing this is of great help!
Vs Code, right? Not VS Studio? But some of these are really cool. Can't wait to try
Thanks for this list. As a begginer in React, it gave me a lot of material to look at and learn from all sources over the internet.