I don't know about you, but I struggle with keeping track of the hundreds of iterations of my resume and keeping my website updated with the most recent one. So I thought to automate it.
This post explains how to automatically update your resume from OverLeaf onto your personal website. This post is specific to paid users of OverLeaf since it is a paid feature to push from OverLeaf to GitHub
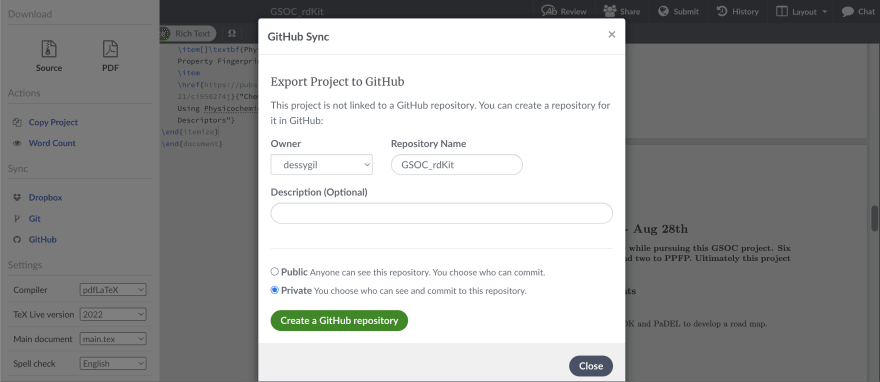
- Open the drop-down where it says menu on the top left-hand side of your project. It will produce a drop-down, as shown in the picture below. Click sync to GitHub.

- Enter a repository name and a brief descriptions to and create the repository.
- Go to GitHub to see a new repository where only your latex file from OverLeaf should exist. In this repo, go to the Actions tab at the top, as shown in the picture below

- Create a new workflow, and then enter the code below. This code will create the PDF version of the latex file with every push into this repository. Each push will create a new release of your resume's latest iteration, and it will be an artifact attached to this. You may encounter an error based off the permission of the GitHub Action but this issue is explained well in this post.
name: Build LaTeX document
on: [push]
jobs:
  build_latex:
    runs-on: ubuntu-latest
    steps:
      - name: Set up Git repository
        uses: actions/checkout@v2
      - name: Compile LaTeX document
        uses: xu-cheng/latex-action@v2
        with:
          root_file: main.tex
      - name: Uploading artifact
        uses: actions/upload-artifact@v2
        with:
          name: PDF
          path: main.pdf
      - name: Get Time
        id: time
        uses: nanzm/get-time-action@v1.1
        with:
          timeZone: -5
          format: 'YYYY-MM-DD-HH-mm-ss'
      - name: Create Release
        id: create_release
        uses: softprops/action-gh-release@v1
        with:
          name: Resume compiled on ${{ steps.time.outputs.time }}
          tag_name: ${{ steps.time.outputs.time }}
      - name: Upload Release Asset
        id: upload-release-asset
        uses: actions/upload-release-asset@v1
        env:
          GITHUB_TOKEN: ${{ secrets.GITHUB_TOKEN }}
        with:
          upload_url: ${{ steps.create_release.outputs.upload_url }}
          asset_path: ./main.pdf
          asset_name:  resume-${{ steps.time.outputs.time }}.pdf
          asset_content_type: application/pdf
- Navigate to your program, where your download resume link exists. We will use GitHub's Graphql API to retrieve the download URL for the PDF version of your resume. Space Jelly explains the following code very well. This was placed at the top of Navbar React component of my personal project.
const [downloadableResume, setDownloadableResume] = useState();

  const baseUrl = "https://api.github.com/graphql";

  const httpLink = createHttpLink({
    uri: baseUrl,
  });

  const authLink = setContext((_, { headers }) => {
    return {
      headers: {
        ...headers,
        authorization: `Bearer $${process.env.GITHUB_ACCESS_TOKEN}`,
      },
    };
  });

  const client = new ApolloClient({
    link: authLink.concat(httpLink),
    cache: new InMemoryCache(),
  });

  useEffect(() => {
    client.query({
        query: gql`
        {
          viewer {
            login
          }
          repository(name: "resume", owner: "dessygil") {
            id
            releases(first: 1) {
              edges {
                node {
                  id
                  releaseAssets(first: 1) {
                    edges {
                      node {
                        downloadUrl
                      }
                    }
                  }
                }
              }
            }
          }
        }
        `,
      })
      .then((response) => {
        setDownloadableResume(response.data.repository.releases.edges[0].node.releaseAssets.edges[0].node.downloadUrl);
      });
  }, []);
This should be all you need to build a fully automated pipeline for your personal website. If there is anything else that you would like to see added to this post, please don't hesitate to reach out.

Top comments (0)