It is never too late to learn a new stack and begin developing skills in it. And if you're seeking guidance on how to add a chatbot to your Android app, you've come to the right place.
Chatbots have become indispensable for everything from ordering food to checking your bank balance. And they are unquestionably useful in that they answer all customer questions and, as a result, generate some business. ChatBots in Android can be used in a lot of ways and they can help in customer service, sales and marketing and so on. This article will explain how to add a chatbot to your Android App using Kommunicate
Kompose by Kommunicate is one such AI-chatbot builder. They provide learn and grow algorithms built in that learn with each conversation.So let's get right into it and start building an Android chatbot.
Build a chatbot for your Android app by creating an account in Kommunicate.
It's simple; Use the Kommunicate dashboard or create your own using the signup page, navigate to the bot section, and select the create bot option to build a chatbot; if not, experiment with the sample bots that are already provided. Integrating the Kompose chatbot into your Android app is quick. As a result, we'll walk you through the steps so you can begin answering support questions in minutes.

Because the goal here is to add a chatbot to an Android app, I'll skip the detailed instructions for building a chatbot. However, you can begin by reading our article "How to Create a Chatbot." for a step-by-step guide.
Adding Chatbot To Android App
Prerequisites
- Android 4.1 (API level 16) or higher
- Java 7 or higher
- Android Gradle Plugin 3.4.0 or higher
Installation
Step 1: Adding gradle dependency to your App
Launch Android Studio and open your project. If you're used to working with external libraries or SDKs, adding Kommunicate SDK is a breeze.
If you are using Gradle 6.7 or lower, add the following code to your root build.gradle file:
allprojects {
repositories {
maven { url 'https://kommunicate.jfrog.io/artifactory/kommunicate-android-sdk' }
}
}
Copy
If you are using Gradle 6.8 or higher, add the following to your settings.gradle file:
dependencyResolutionManagement {
repositories {
maven { url 'https://kommunicate.jfrog.io/artifactory/kommunicate-android-sdk' }
}
}
Copy
Next, for all Gradle versions, add the dependency to your module build.gradle file:
dependencies {
implementation 'io.kommunicate.sdk:kommunicateui:2.4.6'
}
Once the build sync is done, you have installed Kommunicate on your app and can proceed to the next step.
Step 2: Initialize SDK
After the Gradle sync with the kommunicate dependency is complete, you can initialize the SDK by calling the following method:
| Kommunicate.init(context, APP_ID); |
You can initialize the SDK in your Activity's onCreate() function. Just make sure it's initialized before calling any Kommuniate SDK methods. The APP_ID parameter will be set to the application id (APP ID) you just got from the Kommunicate dashboard.
Step 3: Initialize conversation with the created chatbot
Kommunicate includes a ready-to-use Chat UI, so the only thing left to do in this step is to launch the chat screen.
Here's how you can start the conversation:

Also, if you have a list of human agents and/or multiple bots and need to start a conversation with them, use the builder described below:
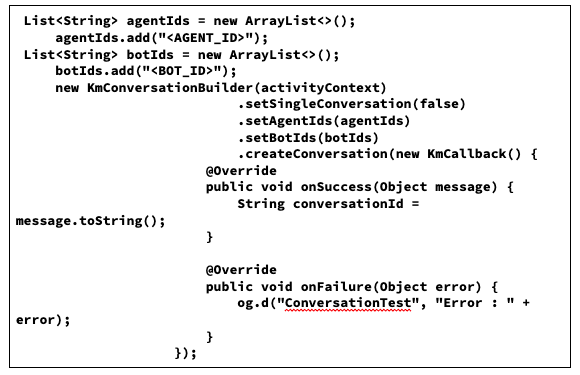
You're finished! Launch the Android app and communicate with the chatbot. In a few simple steps, you can easily integrate a chatbot into your Android app. If you require any additional information, please review the Kommunicate documentation.
Customization
The ability to brand the look and feel of the chat UI as well as customize the colors, strings, and fonts is granted. Kommunicate includes simple settings for customizing different elements and enabling or disabling specific features.
To accomplish this, Essentially, the setting file must be downloaded and the properties modified.
- Download the settings file from here (Right click -> Save as -> Save)
- Place the downloaded applozic-settings.json file under your app/src/main/assets/ folder.
To change the background color
Modify the hex color codes in the properties listed below in the applozic-settings.json file.
| "sentMessageBackgroundColor": "#5c5aa7","receivedMessageBackgroundColor": "#e6e5ec","sentMessageCreatedAtTimeColor": "#ede6e6","receivedMessageCreatedAtTimeColor": "#8a8686","sentMessageTextColor": "#FFFFFFFF","receivedMessageTextColor": "#646262" |

To change the attachment options
By changing the values in the applozic-settings.json file, you can hide or show the media attachments options such as camera, emoji, files, and location sharing.
| "attachmentOptions": { ":location": false, // Location sharing option will be disabled ":camera": true, ":file": true, ":audio":true } |

More customisation and configuration can be found in the kommunicate documentation. And this is how the bot's first-screen interaction should look.

Conclusion:
Not only that, but if you want to develop your own chat implementation and directly integrate other bot platforms like Dialogflow, Amazon Lex, or custom bot into your Android app using Kommunicate SDK, you can do so.
Chatbots are the future of technology, and you can get a head start by adding a chatbot to your android app.

Top comments (0)