🦄 Quick links:
👩💻 What we'll do...
This blog will walk you through how to
Build an opensource python-based text-to-image script based on Tensorflow (you can also just use the Bacalhau HTTP endpoint if this isn't of interest to you)
Run this script on Bacalhau (an open p2p off-chain compute platform)
Create an NFT Contract in Solidity (based on an Open Zeppelin ERC721 contract)
Deploy the NFT Contract to the Filecoin Virtual Machine (FVM) Hyperspace Testnet with Hardhat
Front-end interactions - How to interact with Bacalhau text-to-image script and your NFT contract in React
How to save your NFT Metadata to NFT.Storage
How to deploy your Front-End DApp to Fleek
I've deliberately chosen to use as much open-source and decentralised tech as is available in this stack.
This blog is going to be pretty lengthy (hey - I want to give ALL THE INFO and make sure we're being beginner-friendly and inclusive!) - so feel free to skip through to the parts that are useful to you in the table of contents <3
🎮 Try it!
This app is hosted live here
[Fleek link coming soon]
🏛 Architecture Diagram (kinda)

🥞 DApp Technology Stack
(get it - it's a pancake stack #sorrynotsorry)
Open Source & Web3-valued from the ground up :)

Smart Contract [Solidity, Open Zeppelin]
Smart Contract IDE [Hardhat]
Blockchain Testnet [Filecoin Virtual Machine Hyperspace]
NFT Metadata Storage [NFT.Storage]
Front-End [NextJS / React + NPM]
Smart Contract Interactions from client [Metamask, Ethers, Chainstack RPC Node]
AI Text-To-Image Stable Diffusion Script [Python, Tensorflow]
Decentralised Off-Chain Compute for AI Text-To-Image Generation [Bacalhau]
Decentralised DApp Deployment [Fleek]
🏗 Building the Python Text-To-Image Script
💡 TLDR Tip 💡
This script is already available for use through Bacalhau via the CLI and an HTTP endpoint, so feel free to skip this part.
Quick Intro to Stable Diffusion
Stable Diffusion is currently the leading Machine Learning Model for doing text-to-image processing (& is the same model Dall-E uses). It is a type of Deep Learning - a subset of Machine Learning that teaches itself to perform a specific task - in this case converting a text input to an image output.
In this example, we're using a diffusion probabilistic model that uses a transformer to generate images from text.
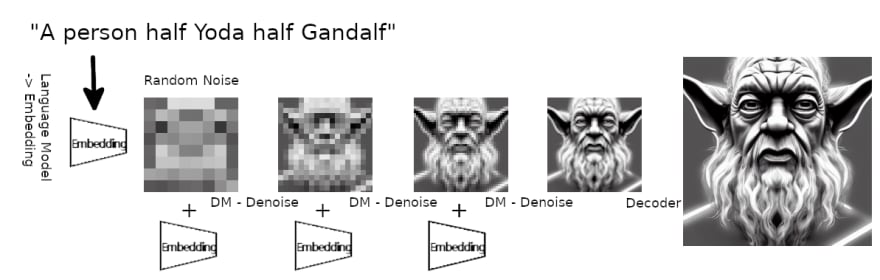
Don't worry though - we don't need to go and train a machine learning model for this (though hey - if that's your thing - you totally could!)
Instead, we're going to use a pre-trained model from Google's TensorFlow open-source Machine Learning library in our python script because the ML weights have been pre-calculated for us.
More correctly, we're using an optimised Keras/TensorFlow implementation fork of the original ML model.
The Python Script
🦄 You can find a complete walkthrough of how to build and Dockerise this text-to-image script and run it on Bacalhau in both the Bacalhau docs and in this @BacalhauProject YouTube video.
🦄 You can also run it in this Google Collabs Notebook
Here's the full python script!
import argparse
from stable_diffusion_tf.stable_diffusion import Text2Image
from PIL import Image
import os

parser = argparse.ArgumentParser(description="Stable Diffusion")
parser.add_argument("--h",dest="height", type=int,help="height of the image",default=512)
parser.add_argument("--w",dest="width", type=int,help="width of the image",default=512)
parser.add_argument("--p",dest="prompt", type=str,help="Description of the image you want to generate",default="cat")
parser.add_argument("--n",dest="numSteps", type=int,help="Number of Steps",default=50)
parser.add_argument("--u",dest="unconditionalGuidanceScale", type=float,help="Number of Steps",default=7.5)
parser.add_argument("--t",dest="temperature", type=int,help="Number of Steps",default=1)
parser.add_argument("--b",dest="batchSize", type=int,help="Number of Images",default=1)
parser.add_argument("--o",dest="output", type=str,help="Output Folder where to store the Image",default="./")

args=parser.parse_args()
height=args.height
width=args.width
prompt=args.prompt
numSteps=args.numSteps
unconditionalGuidanceScale=args.unconditionalGuidanceScale
temperature=args.temperature
batchSize=args.batchSize
output=args.output

generator = Text2Image(
    img_height=height,
    img_width=width,
    jit_compile=False, # You can try True as well (different performance profile)
)

img = generator.generate(
    prompt,
    num_steps=numSteps,
    unconditional_guidance_scale=unconditionalGuidanceScale,
    temperature=temperature,
    batch_size=batchSize,
)
for i in range(0,batchSize):
  pil_img = Image.fromarray(img[i])
  image = pil_img.save(f"{output}/image{i}.png")
The script above simply takes in a text prompt input argument and some other optional parameters and then calls the forked TensorFlow library to generate the image(s) and save them to an outputs file.
All of the heavy lifting done here happens in the section below - this is where the Machine Learning Model does its magic. 🪄
generator = Text2Image(
    img_height=height,
    img_width=width,
    jit_compile=False,
)

img = generator.generate(
    prompt,
    num_steps=numSteps,
    unconditional_guidance_scale=unconditionalGuidanceScale,
    temperature=temperature,
    batch_size=batchSize,
)
Great, we can generate images from a text prompt, but um... where to run this GPU-required script..... 🤔🤔
If there's one thing that blockchain technology does not do inherently well, it is large data processing. This is due to the cost of computing over a distributed system to provide other powerful properties like trustlessness and censorship resistance.
Using your local machine for small examples is possible - in fact I did manage to get this particular example working on my (very unhappy about it) Mac M1, however, it was a very long wait on results (game of table tennis anyone?) so, once you start doing bigger data processing, you are going to need more gas (pun intended) and if you dont have a dedicated server lying around the house, then youre going to need to use a virtual machine on a cloud computing platform. Not only is that centralised, it's also inefficient - due to the data being an unknown distance from the computation machine, and it can get costly fast. I failed to find any free-tier cloud computing service that offered GPU processing for this (did someone say crypto mining bans..?) and plans came in at > US$400 a month.

Bacalhau!
Luckily though, these problems are some of the issues Bacalhau is trying to solve. Making data processing and computation open and available to everyone and speeding up the processing times is possible in Bacalhau, firstly - by using batch processing across multiple nodes and secondly by putting the processing nodes where the data lives!
Bacalhau is aiming to help democratise the future of data processing by enabling off-chain computation over data without giving up the decentralisation values inherent to IPFS, Filecoin & Web3 more broadly.
Bacalhau is a peer-to-peer open computation network that provides a platform for public, transparent and optionally verifiable computation processes where users can run Docker containers or Web Assembly images as tasks against any data including data stored in IPFS (& soon Filecoin). It even has support for GPU jobs (something that I couldn't find on any free tier from a cloud provider!)
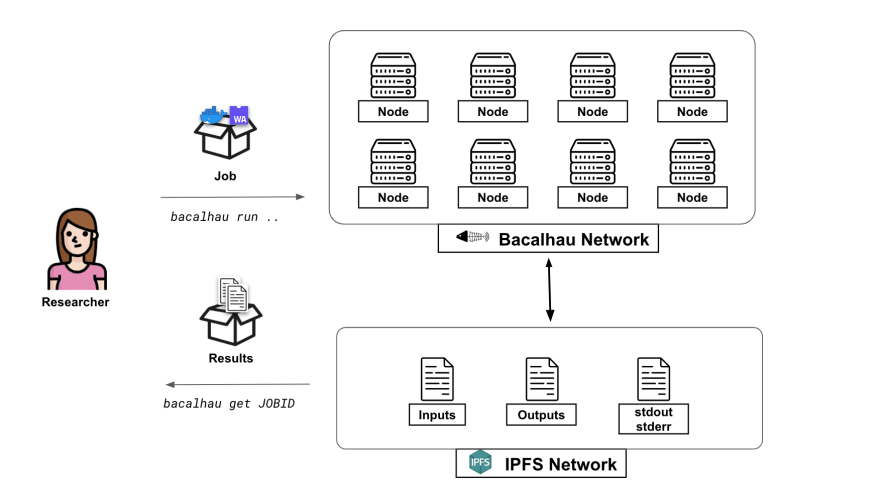
Running the script on Bacalhau
To run this script, we can Dockerise it for use on Bacalhau. You can follow the tutorial here if you want to learn to do that.
We can then run it with the Bacalhau CLI with just one line of code (after installing Bacalhau with another one-liner):
bacalhau docker run --gpu 1 ghcr.io/bacalhau-project/examples/stable-diffusion-gpu:0.0.1 -- python main.py --o ./outputs --p "Rainbow Unicorn"

In this example though, I'm going to use an HTTP endpoint that connects me to this dockerised stable diffusion script, which I'll show you in the Integrations section!
I'll note here though, that this is a powerful and flexible way to run data computation processes that is also web3 friendly - we're not just limited to this one small model.
Let's move on to the NFT script though! :)
Building & Deploying the Solidity NFT Script
The Smart Contract
The NFT Smart Contract is based on Open Zeppelin's implementation of ERC721 but uses the ERC721URIStorage implementation, which includes the metadata standard extensions (so we can pass in our IPFS-addressed metadata - which we'll save on NFT.Storage, to the contract).
This base contract additionally gives us the general functionality of an NFT contract with functions like mint() and transfer() already implemented for us.
You'll notice I've also added a couple of getter functions to fetch data for my front end as well as an Event that will be emitted on-chain each time a new NFT is minted. This gives the ability to listen to on-chain events from the DApp.
💡 Try it out on remix and see all the available functions by clicking this link! 💡
// SPDX-License-Identifier: MIT
pragma solidity ^0.8.4;

import "@openzeppelin/contracts/token/ERC721/extensions/ERC721URIStorage.sol";
import "@openzeppelin/contracts/utils/Counters.sol";
import "@hardhat/console.sol";

contract BacalhauFRC721 is ERC721URIStorage {
/** @notice Counter keeps track of the token ID number for each unique NFT minted in the NFT collection */
    using Counters for Counters.Counter;
    Counters.Counter private _tokenIds;

/** @notice This struct stores information about each NFT minted */
    struct bacalhauFRC721NFT {
        address owner;
        string tokenURI;
        uint256 tokenId;
    }

 /** @notice Keeping an array for each of the NFT's minted on this contract allows me to get information on them all with a read-only front end call */
    bacalhauFRC721NFT[] public nftCollection;
/** @notice The mapping allows me to find NFT's owned by a particular wallet address. I'm only handling the case where an NFT is minted to an owner in this contract - but you'd need to handle others in a mainnet contract like sending to other wallets */
    mapping(address => bacalhauFRC721NFT[]) public nftCollectionByOwner;

/** @notice This event will be triggered (emitted) each time a new NFT is minted - which I will watch for on my front end in order to load new information that comes in about the collection as it happens */
    event NewBacalhauFRC721NFTMinted(
      address indexed sender,
      uint256 indexed tokenId,
      string tokenURI
    );

/** @notice Creates the NFT Collection Contract with a Name and Symbol */
    constructor() ERC721("Bacalhau NFTs", "BAC") {
      console.log("Hello Fil-ders! Now creating Bacalhau FRC721 NFT contract!");
    }

/**
@notice The main function which will mint each NFT.
The ipfsURI is a link to the ipfs content identifier hash of the NFT metadata stored on NFT.Storage. This data minimally includes name, description and the image in a JSON.
*/
    function mintBacalhauNFT(address owner, string memory ipfsURI)
        public
        returns (uint256)
    {
        // get the tokenID for this new NFT
        uint256 newItemId = _tokenIds.current();

        // Format info for saving to our array
        bacalhauFRC721NFT memory newNFT = bacalhauFRC721NFT({
            owner: msg.sender,
            tokenURI: ipfsURI,
            tokenId: newItemId
        });

        //mint the NFT to the chain
        _mint(owner, newItemId);
        //Set the NFT Metadata for this NFT
        _setTokenURI(newItemId, ipfsURI);

        _tokenIds.increment();

        //Add it to our collection array & owner mapping
        nftCollection.push(newNFT);
        nftCollectionByOwner[owner].push(newNFT);

        // Emit an event on-chain to say we've minted an NFT
        emit NewBacalhauFRC721NFTMinted(
          msg.sender,
          newItemId,
          ipfsURI
        );

        return newItemId;
    }

    /**
     * @notice helper function to display NFTs for frontends
     */
    function getNFTCollection() public view returns (bacalhauFRC721NFT[] memory) {
        return nftCollection;
    }

    /**
     * @notice helper function to fetch NFT's by owner
     */
    function getNFTCollectionByOwner(address owner) public view returns (bacalhauFRC721NFT[] memory){
        return nftCollectionByOwner[owner];
    }
Requirements
I'll be deploying this contract to the Filecoin Virtual Machine Hyperspace Testnet, but you could deploy this contract to any EVM-compatible chain including Polygon, BSC, Optimism, Arbitrum, Avalanche and more. You could even tweak your front end to make a multi-chain NFT (hint: this repo)!
To deploy to Hyperspace Testnet we'll need to
Set up & connect Metamask Wallet to Hyperspace Testnet
Deploying the Smart Contract with Hardhat
I'm using hardhat to deploy this contract to the Hyperspace testnet.
Hyperspace RPC & BlockExplorer Options:
| Public RPC Endpoints | BlockExplorer's |
| https://filecoin-hyperspace.chainstacklabs.com/rpc/v0 | https://beryx.zondax.ch/ |
| https://hyperspace.filfox.info/rpc/v0 | https://fvm.starboard.ventures/contracts/ |
| https://rpc.ankr.com/filecoin_testnet | https://explorer.glif.io/?network=hyperspacenet |
| Open API : https://beryx.zondax.ch/ | https://hyperspace.filfox.info/en |
For the config set-up, we can choose from any of the available public RPC endpoints.
hardhat.config.ts
import '@nomicfoundation/hardhat-toolbox';
import { config as dotenvConfig } from 'dotenv';
import { HardhatUserConfig } from 'hardhat/config';
import { resolve } from 'path';

//Import our customised tasks
// import './pages/api/hardhat/tasks';

const dotenvConfigPath: string = process.env.DOTENV_CONFIG_PATH || './.env';
dotenvConfig({ path: resolve(__dirname, dotenvConfigPath) });

// Ensure that we have all the environment variables we need.
const walletPrivateKey: string | undefined = process.env.WALLET_PRIVATE_KEY;
if (!walletPrivateKey) {
  throw new Error('Please set your Wallet private key in a .env file');
}

const config: HardhatUserConfig = {
  solidity: '0.8.17',
  defaultNetwork: 'filecoinHyperspace',
  networks: {
    hardhat: {},
    filecoinHyperspace: {
      url: 'https://api.hyperspace.node.glif.io/rpc/v1',
      chainId: 3141,
      accounts: [process.env.WALLET_PRIVATE_KEY ?? 'undefined'],
    },
    // bleeding edge often-reset FVM testnet
    filecoinWallaby: {
      url: 'https://wallaby.node.glif.io/rpc/v0',
      chainId: 31415,
      accounts: [process.env.WALLET_PRIVATE_KEY ?? 'undefined'],
      //explorer: https://wallaby.filscan.io/ and starboard
    },
  },
// I am using the path mapping so I can keep my hardhat deployment within the /pages folder of my DApp and therefore access the contract ABI for use on my frontend
  paths: {
    root: './pages/api/hardhat',
    tests: './pages/api/hardhat/tests', //who names a directory in the singular?!!! Grammarly would not be happy
    cache: './pages/api/hardhat/cache',
  },
};

export default config;
And to deploy the smart contract we created
deploy/deployBacalhauFRC721.ts
import hre from 'hardhat';

import type { BacalhauFRC721 } from '../typechain-types/contracts/BacalhauFRC721';
import type { BacalhauFRC721 __factory } from '../typechain-types/factories/contracts/BacalhauFRC721__ factory';

async function main() {
  console.log('Bacalhau721 deploying....');

   // needed as hardhat's default does not map correctly to the FEVM
  const owner = new hre.ethers.Wallet(
    process.env.WALLET_PRIVATE_KEY || 'undefined',
    hre.ethers.provider
  );
  const bacalhauFRC721Factory: BacalhauFRC721__factory = <
    BacalhauFRC721__factory
  > await hre.ethers.getContractFactory('BacalhauFRC721', owner);

  const bacalhauFRC721: BacalhauFRC721 = <BacalhauFRC721>(
    await bacalhauFRC721Factory.deploy()
  );
  await bacalhauFRC721.deployed();
  console.log('bacalhauFRC721 deployed to ', bacalhauFRC721.address);
  // optionally log to a file here
}

main().catch((error) => {
  console.error(error);
  process.exitCode = 1;
});
To deploy, run the above script in the terminal by using the following code (NB: since we've set the default network to filecoinHyperspace in our config, it's not necessary to pass a flag for the network though this is shown below)
> cd ./pages/hardhat/deploy/
npx hardhat run ./deployBacalhauFRC721.ts --network filecoinHyperspace
Celebrate! We've just deployed our NFT contract to the Filecoin hyperspace testnet!

🎬 Building the Front-End Interactions
[coming soon]
NFT.Storage
Contract Interactions
Bacalhau Interactions
Creating the front-end API endpoint for Bacalhau is documented in this project report by engineer Luke Marsden.
The API currently only directly hits the stable diffusion scripts documented in this blog, however, the team is in the process of extending it into a more generic API so that you can call any of the examples, and also your own deployed scripts from an HTTP REST API. Keep an eye on this here or in the #bacalhau channel in filecoinproject.slack.
curl -XPOST -d '{"prompt": "rainbow unicorn"}' 'http://dashboard.bacalhau.org:1000/api/v1/stablediffusion';


import { CID } from 'multiformats/cid';

export const callBacalhauJob = async (promptInput: string) => {
  //Bacalahau HTTP Stable Diffusion Endpoint
  const url = 'http://dashboard.bacalhau.org:1000/api/v1/stablediffusion';
  const headers = {
    'Content-Type': 'application/x-www-form-urlencoded',
  };
  const data = {
    prompt: promptInput, //The user text prompt!
  };
  /* FETCH FROM BACALHAU ENDPOINT */
  const cid = await fetch(url, {
    method: 'POST',
    body: JSON.stringify(data),
    headers: headers,
  })
    .then(async (res) => {
      let body = await res.json();
      if (body.cid) {
/* Bacalhau returns a V0 CID which we want to convert to a V1 CID for easier usage with http gateways (ie. displaying the image on web), so I'm using the IPFS multiformats package to convert it here */
        return CID.parse(body.cid).toV1().toString();
      }
    })
    .catch((err) => {
      console.log('error in bac job', err);
    });
  return cid;
};
This call will return an IPFS CID (content identifier) with a folder structure like the one below. The image can be found at /outputs/image0.png. See it for yourself by clicking here!


📺 Deploying the front end to Fleek
[coming soon]
🌟 Final Thoughts: Possibilities for AI & Blockchain
[coming soon]
🐠 The Bacalhau Roadmap
We're currently building out a way for you to run Bacalhau directly from your smart contracts!!!
Keep in touch!
Congrats if you read all the way through!!!
I'd appreciate a like, comment, follow or share if this was useful to you! <3
Keep in touch with Bacalhau!
Twitter @BacalhauProject
YouTube @BacalhauProject
Filecoin Project Slack #bacalhau @filecoinproject
Github @bacalhau.org


Top comments (0)