LAMP stack or Linux, Apache, MySQL and PHP are the main essential set of tools that you need to develop or run a PHP based web application or a CMS (Content Management System) such as Laravel and WordPress.
Usually, when we develop an application, we create at least 3 different and separate environments for development, stage and production. In this guide, mainly you will be able to learn how to install and set up the LAMP stack for a development environment. Additionally, you will be able to learn how to install Composer, NPM and troubleshoot possible errors which can be occurred when setting up the MySQL server and phpMyAdmin.
LAMP (Linux, Apache, MySQL, PHP) Stack Setup
Linux Installation
You can install LAMP stack on any Linux distribution such as Ubuntu, Fedora and CentOS. Since different distributions use their package managers, we are using Ubuntu 20.04 LTS for this guide. If you need to install Ubuntu 20.04 LTS, refer to the Ubuntu 20.04 LTS installation guide which explains everything step-by-step.
Software Repository Update
Before installing any application, the very first thing that you need to do is update the software repository of your system and install available updates. You need to execute these administrative commands with “root” privileges, we are using sudo for that. Enter the following commands, the first command will update the repository and the second command will download and install necessary updates. We are using the -y flag to indicate that we do not need to confirm each action.
sudo apt-get update -y
sudo apt-get upgrade -y
Apache, PHP And PHP Modules Installation
Again, enter the following command. It will take a few minutes to complete the installation.
sudo apt-get install apache2 curl php php-bcmath php-cli php-curl php-gd php-intl php-mbstring php-mysql php-pgsql php-sqlite3 php-xdebug php-xml php-zip
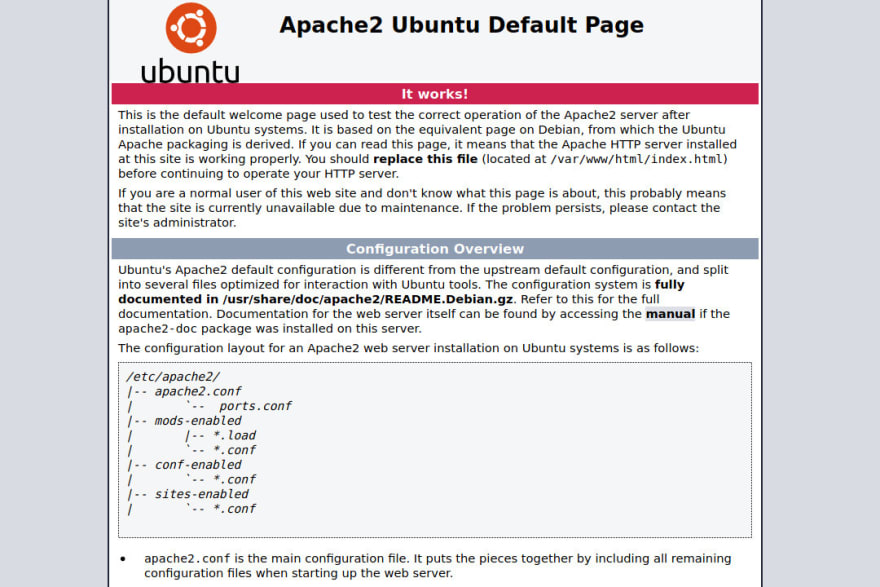
Now you should be able to access the Apache webserver by going to http://localhost address from your web browser. Make sure it does not start with “https”. If everything is installed properly, you should be able to see the Apache welcome screen.
Now you should be able to access your web pages (PHP, HTML,..) in /var/www/html directory.
Enable Apache mod_rewrite module
Apache mod_rewrite module helps to create SEO friendly pretty URLs, conditional redirections and much more. It is not mandatory, but it is highly recommended to enable it. Visit how to enable Apache mod_rewrite module for detailed instructions.
Composer dependency manager installation
Composer is a dependency manager which you can use to manage PHP packages in your application. Mainly, Composer eliminates the requirement of manually downloading package files. In addition to that, it maintains a record of which packages and versions have been used for the application that we are developing. Once you included the composer.json and composer.lock files in your source code, another developer can install the required packages with the same versions without making version conflicts.
Enter the following command to download Composer.
curl -sS https://getcomposer.org/installer | php
Make it globally available for all the users in the system, so you will be able to use it anywhere regardless of the path of your project or the user currently logged in.
sudo mv composer.phar /usr/local/bin/composer
Make it executable, then you will be able to use it by typing composer.
sudo chmod +x /usr/local/bin/composer
Now check whether Composer has been successfully installed by entering the following command.
composer -V
It should print the version of Composer.
NodeJS NPM package manager installation
NPM or Node Package Manager is a tool that is similar to Composer but for JavaScript packages. You can use NPM to manage JavaScript packages.
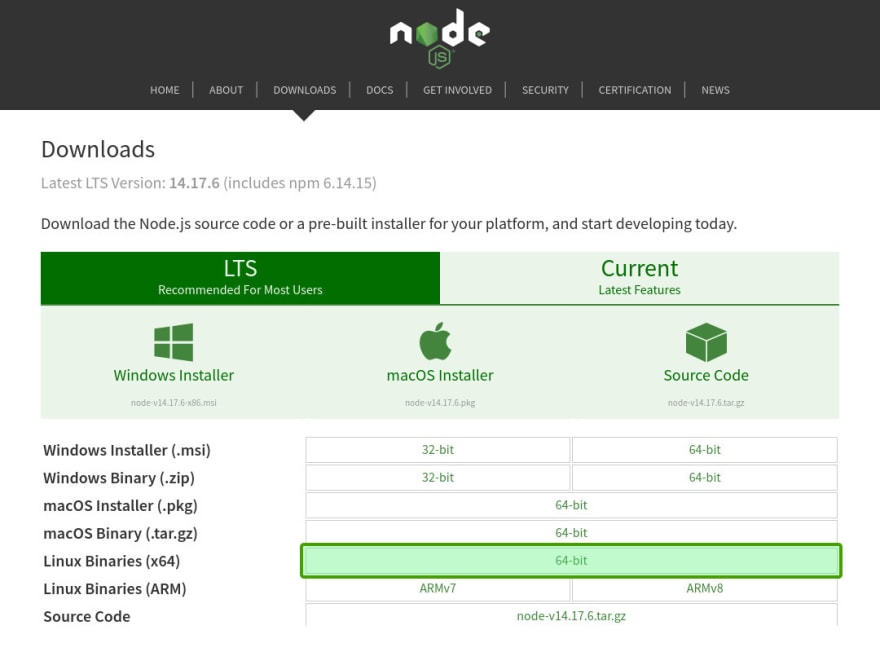
Go to https://nodejs.org/en/download and download the Linux binary tar.xz file.
Open its download directory using the file manager and open a terminal window from there by right-clicking and selecting the “Open in Terminal”.
Type this command in the terminal to create a directory for NodeJS.
mkdir ~/nodejs
Enter the following command to extract the downloaded file to the nodejs directory that we have created. Since the download file name change from time to time with its version numbers, make sure to type the same file name that you have downloaded. We are using the -C flag to mention the destination path and --strip-components=1 to directly extract files in to the nodejs directory.
tar -xf node-v14.17.6-linux-x64.tar.xz -C ~/nodejs --strip-components=1
Now we need to make NodeJS accessible with the terminal, for that type the following command.
echo "export PATH=$PATH:~/nodejs/bin" >> ~/.bashrc
This command will apply the changes and make them available immediately through the terminal.
source ~/.bashrc
Make sure NodeJS and NPM are installed properly by typing the following commands. They should print the current version numbers.
node -v
npm -v
This command is optional, but if you need you can use this command to delete the downloaded file tar.xz.This command is optional, but if you need you can use this command to delete the downloaded file tar.xz.
mv node-v14.17.6.tar.gz
MySQL Server Installation
Run the following command to install the MySQL server.
sudo apt-get install mysql-server
This command is completely optional since we are building a development environment. But still, you can run the following command to secure the MySQL server.
sudo mysql_secure_installation
phpMyAdmin installation
phpMyAdmin is a web-based tool that you can use to browser databases in the MySQL server. Run the following command to install it.
sudo apt-get install phpmyadmin
Once you run that command, within a few seconds, it will ask the web server that you are using. Select apache2 by using up/down arrow keys and press space to select it. Then press the tab key to select “Ok” and press enter key.

Again it will ask to configure the database for phpMyAdmin with dbconfig-common, select “Yes” and press the enter key.

After that, it will ask for a password, just leave it blank by pressing the enter key to generate a password by itself.

Now check whether that you can access the phpMyAdmin login page by visiting http://localhost/phpmyadmin. But sometimes you will not be able to login with the “root” MySQL account as it shows an error called “Login without a password is forbidden by configuration”. This is a security measure implemented by phpMyAdmin and you can easily fix it by following how to fix phpMyAdmin “Login without a password is forbidden by configuration” error. Again, you might get another error called mysqli_real_connect(): (HY000/1698): Access denied for user ‘root’@'localhost'. This can be happened due to the default MySQL Unix socket-based authentication. Learn how to fix mysqli_real_connect(): (HY000/1698): Access denied for user ‘root’@'localhost' error.
Now try to login to the phpMyAdmin with “root” user and a blank password. You should be able to see a similar page.

Conclusion
In this guide, mainly we explained the installations of Apache web server, PHP and MySQL DBMS (Database Management System). Also, we explained the installations of phpMyAdmin, Composer and NPM package manager. Additionally, we discussed the possible troubleshooting with MySQL server and phpMyAdmin. What do you think about this guide? Let us know your thoughts in the comment section.
Feel free to visit devtonight.com for more related content.


Top comments (4)
Your article states you'll install LAMP and i guess you roughly end up doing that.
You only link to a different article for ubuntu setup as if that's not the biggest part in all this since none of it can run without the OS. Then again most hosting servers would already have it installed so sure we can skip it.
You skipped APACHE virtualhost configs completely.
As in, you are running the site on localhost, the default web folder for apache, which is useless if you ever want to run this on a real domain and need to set the right headers, url rewrites and a dozen other things you need in the virtualhost config.
You install Composer and Node???!?!?! What for exactly? You're not using them in your example. You don't need either of these to get a domain running on Apache. I don't believe you understood what you were really doing there. Nevermind that though, you did get a site up and running, which is the end goal, right?
Also please tell me you're not leaving phpmyadmin like that if you ever put this on a live server. It'll only be getting hit by attacks 24/7. Never use default settings on a server, that's what attack bots crave.
Here's a much more comprehensive list of articles on how to install a LAMP stack.
Digital Ocean keeps these up to date for every new version. Currently it's Ubuntu 20.
digitalocean.com/community/tutoria...
Please kindly note this setup is intended to be used as a local LAMP development environment and it is not suitable for a production environment at all. However, we just updated the article to make it even more clear.
As you pointed out, we have added the Apache mod_rewrite module part as it is useful for this setup.
Thank you very much for your constructive comment and we highly appreciate it.
Super well written article! Well done!
I actually uploaded a video on my YouTube channel on the exact same topic a couple of weeks 😁
Thank you very much and much appreciated it for sharing your awesome video on the same topic! 😀