
Introduction
Welcome to part two of the Introduction to the IndexedDB API series, last time we learned about the basics of the API and how we could perform some of the most common operations. In this part, we will begin the construction of our To-Do web application by applying that knowledge. Specifically, we will:
- Get familiar with the boilerplate code of the application
- Create a class that encapsulates the IndexedDB instance
- Set the logic to create and save a new task
Getting Started
To start, make sure you have a recent version of NPM, then go to the following GitHub repo here and, in the README, find the Want to Code Along? section and download the code tagged as starting code for part one. The project uses webpack and webpack-dev-server to create a local development server as well as Bulma (a modern CSS framework) for the front-end. Once you got it, execute the following commands:
npm install
npm run start
The first one will download all the dependencies, the second one will run the start script defined in the package.json file and start the local server. If everything goes well, the server will start listening in the port 8080 at the following URL:
Project Structure
Letting the node_modules/ folder aside, the project has the following file structure:
│   .babelrc
│   .gitignore
│   package-lock.json
│   package.json
│   webpack.config.js
│
├───dist
│   │   index.html
│   │   main.js
│   │
│   └───assets
│       └───css
│               index.css
│
└───src
    │   index.js
    │
    └───database
            database.js
The
dist/folder contains the public files. We won't necessary edit these files but I encourage you to personalize theindex.htmlfile and create your layoutThe
src/folder contains the javascript code, including theindex.jsfile (the entry point of our application) and thedatabase.jsfile that will export theDatabaseclassThe rest of the files are configuration files and should not be changed
(Note: It is not necessary to run the start script every time we make a change as the webpack-dev-server dependency will automatically compile the code and reload the page.)
The index.js file already has a saveTask function that will be called when a submit event on the form is fired.
Creating the Database
As said earlier, the database.js file contains a class. This class will encapsulate the IndexedDB instance and manage the methods for the CRUD operations. Let's start by creating the instance, remember that we need two things, the name and the version of the database, we can easily pass these information as variables to the constructor, like this:
export default class Database {
  constructor(name, version) {
    this.name = name;
    this.version = version;
    this.indexedDB = {};
    this.database = window.indexedDB.open(name, version);
    this.database.onsuccess = () => {
      console.log(`Database ${name}: created successfully`);
      this.indexedDB = this.database.result;
    }
  }
}
Now, back in the index.js file, let's create a new instance of our Database class by passing in the name and version we want, like this:

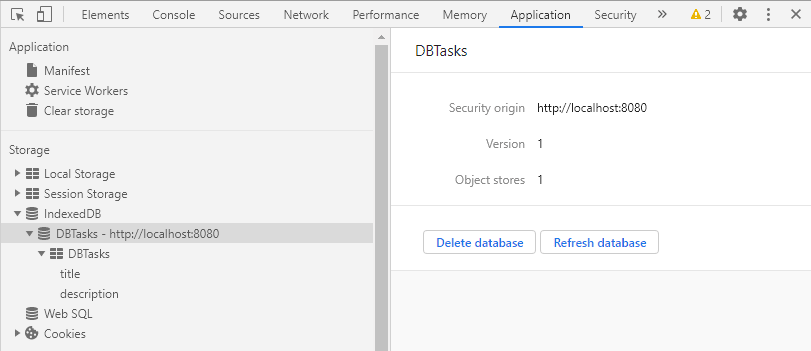
Now if we run the start script once again (remember, it's not necessary if it was already running) we will see the message Database DBTasks: created successfully but, if we really want to make sure our database was created, we can go to the Application tab on the Chrome DevTools and check under Storage > IndexedDB:

As you can see, the database indeed exists but is empty.
Creating the persist Function
Before we can attempt to save something remember, we first need to create the schema. We could create the fields directly in the constructor, but we want the Database class to be capable of building different databases with different fields. For that purpose, let's pass another variable to the constructor called fields that can be either a string or an array and create the model from it, like this:
export default class Database {
  constructor(name, version, fields) {
    // ...
    this.database.onupgradeneeded = event => {
      const instance = event.target.result;
      const objectStore = instance.createObjectStore(name, {
        keyPath: "key",
        autoIncrement: true,
      });

      if (typeof fields === "string") fields = fields.split(",").map(s => s.trim());
      for (let field of fields) objectStore.createIndex(field, field);
    }
  }
}
Now we can easily pass the various fields we could need for our database. The following code snippets are equivalent:
const database = new Database("DBTasks", 1, "title, description");
const database = new Database("DBTasks", 1, ["title", "description"]);
Now when the database is created, it will have an object store attached to it:
Bravo 🎉🎉 !! Our database is up and running, now the only thing left to do is to create a new class method that receives an object (a task) and save it. Let's go to our Database class and create a method called persist, next let's create an IDBTransaction object from the instance of the database and then get access to the object store, like this:
export default class Database {
  constructor(name, version, fields) {
   // ...
  }

  persist(task) {
    if (typeof task === "object") {
      const transaction = this.indexedDB.transaction([this.name], "readwrite");
      const objectStore = transaction.objectStore(this.name);
    } else {
      throw new Error("An object was expected.");
    }
  }
}
Now, in the previous part, we also talked about a request that we have to make through the objectStore object, that's because, to save a new record, we need to call the add() method on the objectStore object, said method will return an IDBRequest object with information about the status of our petition. This is useful because we can then pass a callback function to execute when the request is complete. The whole process would look something like this:
export default class Database {
  constructor(name, version, fields) {
   // ...
  }

  persist(task, success) {
    if (typeof task === "object") {
      const transaction = this.indexedDB.transaction([this.name], "readwrite");
      const objectStore = transaction.objectStore(this.name);
      const request = objectStore.add(task);
      if (typeof success === "function") request.onsuccess = success;
    } else {
      throw new Error("An object was expected.");
    }
  }
}
Great 👏! We are almost done as we still need to supply a callback for when the transaction is complete, we could pass more callbacks to the persist function, but it is more practical if we just return the transaction object, that way we can handle it in the index.js file.
Using the persist Function
Before moving out to the index.js file, let's think for a moment what kind of operations we could execute as callbacks for the request and the transaction.
If a request is fulfilled, it does not necessarily mean that everything went fine, it just tells us that our request was accepted, therefore, we can not assure that the object was successfully saved but, we sure can say that the data recollected from the form were stored in the task object and if that's the case, we can then reset the form.
On the other hand, if a transaction is completed successfully, then there were no errors during the process that was requested and if that's the case, then we can be sure the object was successfully saved.
Now that we have that figured out, we can code it! The implementation would look something like this:
function saveTask(event) {
    // ...
  const task = {title, description};
  const transaction = database.persist(task, () => form.reset());
  transaction.oncomplete = () => {
    console.log("Task added successfully!");
  }
}
Now to the fun part, let's test it! Go to your browser and create a task you would like to do, in my case, I want to finish all my series on Netflix.

Press on the Create button and you will see that the form resets itself (as intended), and after a few seconds (or less) you should see the following message on your console:
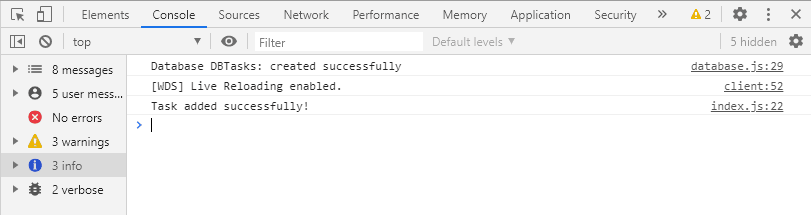
And if we check again the Application tab, we now will see our newly saved data:

Excellent! The task has been successfully saved.
Let's Recap
In this second part, we:
- Created the
Databaseclass to encapsulate the IndexedDB instance - Learned how we can create fields dynamically in the constructor of the
Databaseclass - Learned how we can see the status of our database by checking in the Application tab on the Chrome DevTools
- Learned how we can save new objects by using the
add()method on theobjectStore - Learned what to expect when the
requestemits theonsuccessevent - Learned what to expect when the
transactionemits theoncompleteevent
The complete code is available in the project repo tagged as finished code for part one, go check it out.
 DevTony101
/
js-todo-app-indexed_db
DevTony101
/
js-todo-app-indexed_db
This is a to-do web application that uses the IndexedDB API.
That's all! In the next part, we will begin with the implementation of a function that allows us to retrieve the objects stored in the database and then display them on the page.
Thank you so much for reading! If you have questions or suggestions please leave them down below. See you next time 👋.

Oldest comments (0)