
View Site: Live Site | GitHub | Site Demo
As part of my coding bootcamp, I’ve already built a few apps and sites, but I decided that it was time to learn how to take that last step and actually deploy my own site on the internet. Turns out, it’s not as easy as it sounds (shocker, I know) and it took a lot of research and piecing together portions of existing articles and documentation to get to the end result. So, I figured I’d document how I did this in case anyone (ahem…me) is having trouble down the line and finding themselves wishing for a step-by-step guide.
As a disclaimer, the specifics of this process are highly dependent on a lot of factors. I use a Windows PC running Windows Subsystem for Linux with Ubuntu OS, the back-end of this site is built with Ruby-on-Rails v5 running a Puma v3 server, and the front-end is built using HTML, CSS, and vanilla JavaScript. If you have a different combination of techs, this will probably only get you so far. Also, as this is my first deploy, I’m sure there are better ways to do this, and I’d love to hear them – feel free to throw any best-practices you’ve learned in the comments.
Table of Contents
Step 1: Split Your Code
Step 2: Choose Your Platform(s)
Step 3: Download Heroku’s CLI
Step 4: Use Heroku CLI to Create App
Step 5: Create the Procfile
Step 6: Convert Your SQLite3 Database
Step 7: Push to Heroku
Step 8: Add Environment Variables
Step 9: Push Database Migrations to Heroku
Step 10: Link Front-End Code With Live API URL
Step 11: Deploy Your Front-End
Step 12: Enable CORS
Step 13: One Final Gotcha
Step 1 - Split Your Code
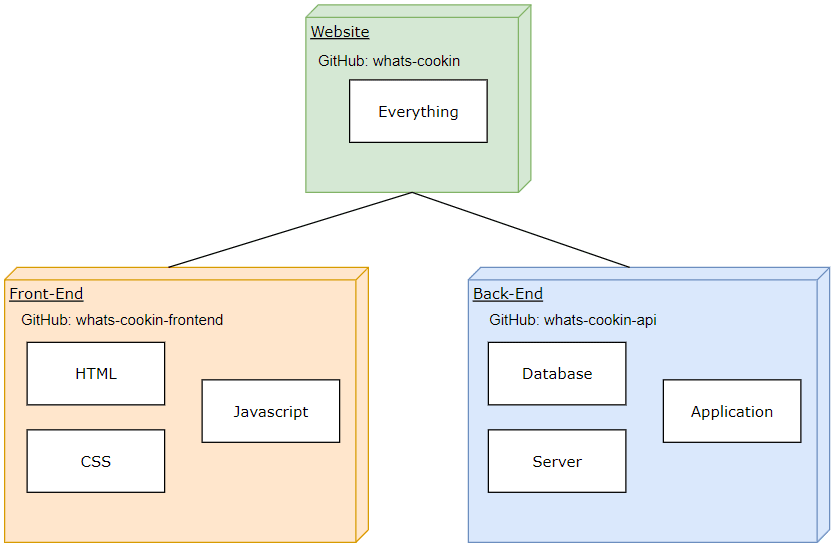
It’s easy to think of a website as a single entity, but they are actually two separate pieces - the front-end site and the back-end API - that will need to be deployed separately. There are also a lot of different platform options, which may be optimized toward either front-end or back-end apps, so you may want to deploy each side to a separate platform. Due to this, you'll need to split your front-end code to a separate repository from your back-end.
Naturally, there are a lot of ways to do this, but the way that I handled it was to have 3 git tracks: back-end (API), front-end, and combined. I like this approach because on the one hand, it keeps everything contained in one repository for reference (combined), yet at the same time, I can keep separate front & back end repositories for the actual deployment.
Firstly, make sure the Combined repo is fully updated and pushed to GitHub (or whatever version control remote that you use). When referring someone to your GitHub, this will be the link you will send since it will have everything, front and back, all contained in one place.
Next, create a new GitHub Repository for your back-end stuff. I appended mine with "-api" so I could keep track easier. Once that’s created you can ‘cd’ into your local back-end directory and create a brand new git file with the same name using ‘git init’. Then push it into your newly created Remote Repository. Now you have your back-end git file ready to deploy and saved to GitHub.
Then finally, repeat the previous step for your front-end stuff. I appended mine with “-frontend” to keep it separate from the combined repository.
back to top
Step 2 - Choose Your Platform(s)
There are a lot of ways to go with this. Heroku is easily the most common platform that my peers were using for their back-end, and the starting plan is free, so I decided to sign up and use it for my first site. For the front-end, GitHub can actually host your site directly from the GitHub Repository with GitHub Pages (this is why you need to separate the two repositories). This seemed like it would be the most straightforward option, so that’s the route I took.

As far as the documentation goes, GitHub Pages documentation couldn’t be simpler. You just toggle a few options and it will output your instructions for you. Heroku was a different story. There are so many factors that affect how you will deploy that I found their documentation to be a bit overwhelming. That said, it seems to be very comprehensive and they make a best attempt at keeping it as straightforward and step-by-step as possible. These will be a great resource if you get stuck at any point, if you are using WSL like me, just remember that you’ll generally follow Linux instructions, not Windows.
back to top
Step 3 - Download Heroku’s CLI
If you start by diving into Heroku’s “show next steps” instructions like I did, you will now be instructed to create a new App and add it to a pipeline, and then select a bunch of configurations. I’m sure once I get a better feel for deployment this will all be very useful, but for my first time, I was feeling lost. Luckily, there are a LOT of blog posts and help articles about how to deploy, and I noticed that many of them only mentioned using Heroku CLI during this whole process.
So I deleted everything I had done on Heroku up to this point and went ahead and downloaded the CLI. Unfortunately, this was less straightforward than I had expected. The instructions on Heroku didn’t work because I am using WSL which doesn’t support Snap… Luckily for me, Thomas Wright had had the same issue and wrote an article about how to download the CLI with WSL, otherwise this would have been a real ordeal. But all you need to do is run curl https://cli-assets.heroku.com/install.sh | sh on your Ubuntu terminal and you’ll be good to go with the CLI.
back to top
Step 4 - Use Heroku CLI to Create App
From the root of your back-end directory (not of the whole app) you will use the CLI to run commands that are very similar to the git workflow:
- Create an empty Heroku app with your app name (I kept the “-api” for clarity):
heroku create -a <app-name>-api** This command will also create a remote repository linked to whatever you called the command from – this is why you call it from the root of your back-end - Run
git remote -vto check that there is indeed a Heroku remote. It should look like this if all went well:
back to top
Step 5 - Create the Procfile
Heroku uses a Procfile on the root of the back-end directory to execute startup commands, like starting up your server. The “Rails New” generator sets up Puma in a way that works right out of the box, you can view the details in your ./config/puma.rb. The only thing we need to with the procfile then, is to create it and add a web-process that starts Puma according to the specifications in the config file. This does the trick: web: bundle exec puma -C config/puma.rb.
back to top
Step 6 - Convert Your SQLite3 Database
Rails is set up to use SQLite3 for the database by default. This won’t work on Heroku, so we need to change it. I changed it to Postgres as recommended in the Heroku documentation. I thought I’d have to rebuild my database migrations and do a lot of extra work to do this, but it was actually super simple. Just go into your gemfile and replace “gem ‘sqlite3’” with “gem ‘pg’” and run bundle install. Hopefully you’ll get a new ./config/database.yml file that is adapted to Postgres, but I did not. Luckily all I had to do was change the adapter to “postgresql” and add an encoding line set to Unicode and I was good to go.
default: &default
  adapter: postgresql
  encoding: unicode
The only gotcha that I ran into was that Postgres seems to be a little bit more strict with its migration order. Evidently I had created a table that references another table prior to its creation. I just had to switch the order of the migrations around and everything worked fine. From now on though, I’ll probably just build my Rails APIs using Postgres to skip this whole issue.
back to top
Step 7 - Push to Heroku
Now, you’re finally done prepping your code and you can push to Heroku. Just use the CLI to add git add ., commit git commit -m “_commit message_”, and push your code to Heroku git push heroku master and you’re done! You should only push to Heroku master branch, non-master branches won’t deploy.
back to top
Step 8 - Add Environment Variables
I had some features in my site that were dependent on secret variables - JSON Web Token Secret for authentication, and a 3rd party API Key. If you use the dotenv gem, these would be in your .env file. They need to be added to Heroku by going into the app’s settings and scrolling to the Config Vars section and adding the Keys and Values. Took me a little bit and some heavy debugging to figure that one out.
back to top
Step 9 - Push Database Migrations to Heroku
Once the App is all set up and fully pushed to Heroku, you can push your database migrations to set up your production database using the Heroku CLI: “heroku run rake db:migrate”. And now, your api should be fully live and working!
back to top
Now you're done with the hard part - phew!
Step 10 - Link Front-End Code With Live API URL
Your front-end likely connects to your api using fetch calls. The URL in all of these calls needs to be changed from your localhost address to the live URL for your API. Once you do this, the site will be pulling from your production database.
back to top
Step 11 - Deploy Your Front-End
Deploying your front-end code is super simple with GitHub Pages. Just go into your front-end repository (remember, not the combined one), go to Settings, and scroll down to the GitHub Pages Section. Here, you simply select the branch that you want to deploy and click Save and you’re done.
back to top
Step 12 - Enable CORS
Now that you have a live front-end site (woohoo!) you just need your back-end API to allow it access. You probably set up CORS during development, but you have it pointed at the localhost URL. This will need to change to the new, live front-end URL in your ./config/initializers/cors.rb file. If you know this address ahead of time, you can set up CORS as part of your back-end code prep (Step 5 & 6).
back to top
There. Now you should have a fully functioning website live on the internet!! Time to celebrate by grabbing a snack or beverage of your choice, putting your computer away, and playing with your new site on someone else’s device. Or better yet, have THEM play with your site while you watch and relax.
Step 13? - One Final Gotcha
For me, when I tested my site the authentication failed, although it was working just fine in development. I learned 2 things through debugging this issue:
- It’s much harder to debug a live App. The logs are much less detailed and you can’t throw in a
binding.pryto stop the code. So use custom logging generouslyputs ‘…’to help you see where things are breaking. You can runheroku logs -tfrom your terminal to view your logs on the terminal, or you can go to the App in the Heroku website and view logs from the “More” button. - Ruby implicitly returns the last line processed in a method, but this might not be a safe assumption to make. Somehow, a method in my code was not returning anything because I had a missing return. It worked locally, but not with Heroku. If you’re site seems to be broken for no reason – check your returns.

Oldest comments (0)