
Today you’ll learn how to develop REST API with Spring Boot 2 and Kotlin. Kotlin is 100% interoperable with Java. Which means you can call Java code from Kotlin and Kotlin code can be used from Java seamlessly. If you want to learn more about Kotlin, refer to Kotlin reference doc.
In this tutorial we'll use an in-memory database (H2) with Spring Data to persist and retrieve data via rest API.
Creating a New Project
Visit Spring Initializr and select Kotlin language. In this tutorial we'll use Maven, select Maven project. But you can also use Gradle.
Add the following dependencies:
- Spring Data JPA
- Spring Web
- H2 Database
- Spring Boot DevTools
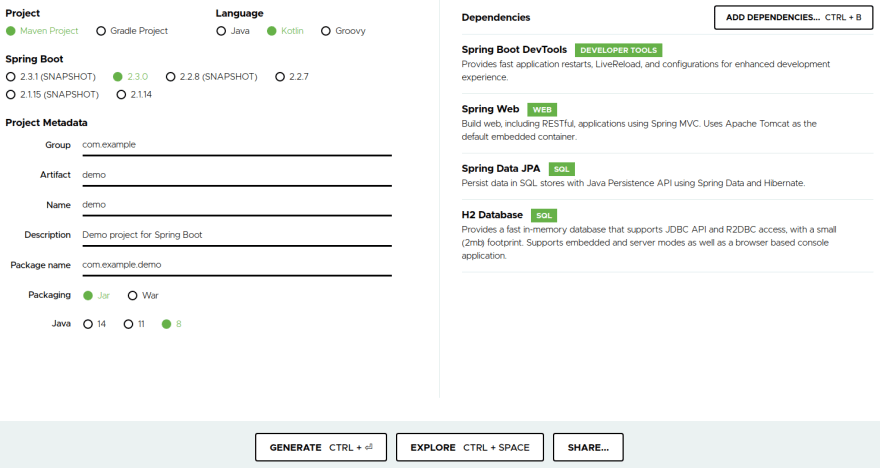
Click Generate to downlaod .zip file and upack it into your working directory.
Understanding Application entry point
src/main/com/example/demo/DemoApplication.kt
package com.example.demo

import org.springframework.boot.autoconfigure.SpringBootApplication
import org.springframework.boot.runApplication

@SpringBootApplication
class DemoApplication

fun main(args: Array<String>) {
    runApplication<DemoApplication>(*args)
}
Main fun is the entry point for Springboot application. runApplication<DemoApplication>(*args) is Kotlin idiomatic alternative to SpringApplication.run(DemoApplication::class.java, *args) that you see mostly in Java.
Create Project structure
Create the following packages in src/main/com/example/demo directory:
- config
- controller
- domain
- repository
- service

Create Entity Class
Create Product.kt in domain package.
package com.example.demo.domain

import javax.persistence.Column
import javax.persistence.Entity
import javax.persistence.Id
import javax.persistence.Table

@Entity
@Table(name = "product")
class Product(
        @Id
        @GeneratedValue(strategy = GenerationType.AUTO
        var id: Long,
        @Column
        var name: String,
        @Column
        var price: Float) {

    override fun toString(): String {
        return "Product(name='$name', price=$price)"
    }
}
Compared to Java, you can notice that we defined primary constructor as part of the class header. Kotlin will generate getter, setter, hashcode, and equals methods for us, which you can also override.
Create Repository Interface
Create ProductRepository.kt in domain package.
package com.example.demo.repository

import com.example.demo.domain.Product
import org.springframework.data.repository.CrudRepository
import org.springframework.stereotype.Repository

@Repository
interface ProductRepository: CrudRepository<Product, Long> {
    fun findProductsByName(name: String): List<Product>
}
Compared to Java, you can notice the use of : to implement CrudRepository
Service Interface and Implementation
Create ProductService.kt and ProductServiceImpl.kt in service package.
package com.example.demo.service

import com.example.demo.domain.Product

interface ProductService {
    fun createProduct(product: Product)
    fun findProductsByName(name: String): List<Product>
}
package com.example.demo.service

import com.example.demo.domain.Product
import com.example.demo.repository.ProductRepository
import org.springframework.beans.factory.annotation.Autowired
import org.springframework.stereotype.Service

@Service
class ProductServiceImpl(@Autowired val productRepository: ProductRepository): ProductService {
    override fun createProduct(product: Product) {
        productRepository.save(product)
    }

    override fun findProductsByName(name: String): List<Product> {
        return productRepository.findProductsByName(name)
    }
}
Notice how we used constructor injection as part of class header to inject ProductRepository.
Controller Class
Create ProductController.kt in controller package
package com.example.demo.controller

import com.example.demo.domain.Product
import com.example.demo.service.ProductService
import org.springframework.beans.factory.annotation.Autowired
import org.springframework.web.bind.annotation.*

@RestController
@RequestMapping("api/v1/products")
class ProductController(@Autowired val productService: ProductService) {

    @PostMapping
    fun createProduct(@RequestBody product: Product) {
        productService.createProduct(product)
    }

    @GetMapping("{name}")
    fun getProductsByName(@PathVariable("name") name: String): List<Product> {
        return productService.findProductsByName(name)
    }
}
Config Swagger UI
To configure Swagger UI add the following dependencies to pom.xml:
<dependency>
    <groupId>io.springfox</groupId>
    <artifactId>springfox-swagger2</artifactId>
    <version>2.9.2</version>
</dependency>
<dependency>
    <groupId>io.springfox</groupId>
    <artifactId>springfox-swagger-ui</artifactId>
    <version>2.9.2</version>
</dependency>
Create SwaggerConfig.kt in config package.
package com.example.demo.config

import org.springframework.context.annotation.Bean
import org.springframework.context.annotation.Configuration
import springfox.documentation.builders.PathSelectors
import springfox.documentation.builders.RequestHandlerSelectors
import springfox.documentation.spi.DocumentationType
import springfox.documentation.spring.web.plugins.Docket
import springfox.documentation.swagger2.annotations.EnableSwagger2

@EnableSwagger2
@Configuration
class SwaggerConfig {
    @Bean
    fun api(): Docket = Docket(DocumentationType.SWAGGER_2)
            .select()
            .apis(RequestHandlerSelectors.any())
            .paths(PathSelectors.any())
            .build()
}
@EnableSwagger2 annotation will enable Swagger UI for this applicaton.
Now if you run the application and visit http://localhost:8080/swagger-ui.html, you will be able to persist/retrieve product using swagger-ui.

Code available on github.
Thank you for reading. Please leave a comment or questing.

Latest comments (0)