Laravel Voyager is a great tool for creating custom backends for all different kinds of apps or webapps. I used Voyager to create an app backend for a customer of mine. Beside some other functionalities, the app contains different kinds of recipes.
For every recipe, I need to store ingredients. Every ingredient has an amount, a unit and some text. In the end, an ingredient section could look a little like that:
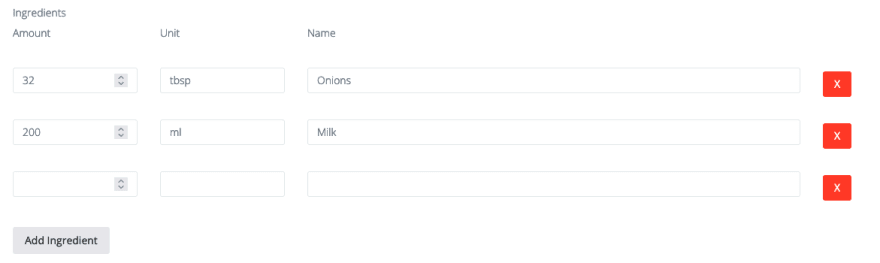
(No style applied yet, though)
So what I needed to do is create a repeatable field with multiple inputs. Every Input should be able to be deleted again.
Here are the 5 steps we need to take to get that thing working:
1. Add your field to the database
For this example, we will store the ingredients as JSON in the recipe-table to keep it simple.
You could (or should) use another table for the products as well and store the ingredient-connection in a meta-table. Especially if you want to filter recipes based on the ingredients or implement other ingredient-based functionalities, this might be a thing.
I think JSON is okay here in this example. As a first step, we thus have to add a field called "ingredients" that contains "LONGTEXT" or "JSON" to the recipe-table:
![]()
2. Register your custom form field
To use a custom field in BREAD, we need to create a custom form field and register it. First, let's create a new folder and a new file in app/FormFields/IngredientsFormField.php:
namespace App\FormFields;

use TCG\Voyager\FormFields\AbstractHandler;

class IngredientsFormField extends AbstractHandler
{
    protected $codename = 'ingredient';

    public function createContent($row, $dataType, $dataTypeContent, $options)
    {
        return view('formfields.ingredients', [
            'row' => $row,
            'options' => $options,
            'dataType' => $dataType,
            'dataTypeContent' => $dataTypeContent
        ]);
    }
}
If you use this code-snippet, just keep in mind to change the codename and the path of the view based on your needs.
We now need to tell Voyager to use this form field in BREAD. This can be done in the register()-function in AppServiceProvider.php:
use TCG\Voyager\Facades\Voyager;
use App\FormFields\IngredientsFormField;
...
public function register()
{
    Voyager::addFormField(IngredientsFormField::class);
}
When creating a BREAD, we should now be able to choose our custom form field type as input type:

Note: The Edit-Page for BREAD-Elements now wont work anymore, because we didn't create a view for the form field already. That will be our next step.
3. Create your View
We create two new files for managing the view-layout in the customer backend. First, we create app/resources/views/formfields/ingredients.blade.php.
This view will contain the main logic of my input field. The path to this view is specified in app/FormFields/IngredientsFormField.php.
Next, let's check if there are already ingredients stored in the database. If they are, we decode the JSON and store it in a variable.
Afterwards, we add some markup for the table header.
If we already have data in the database, we create rows for every ingredient by including a subview. We could use custom components here as well.
If we have no data, we create an empty ingredient-row.
At the end we provide a button to add more ingredients.
@php
    $data = json_decode($dataTypeContent->ingredients);
@endphp

<div id="ingredients-container">
    <div class="ingredients-header-row row">
        <div class="voyager-header-col col-md-2">
            <p class="control-label">
                Amount
            </p>
        </div>
        <div class="voyager-header-col col-md-2">
            <p class="control-label">
               Unit
            </p>
        </div>
        <div class="voyager-header-col col-md-8">
            <p class="control-label">
                Name
            </p>
        </div>
    </div>

    @if ($data)
        @foreach ($data as $row)
            @include('formfields.parts.ingredient', ['index' => $loop->index, 'row' => $row])
        @endforeach
    @else
        @include('formfields.parts.ingredient')
    @endif
</div>
<button type="button" name="add" id="addIngredient" class="btn btn-light">Add Ingredient</button>
In app/resources/views/formfields/parts/ingredient.blade.php we create the markup for a single ingredient view.
By default, if we have no row to display, we use an empty row and start our count by zero. We will also add a delete-button for each row already.
@php
    $default_row = new \stdClass();
    $default_row->unit = "";
    $default_row->amount = "";
    $default_row->ingredient = "";
    $row = $row ?? $default_row;
    $index = $index ?? 0;
@endphp

<div class="row ingredients-row" id="ingredients-row-{{$index}}" data-index="{{$index}}">
    <div class="col-md-2">
        <input
            type="number"
            class="form-control ingredients-amount"
            name="ingredients[{{$index}}][amount]"
            required
            value="{{$row->amount}}"
        />
    </div>
    <div class="col-md-2">
        <input
            type="text"
            class="form-control ingredients-units"
            name="ingredients[{{$index}}][unit]"
            required
            value="{{$row->unit}}"
        />
    </div>
    <div class="col-md-7">
        <input
            type="text"
            class="form-control ingredients-ingredie"
            name="ingredients[{{$index}}][ingredient]"
            required
            value="{{$row->ingredient}}"
        />
    </div>
    <div class="col-md-1 remove-ingredients-col">
        <button class="btn btn-danger remove-ingredients-row-btn" data-remove-row={{$index}}>
            X
        </button>
    </div>
</div>
As you can see, I wrote the names of the inputs in array-notion.
This way, we submit the data as array without extra code needed. We are basically creating an ingredients-array, where each row is a new array-element. anto.online did a pretty good job describing how this works over here.
Those elements further contain the amount, the unit and the ingredient. This provides the following structure in the database:
[
    {
        "amount":"200",
        "unit":"ml",
        "ingredient":"Milk"
    },
    {
        "amount":"50",
        "unit":"ml",
        "ingredient":"Water"
    }
]
After finishing the view, the edit-page should work again. We should also be able to insert one ingredient already. To make the field repeatable, we need to add some Javascript.
4. Make it repeatable
We create a new file: public/js/ingredients.js.
This file will contain all the code to make the field repeatable. We use vanilla Javascript here, but you can, of course, use whatever library you like.
To use the file, I added it to webpack.mix.js:
.js('resources/js/ingredients.js', 'public/js')
I also added the file to the existing additional_js-array in config/voyager.php.
'additional_js' => [
    'js/ingredients.js',
],
As we are working with Javascript now, we need to make sure we are compiling our code as well.
If you didn't change the package.json already, compiling should work with npm run watch or yarn watch.
In the Javascript-file, we add three functions:
- main
- addIngredientRow
- removeIngredientRow
The main-function is looking for the addIngredient-Button. If this button exists on the page, it adds the addIngredientRow-function to the button. It also adds the removeIngredientRow -function to all the remove-buttons.
addIngredientRow clones the first row, clears it, sets the id to the current row count and appends it as a new, clean row to the container.
removeIngredientRow removes the current row from the DOM by using the remove-row-dataset.
const addIngredientRow = (firstRow) => {

    const rowsCount = document.querySelector(".ingredients-row:last-child").dataset.index + 1;

    const newRow = firstRow.cloneNode(true);

    newRow.id = `ingredients-row-${rowsCount}`;
    newRow.dataset.index = rowsCount;
    newRow.querySelector('.ingredients-amount').setAttribute('name', `ingredients[${rowsCount}][amount]`);
    newRow.querySelector('.ingredients-amount').value = "";
    newRow.querySelector('.ingredients-units').setAttribute('name', `ingredients[${rowsCount}][unit]`);
    newRow.querySelector('.ingredients-units').value = "";
    newRow.querySelector('.ingredients-ingredients').setAttribute('name', `ingredients[${rowsCount}][ingredient]`);
    newRow.querySelector('.ingredients-ingredients').value = "";
    newRow.querySelector('.remove-ingredients-row-btn').dataset.removeRow = rowsCount;
    newRow.querySelector('.remove-ingredients-row-btn').addEventListener('click', (e) => {removeIngredientRow(e)}, false);
    document.querySelector('#ingredients-container').appendChild(newRow);
}

const removeIngredientRow = (e) => {
    e.preventDefault();
    document.querySelector(`#ingredients-row-${e.currentTarget.dataset.removeRow}`).remove();
}

const main = () => {
    if(document.querySelector("#addIngredient")) {
        const firstRow = document.querySelector("#ingredients-row-0");
        const addButton = document.querySelector("#addIngredient");
        addButton.addEventListener('click', () => {addIngredientRow(firstRow), false});

        const removeButtons = document.querySelectorAll(".remove-ingredients-row-btn");
        removeButtons.forEach((btn) => {
            btn.addEventListener('click', (e) => {removeIngredientRow(e)}, false);
        })
    }
}

main();
If you are working with JSON-values as well, this should already work for you most of the time. In some cases, we might need to change the save-function to encode the JSON-values. Let's take a look at that in step five.
Note:
Your Javascript-code is not working? Try to restart npm run watch. It could also be necessary to restart php artisan serve. In some cases you might need to clear your config by running php artisan config:cache before running php artisan serve.
5. Save your data
If JSON is not working right away or you would like to store the data in another way, you will need to override the save-method of your model.
You should find your model-file in your app or your app\modelfolder. Most of the time, it has the same name as your BREAD. If you can't find it, just create a file in your app-folder that containins the following code.
<?php

namespace App;

use Illuminate\Database\Eloquent\Model;

class Recipe extends Model
{

}
Don't forget to add the model to your BREAD:
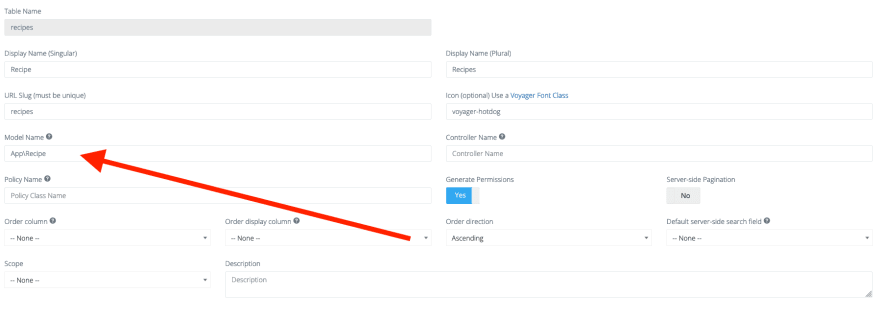
If you want to work with the input-field now, just extend the save-method of your model. In my example, I performed a JSON-encode on my ingredients. You can do whatever you like here.
<?php

namespace App;

use Illuminate\Database\Eloquent\Model;

class Recipe extends Model
{
   public function save(array $options = [])
    {
                // Do whatever you want
        $this->ingredients = json_encode(request()->input('ingredients'));
        parent::save();
    }
}
That's it.
We created a custom repeatable formfield in Laravel Voyager in just five steps. Hope this works for you as well. Thanks for reading!
P. S. I am planning to do more Laravel and Laravel Voyager Content. Follow me on Twitter @dominikjosch, if you don't want to miss it.
Stats, Sources, Versions
I used Laravel v8.76.2 and Voyager v1.5 for this example. You can find a tutorial on how to create a custom formfield in Voyager in the official documentation as well.

Top comments (0)