
Introduction
Like REST, GraphQL also allows the client to make changes to data that’s currently stored in the backend. In GraphQL, these changes are made using mutations which is nothing but a type of operation that allows creating, updating, and deleting data. For the read operation, we used GraphQL query type (explained in the article “Build an API in .NET Core with GraphQL”), which is completely flexible, and based on the requirement that the user/client decides what data is actually needed.
As we know, GraphQL specifies three types that are used to perform operations of a GraphQL server.
- Query - Used for retrieving data based on needs.
- Mutation – Used for making changes to the data/entity.
- Subscription – Used for real-time updates on important events.
Related reads:
Part 1 - Build an API in .NET Core with GraphQL
Implementing GraphQL Mutation with ASP.NET Core
In this article, we will be going to add a mutation type that allows users to modify a tech event entity into the DB. This article is a continuation of the previous one which is mentioned in related reads.
First, we're going to make some changes to model and repositories which will allow inserting, updating, and deleting on tech event entity. Next, we're going to create new GraphQL types that we need in order to enable the mutation. And then we will update the schema so that mutation will be available to the client/user and then create a mutation and test is though GraphiQL UI as well as Postman.
Create models and add methods to the repository
Add a folder called Models into the project (which we build earlier here) and add a new model called NewTechEventRequest.cs into it which basically contains properties that are required to create a new tech event and save into DB.
NewTechEventRequest.cs
using System;
namespace GraphQL.API.Models
{
    public class NewTechEventRequest
    {
        public string EventName { get; set; }
        public string Speaker { get; set; }
        public DateTime EventDate { get; set; }
    }
}
Now we are going to add the below 3 methods to our repository interface.
ITechEventRepository.cs
Task<TechEventInfo> AddTechEventAsync(NewTechEventRequest techEvent);
Task<TechEventInfo> UpdateTechEventAsync(TechEventInfo techEvent);
Task<bool> DeleteTechEventByIdAsync(TechEventInfo techEvent);
And implement those methods into TechEventRepository.cs.
public async Task<TechEventInfo> AddTechEventAsync(NewTechEventRequest techEvent)
{
    var newEvent = new TechEventInfo { EventName = techEvent.EventName, Speaker = techEvent.Speaker, EventDate = techEvent.EventDate };
    var savedEvent = (await _context.TechEventInfo.AddAsync(newEvent)).Entity;
    await _context.SaveChangesAsync();
    return savedEvent;
}

public async Task<bool> DeleteTechEventByIdAsync(TechEventInfo techEvent)
{
    _context.TechEventInfo.Remove(techEvent);
    await _context.SaveChangesAsync();
    return true;
}

public async Task<TechEventInfo> UpdateTechEventAsync(TechEventInfo techEvent)
{
    var updatedEvent = (_context.TechEventInfo.Update(techEvent)).Entity;
    await _context.SaveChangesAsync();
    return updatedEvent;
}
Create GraphQL input type
Next, we're going to update the schema. To do this, create a GraphQL input type which will correspond with the NewTechEventRequest model that we just created. This is the type that we are going to send from a client as an argument to mutation.
Right click on GraphqlCore folder, then add a new class called TechEventInputType.cs and add below-mentioned code.
TechEventInputType.cs
using GraphQL.Types;
namespace GraphQL.API.GraphqlCore
{
    public class TechEventInputType : InputObjectGraphType
    {
        public TechEventInputType()
        {
            Name = "AddEventInput";
            Field<NonNullGraphType<StringGraphType>>("eventName");
            Field<StringGraphType>("speaker");
            Field<NonNullGraphType<DateGraphType>>("eventDate");
        }
    }
}
The TechEventInputType class derives from the InputObjectGraphType class and in the constructor, we just populate the Name property and added three fields.
Here:
- InputObjectGraphType – used to define an input type and this is going to tell GraphQL that this is an input type.
- NonNullGraphType – used to require a non-null values.
- StringGraphType – used to define a string field.
- DateGraphType – used to define a date field.
Create Mutation
Create the TechEventMutation class inside the GraphqlCore folder.
TechEventMutation.cs
using GraphQL.API.Infrastructure.Repositories;
using GraphQL.Types;
using GraphQL.API.Models;
using GraphQL.API.Infrastructure.DBContext;

namespace GraphQL.API.GraphqlCore
{
    public class TechEventMutation : ObjectGraphType<object>
    {
        public TechEventMutation(ITechEventRepository repository)
        {
            Name = "TechEventMutation";

            FieldAsync<TechEventInfoType>(
                "createTechEvent",
                arguments: new QueryArguments(
                    new QueryArgument<NonNullGraphType<TechEventInputType>> { Name = "techEventInput" }
                ),
                resolve: async context =>
                {
                    var techEventInput = context.GetArgument<NewTechEventRequest>("techEventInput");
                    return await repository.AddTechEventAsync(techEventInput);
                });
        }
    }
}
Inside the constructor, the name is the name of the mutation and field with the name createTechEvent, which will return the TechEventInfoType object.
When we create a tech event, we are going to pass an instance of an argument of type TechEventInputType, with a variable name “techEventInput” that we provide in GraphQL. The resolve action is going to execute the AddTechEventAsync method from our repository to add data into DB.
TechEventSchema.cs
Mutation = resolver.Resolve<TechEventMutation>();
Update startup.cs class and register these types into ConfigureServices that we created so far.
services.AddSingleton<TechEventInputType>();
services.AddSingleton<TechEventMutation>();
Excellent, now we are done with adding Mutation into our project. Let’s start the project, and create a tech event from GraphiQL. We will see newly added schema details once it’s loaded to the browser.

Now it’s time to test it.
The syntactical structure of Mutations is similar to queries, but always starts with the mutation keyword. Below is the example to create a tech event.
mutation ($techEvent : AddEventInput!){
  createTechEvent(techEventInput : $techEvent){
    eventId,
    eventName,
    eventDate,
    participants{
      phone
    }
  }
}
Add the below variable to the Query Variables window:
{
  "techEvent": {
    "eventName": "Azure Devops CI/CD Demo",
    "speaker": "Anupam M",
    "eventDate": "2020-12-12"
  }
}

Here, we create a tech event with an argument called techEventInput and return the eventId, eventName, eventDate, participants of that newly added event. We used a variable called “techEvent” to pass in the techEventInput argument via the Query Variables window. On the right side of GraphiQL, we can see that event creation is successful and got the newly created tech event as a response.
Let’s test the same using Postman. We will use the below output as an example.

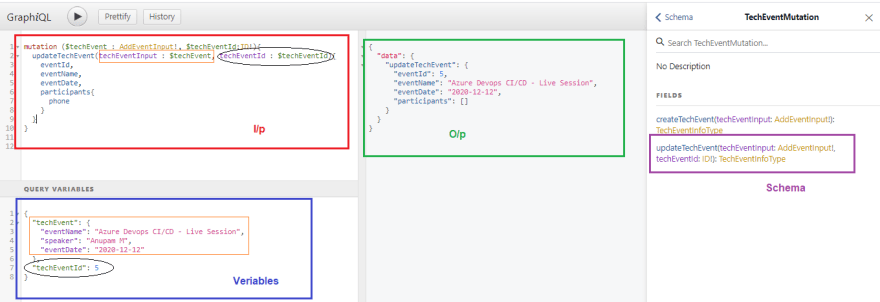
Update Mutation
Whatever we did for Create tech event, we can similarly do for an update tech event.pasting. Add an additional field into TechEventMutation.cs with the name “updateTechEvent”.
FieldAsync<TechEventInfoType>(
    "updateTechEvent",
    arguments: new QueryArguments(
        new QueryArgument<NonNullGraphType<TechEventInputType>> { Name = "techEventInput" },
        new QueryArgument<NonNullGraphType<IdGraphType>> { Name = "techEventId" }),
    resolve: async context =>
    {
        var techEventInput = context.GetArgument<TechEventInfo>("techEventInput");
        var techEventId = context.GetArgument<int>("techEventId");

        var eventInfoRetrived = await repository.GetTechEventById(techEventId);
        if (eventInfoRetrived == null)
        {
            context.Errors.Add(new ExecutionError("Couldn't find Tech event info."));
            return null;
        }
        eventInfoRetrived.EventName = techEventInput.EventName;
        eventInfoRetrived.EventDate = techEventInput.EventDate;

        return await repository.UpdateTechEventAsync(eventInfoRetrived);
    }
);
Now run the project again and test it.

When we pass a non-existing event during an update operation, we receive an error message which is expected as we defined it.
Delete Mutation
Similarly, add a new field for deleting an operation in the TechEventMutation.cs class and name it as “deleteTechEvent”.
FieldAsync<StringGraphType>(
    "deleteTechEvent",
    arguments: new QueryArguments(new QueryArgument<NonNullGraphType<IdGraphType>> { Name = "techEventId" }),
    resolve: async context =>
    {
        var techEventId = context.GetArgument<int>("techEventId");

        var eventInfoRetrived = await repository.GetTechEventById(techEventId);
        if (eventInfoRetrived == null)
        {
            context.Errors.Add(new ExecutionError("Couldn't find Tech event info."));
            return null;
        }
        await repository.DeleteTechEventByIdAsync(eventInfoRetrived);
        return $"Tech Event ID {techEventId} with Name {eventInfoRetrived.EventName} has been deleted succesfully.";
    }
);
Let’s run the project again and test it with the below mutation request:

mutation ($techEventId:ID!){
  deleteTechEvent(techEventId : $techEventId)
}
Query variable:
{
  "techEventId": 5
}

Awesome, isn’t it!
We are done with basic CRUD operations using GraphQL in ASP.NET Core.
All the source code described here can be found on GitHub.
Conclusion
In this article, we discussed the input type for the mutations, created different mutation actions, and performed CRUD operations on an entity by modifying mutation requests and testing it from GraphiQL as well as Postman. I hope you learned GraphQL API implementation with .NET Core using mutation and query type so far. Happy learning!

Top comments (0)