Pun very much intended…
With the release of Xamarin.Forms 4.1 arrives a new Checkbox control. Here is what it looks like:

Here are the two ways to instantiate it in XAML and C#
The Checkbox has a bindable property for the checked status (IsChecked) and you can handle the CheckedChanged event too.
A little thing
The control has a rounded shape on iOS if you want it to have a square shape you can use the Visual API.
For now, the CheckBox control doesn’t include a Text property and it doesn’t render a Label next to it, to achieve this you would need to explicitly include a Label control and align it next to it.
The result looks like this:

Other options
If you’re working on a legacy project or, for whatever reason, you are not able to update to Xamarin.Forms 4.1 but you are still looking to include a CheckBox here are a couple of options for you:
- Use the Switch control. In a practical/functional way, this is pretty much the same as a CheckBox in that you can manage on/off (true/false) states. The UI is certainly not that of a Checkbox but if all you need is the functionality this will be just fine.
- Use the Xamarin.Forms.InputKit library. It has been out for a while now so the team has had the time to include some neat features, like being able to set the label for the control, radio buttons and set a custom check icon to name a few.
Using the Xamarin.Forms.InputKit library
Like most third-party libraries in the Xamarin Ecosystem, it is very easy to set up and gives you access to a healthy variety of controls. We will focus on the Checkbox functionality, for now. I may write about the complete library on a later entry.
To set up the library just do as follows:
- Include the Xamarin.Forms.InputKit NuGet package in all your projects.
- Initialize it in your target projects by calling Plugin.InputKit.Platforms.iOS.Config.Init(); or Plugin.InputKit.Platforms.Droid.Config.Init(this, savedInstanceState); accordingly.
- Reference the library’s namespace in your XAML xmlns:input=”clr-namespace:Plugin.InputKit.Shared.Controls;assembly=Plugin.InputKit”.
- Prepend the input namespace to the controls you want to include.
To create a checkbox you would write something like this:


Same as the new Xamarin.Forms Checkbox control, the InputKit one includes a bindable property for the checked state called IsChecked and you can listen to the checked status changed status either with the event handler CheckChanged or with the command CheckChangedCommand.
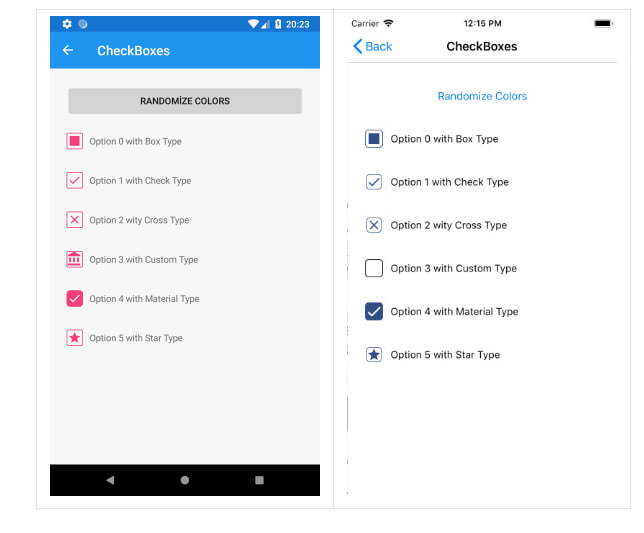
As mentioned before, this library has been around for some time some it includes a few more things than the new Xamarin Forms native Checkbox like the ability to include the checkbox’s label text and the type of checkbox you want to render. These are the different types:
I wrote a sample project here if you want to check it out https://github.com/eatskolnikov/CheckBoxSample
And that’s all folks, as always, I hope this information has been of use to you and if you liked it feel free to share it with your peers and check the other posts. Thanks, Bye!
The post Checking the new Checkbox in Xamarin.Forms 4.1 and overviewing InputKit control appeared first on Enmanuel Toribio.

Latest comments (0)