
Azure SQL is a fully managed cloud-based relational database service provided by Microsoft. It allows you to deploy and configure servers, instances, and databases quickly and easily. In this article, I will guide you through the process of deploying and configuring servers, instances, and databases for Azure SQL, including launching the three different types of SQL database options in Azure.

Step 1: Create an Azure account and sign in
To get started, create an Azure account if you haven't already and sign in to the Azure portal.
Step 2: Create a SQL server
To deploy a SQL server, click on "Create a resource" in the Azure portal, then search for "SQL Server". Select "SQL Server" from the list of results, then click on the "Create" button.
In the "Basics" tab, enter a name for your server, select the subscription, resource group, and location. Choose the pricing tier that meets your requirements and enter a username and password for the SQL administrator account. Click on the "Review + Create" button, then click on "Create" to create your SQL server.
Step 3: Create a SQL instance
Once your SQL server is created, you can create a SQL instance. Click on "Create a resource" in the Azure portal, then search for "SQL Database". Select "SQL Database" from the list of results, then click on the "Create" button.
In the "Basics" tab, select your subscription, resource group, and location. Enter a name for your database, then select the SQL server you created in the previous step. Choose the pricing tier that meets your requirements, then click on the "Review + Create" button. Finally, click on "Create" to create your SQL instance.
Step 4: Create a SQL managed instance
To create a SQL managed instance, click on "Create a resource" in the Azure portal, then search for "SQL Managed Instance". Select "SQL Managed Instance" from the list of results, then click on the "Create" button.
In the "Basics" tab, enter a name for your managed instance, select your subscription, resource group, and location. Choose the pricing tier that meets your requirements, then click on the "Review + Create" button. Finally, click on "Create" to create your SQL managed instance.

You will get a confirmation that your deployment is complete.

Step 5: Connect to your SQL instance or managed instance
To connect to your SQL instance or managed instance, click on the instance in the Azure portal, then click on the "Connection strings" button. This will provide you with the necessary information to connect to your SQL instance or managed instance, including the server name and port, the database name, and the username and password.


Step 6: Launch a SQL database option in Azure
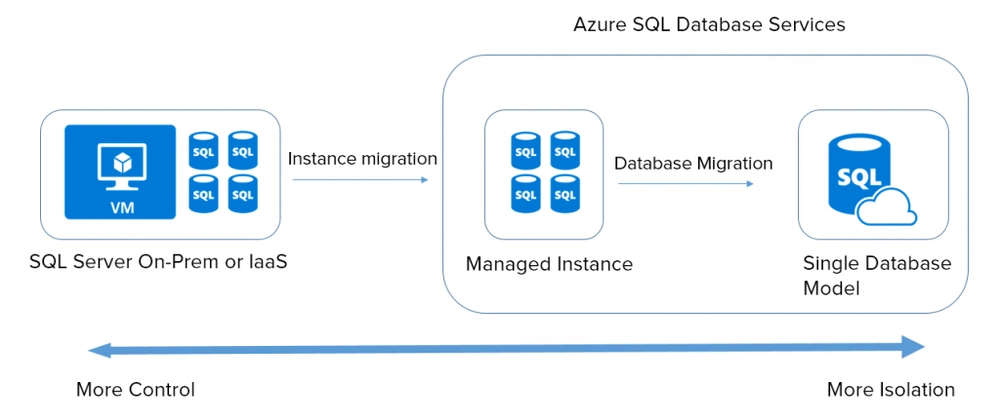
Azure SQL offers three different types of database options: single database, elastic pool, and managed instance. To launch each of these options, follow the steps outlined in steps 2-4 above.

Single database: A single database is a standalone database with its own set of resources, such as compute and storage. It's ideal for applications with predictable or variable workloads.
Elastic pool: An elastic pool is a collection of databases with a shared set of resources, such as compute and storage. It's ideal for applications with unpredictable or variable workloads.
Managed instance: A managed instance is a fully managed instance of SQL Server with native virtual network support. It's ideal for applications that require the full range of SQL Server features and functionality.
Deploying and configuring servers, instances, and databases for Azure SQL is a straightforward process that can be completed in just a few steps. By following the steps outlined in this article, you can quickly and easily launch the three different types of SQL database options in Azure.

Top comments (0)