
In this post, you’ll learn how to implement the easy to integrate Firebase Analytics in React Native apps.
Complete code of this post can be found in the Github repository react-native-firebase-analytics
What is analytics
Analysis is focused on understanding the past; what happened and why it happened. Analytics focuses on why it happened and what will happen next.
Analytics is a free app measurement solution that provides insight on app usage and user engagement.
Organizations may apply analytics to business data to describe, predict, and improve business performance. Specifically, areas within analytics include predictive analytics, prescriptive analytics, enterprise decision management, descriptive analytics, cognitive analytics, Big Data Analytics, retail analytics, supply chain analytics, store assortment and stock-keeping unit optimization, marketing optimization and marketing mix modeling, web analytics, call analytics, speech analytics, sales force sizing and optimization, price and promotion modeling, predictive science, credit risk analysis, and fraud analytics. Since analytics can require extensive computation (see big data), the algorithms and software used for analytics harness the most current methods in computer science, statistics, and mathematics
Why is analytics important?
Internet marketing without analytics is like pointing at NYC and saying “the building is somewhere in there.” Internet marketing with analytics is akin to pinpointing the exact location of a specific building using satellite technology.
Analytics allow you to quantify the effects of making a change to your marketing strategy, and that’s invaluable to the process of improving and optimizing online marketing campaigns. The biggest benefit of utilizing proper analytics is being able to identify strengths and weaknesses.
Analytics essentially allow for a defined path of optimization that leads to better results on all fronts.
What is React-Native
TLDR; — React Native (RN) apps are more “native” than webview apps made by Cordova / Ionic. But React Native is yet to release a stable (1.0.0_) version of the framework.
React Native is a JavaScript framework for writing natively rendering mobile applications. It’ is based on React, Facebook’s JavaScript library for building user interfaces, but instead of targeting the browser, it targets mobile platforms. Because most of the code you write can be shared between platforms, React Native makes it easy to simultaneously develop for both Android and iOS.
React Native applications render using real mobile UI components, not webviews, and will look and feel like any other native mobile application. React Native also exposes JavaScript interfaces for platform APIs, so your React Native apps can access platform features like the phone camera, or the user’s location. Facebook, Palantir, TaskRabbit etc are already using it in production for user-facing applications.

Firebase
Firebase is a Backend-as-a-Service (BaaS) platform. It started as a YC11 startup and grew up into a next-generation app-development platform on Google Cloud Platform. It is getting popular by the day because of the ease of integration and a variety of functionalities available on it.
Some of the quick integrations available with Firebase are
- Email Authentication
- Social logins
- Real-time database
- Analytics
- Crashlytics
- Push notifications
- In-app messages
- Remote config
and much more. Firebase is quickly growing to become the most popular mobile app back-end platform.
Enough of story-telling, let’s dive into — how to implement analytics in React Native apps
Structure
I will go ahead in step-by-step fashion so you can follow easily.
- Create a Firebase project and find analytics options
- Create a basic React Native app
- Running the app on a device
- Install firebase analytics dependency
- Implement analytics in your app
- Send analytics event from app to firebase dashboard
- Check this event on Firebase dashboard.
So let’s dive right in!

1. Create a Firebase project and find analytics options
Go to Firebase and create your first project (or use an existing one). Your console should look like this

Note — It’s really easy to create a Firebase project, but if you still face any issue, follow step 1–4 of this blog
Click on your project and you’ll enter the project’s dashboard. Look for the Analytics tab. This is where the magic will happen!

For setting up options, you’ll first have to create an Android app in Firebase console.
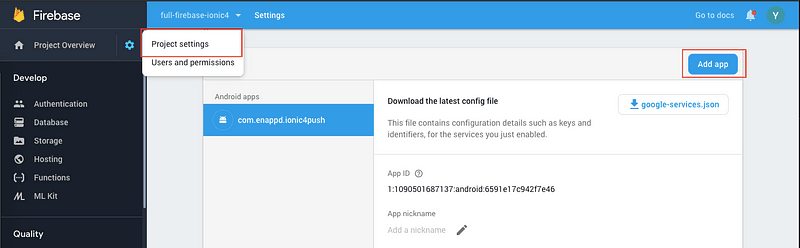
During the process, it will ask you to enter app’s package name and provide google-services.json. Make sure you keep the package name same as what you are setting in config.xml of your app. (If we create a new project called “HelloWorld” using react native CLI, by default package name for android project will be “com.helloworld” and default bundle identifier for iOS app will be “org.reactjs.native.example.HelloWorld”., don’t use the default package name)

2. Create a basic React Native app
First, make sure you have all pre-requisites to create a react-native app as per the official documentation.
At the time of this post, I have React-Native version 0.60
Create a blank react-native app (Replace myApp with your own name)
$ react-native init myApp
This will create a basic React-native app which you can run in a device or simulator. (either Android or iOS)
Step 3: Running the app on a device
To run the iOS app, you should specify simulator
react-native run-ios --simulator=”iPhone X”To run Android app, you should start emulator first, either via Android Studio or adb , then call
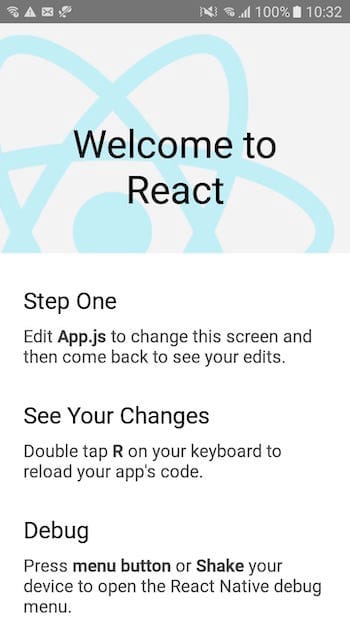
react-native run-androidYou’ll see the default start screen
4. Install firebase analytics dependency
Install this module with Yarn:
yarn add @react-native-firebase/analytics
yarn add @react-native-firebase/app
Need to install the module manually? Follow this guide installation guides.
Android:-
The following steps are only required if you are using React Native <= 0.59 or need to manually integrate the library.
Update Gradle Settings
Add the following to your projects /android/settings.gradle file:
include ':@react-native-firebase_analytics'
project(':@react-native-firebase_analytics').projectDir = new File(rootProject.projectDir, './../node_modules/@react-native-firebase/analytics/android')
Update Gradle Dependencies
Add the React Native Firebase module dependency to your /android/app/build.gradle file:
dependencies {
...
implementation project(path: ":@react-native-firebase_analytics")
}
Add package to the Android Application
Import and apply the React Native Firebase module package to your /android/app/src/main/java/**/MainApplication.java file:
Import the package:
import io.invertase.firebase.analytics.ReactNativeFirebaseAnalyticsPackage;Add the package to the registry:
protected List<ReactPackage> getPackages() {
return Arrays.asList(
new MainReactPackage(),
new ReactNativeFirebaseAnalyticsPackage(),
Rebuild the project
Once the above steps have been completed, rebuild your Android project:
react-native run-androidiOS:-
The following steps are only required if you are using React Native <= 0.59 or need to manually integrate the library.
Installation can be done via CocoaPods (recommended) or via Frameworks:
1. CocoaPods Installation
Add the RNFBAnalytics Pod
Add the RNFBAnalytics Pod to your projects /ios/Podfile:
target 'app' do
...
pod 'RNFBAnalytics', :path => '../node_modules/@react-native-firebase/analytics/ios'
end
Update Pods & rebuild the project
You may need to update your local Pods in order for the RNFBAnalytics Pod to be installed in your project:
$ cd /ios/
$ pod install --repo-update
Once the Pods have installed locally, rebuild your iOS project:
react-native run-ios2. Manual Framework Installation
If your environment does not have access to Cocopods, it is still possible to install the project via Frameworks.
TODO
Device Identification
If you would like to enable Firebase Analytics to generate automatic audience metrics for iOS (as it does by default in Android), you must link additional iOS libraries, as documented by the Google Firebase team. Specifically you need libAdIdAccess.a and AdSupport.framework.
The way to do this using Cocoapods is to add this to your Podfile (though please use the most current Pod version supported by react-native-firebase):
ios/Podfile:
// ..
target 'app' do
// ..
pod 'RNFBAnalytics', :path => '../node_modules/@react-native-firebase/analytics/ios'
pod 'GoogleIDFASupport', '~> 3.14.0'
end
5. Implement analytics in your app
The Analytics package will automatically start tracking events such as when users clear app data, dismiss notifications and more. To view the full list of automatic events, see this page of the official Firebase documentation.
The package also provides a JavaScript API to allow for logging custom events and metrics throughout your application.
Import the Cloud Functions package into your project:
import analytics from '@react-native-firebase/analytics';The package also provides access to the firebase instance:
import { firebase } from '@react-native-firebase/analytics';Custom events
To log a custom event, use the logEvent method:
import analytics from '@react-native-firebase/analytics';
async function onProductView() {
     await analytics().logEvent('product_view', {
                 id: '123456789',
                 color: 'red',
                 via: 'ProductCatalog',
      });
}
Attaching user data
User data can be attached to analytical events via the setUserId, setUserProperties and setUserProperty methods. Each Firebase project can have up to 25 uniquely named (case-sensitive) user properties.
import analytics from '@react-native-firebase/analytics';
async function onSignIn(user) {
 await Promise.all([
   analytics().setUserId(user.uid),
   analytics().setUserProperty('account_balance', user.balance),
 ]);
}
Tracking screen names
Similar to Analytics on the web, it’s important to understand the user’s journey within your application, for example, tracking drop off points during an e-commerce transaction flow. The Analytics package provides a method called setCurrentScreen to help track this.
import React, { useEffect } from 'react';
import { View } from 'react';
import analytics from '@react-native-firebase/analytics';
function BasketScreen() {
async function trackScreenView(screen) {
    // Set & override the MainActivity screen name
    await analytics().setCurrentScreen(screen, screen);
}
// Track a screen view once the component has mounted
useEffect(() => {
    trackScreenView('BasketScreen');
}, []);
  return <View />;
}
Resetting analytics data
In some cases, resetting all analytics data is required on certain events such as signing out of the application. To achieve this call the resetAnalyticsData method.
import analytics from '@react-native-firebase/analytics';
async function onSignOut() {
    await analytics().resetAnalyticsData();
}
Reserved Events
The Analytics package works out of the box, however a number of events are automatically reported to Firebase. These event names are called as ‘Reserved Events’. Attempting to send any custom event using the logEvent method with any of the following event names will throw an error.
Reserved event list
app_clear_dataapp_uninstallapp_updateerrorfirst_openfirst_visitfirst_visitfirst_open_timefirst_visit_timein_app_purchasein_app_purchasenotification_dismissnotification_foregroundnotification_opennotification_receiveos_updatesession_startscreen_viewuser_engagementad_impressionad_clickad_queryad_exposureadunit_exposuread_activeiew
6. Send analytics event from app to firebase dashboard
Prepare a simple event from our app and send it to all Firebase console. For sending app event to dashboard I am just creating one component named it Analytics.js
Import this component to your app.js File like this.

We have added three buttons here for three events
- Custom Event
- Set User Event
- Reset Analytics Data Event
So when you click on any of these buttons you can your app events recorded in Firebase dashboard.
7. Check this event on Firebase dashboard.
Attention: if the app is running with -FIRDebugEnabled it shouldn't take more than a few seconds for events to start appearing on the DebugView.
Dashboard View:-

Event View:-

Event Details View:-

Conclusion
In this post, we learnt how to implement Analytics using Firebase in React native apps. We also learnt how to handle different types of actions and see their data in the dashboard.
Complete code of this post can be found in the Github repository react-native-firebase-analytics(master branch)
Next Steps
Now that you have learnt about setting up Analytics in React Native apps, here are some other topics you can look into
- Firebase — Integrate Firebase | Push notifications | Firebase CRUD
- How To in React Native — Geolocation | Life cycle hooks | Image Picker | Redux implementation | Make API calls | Navigation | Translation | Barcode & QR code scan | Send & Read SMS | Google Vision
- Payments — Apple Pay | Stripe payments
- Authentication — Google Login| Facebook login | Phone Auth | Twitter login | Anonymous Login
- Create Instagram / Whatsapp Story Feature in React Native
- React Native life cycle hooks | Implement Redux | Async actions with Redux
- Create Awesome Apps in React Native using Full App
If you need a base to start your next React Native app, you can make your next awesome app using React Native Full App


Oldest comments (0)