


From P1 Port to Home Assistant in 4 Hours: Reading a Belgian Smart Meter with ESP32
I wanted one simple thing: get the actual data from my Belgian digital meter into Home Assistant.
No cloud service in between. No external energy-monitoring platform. No additional current clamps measuring something the smart meter already knows.
The idea:
Belgian digital meter
↓
P1 / DSMR
↓
ESP32
↓
ESPHome
↓
Home Assistant
About four hours after starting the project, that was exactly what I had.
And the P1 connection turned out to provide considerably more than just a total electricity reading: live import and export, three-phase measurements, quarter-hour demand, the monthly peak and even my water meter.
The last one led to another small addition: turning a cumulative water-meter reading into a useful Home Assistant state answering a much simpler question:
Is water being used right now?
This is how I built it.
Why P1?
My house already runs Home Assistant, and I'm gradually bringing more of its technical systems together into one local interface.
The electricity meter is an obvious source of useful data.
What I wanted:
current grid consumption
current grid injection
electricity consumption for tariff 1 and tariff 2
electricity injection for tariff 1 and tariff 2
voltage and current on all three phases
import and export power per phase
current quarter-hour demand
maximum demand for the current month
electricity interruptions
cumulative water consumption
whether water is currently being used
Most importantly, I wanted the data to remain local.
The digital meter already measures most of this. Adding another energy meter or a set of current clamps just to measure the same thing again seemed unnecessary.
The P1 port is already there. So I decided to use it.
Hardware
The hardware:
Smart meter: Belgian digital electricity meter with an enabled P1 port
Controller: ESP32 development board
Connection: RJ12 6P6C
Pull-up: 10 kΩ resistor
Power: separate power supply for the ESP32
Firmware: ESPHome
Automation: Home Assistant
The ESP32 I used is configured as a standard esp32dev.
For the serial connection, I'm using GPIO16 as the receive pin.
The actual installation:

The actual ESP32 P1 reader installed in my electrical cabinet. The annotations show the P1 signals used in this installation, including the separate Data Request and power connections, both ground references and the data connection to GPIO16.
P1 connections:
Pin 1 — +5 V: P1 power supply
Pin 2 — Data Request: held high to request telegrams
Pin 3 — Data GND: ground reference for the data signal
Pin 4 — NC: not connected
Pin 5 — Data: serial data to GPIO16
Pin 6 — Power GND: ground for the P1 power supply
Why two positive and two ground connections?
At first glance, the wiring can look a little strange.
There are two connections on the positive side because they serve different purposes.
Pin 1 provides +5 V, while pin 2 is Data Request. Data Request needs to be held high for the meter to transmit its telegrams.
Likewise, there are two ground connections:
Pin 3: Data GND
Pin 6: Power GND
They ultimately share the same ground reference in this installation, but they have different functions on the P1 connector.
⚠️ Lesson learned the hard way:
Don't copy RJ12 wire colours from someone else's cable.
I did that once with a Home Assistant Zigbee dongle because I assumed two cables used the same colour scheme.
The dongle did not appreciate that at all.
Always identify the connector pins and signals first. Treat the wire colours as nothing more than colours.
I first tried powering the ESP32 from P1
Initially, I wanted the entire thing to run from the P1 connection.
The ideal situation:
P1
├── data
└── power
↓
ESP32
One connection for everything.
So I tested it.
In my particular setup, however, powering the ESP32 from the P1 connection wasn't reliable enough. The ESP32 did not operate consistently from the P1 supply alone.
During troubleshooting I switched to a separate power source.
That turned out to be useful for another reason: it separated two completely different possible problems.
Is my P1 communication broken, or is the ESP32 simply not being powered reliably?
With separate power, I could debug the data connection independently.
Once everything worked, I decided to keep the ESP32 on a separate regulated supply rather than depending on the P1 port for power.
This isn't meant as a universal statement that an ESP32 can never be powered from P1.
It's simply what I found while testing this installation:
P1 power wasn't reliable enough for my ESP32, while separate power was.
First problem: no data
The next problem had nothing to do with ESPHome.
My P1 port wasn't enabled.
You can have:
correct wiring
a working ESP32
the right UART configuration
a perfectly valid ESPHome configuration
…and still receive absolutely nothing if the meter isn't transmitting.
After activating the P1 port through the grid operators website, telegrams started arriving.
💡 Lesson learned:
Before debugging the receiver, make sure the transmitter is actually transmitting.
ESPHome
The ESP32 runs ESPHome using ESP-IDF.
ESP32 configuration:
esphome:
name: p1-meter
friendly_name: P1 Meter
esp32:
board: esp32dev
framework:
type: esp-idf
UART configuration:
uart:
id: p1_uart
rx_pin:
number: GPIO16
inverted: true
baud_rate: 115200
rx_buffer_size: 1700
And then ESPHome's DSMR component handles the telegram:
dsmr:
uart_id: p1_uart
max_telegram_length: 1700
water_mbus_id: 1
Once a valid DSMR telegram appeared in the logs, most of the difficult debugging was over.
The rest was largely a matter of deciding which data I actually wanted to expose.
Electricity totals and live power
Grid import and export:
sensor:
-
platform: dsmr
energy_delivered_tariff1:
name: "Afname tarief 1"energy_delivered_tariff2:
name: "Afname tarief 2"energy_returned_tariff1:
name: "Injectie tarief 1"energy_returned_tariff2:
name: "Injectie tarief 2"power_delivered:
name: "Actueel afnamevermogen"power_returned:
name: "Actueel injectievermogen"
That gives me the cumulative electricity counters for both tariffs as well as the current direction of power flow.
Home Assistant therefore knows whether the house is currently consuming electricity from the grid or injecting electricity back into it.
Three-phase data
My installation is three-phase, and the P1 telegram exposes measurements for each phase.
Voltage and current:
voltage_l1:
name: "Spanning L1"
voltage_l2:
name: "Spanning L2"
voltage_l3:
name: "Spanning L3"
current_l1:
name: "Stroom L1"
current_l2:
name: "Stroom L2"
current_l3:
name: "Stroom L3"
Power in both directions:
power_delivered_l1:
name: "Afnamevermogen L1"
power_delivered_l2:
name: "Afnamevermogen L2"
power_delivered_l3:
name: "Afnamevermogen L3"
power_returned_l1:
name: "Injectievermogen L1"
power_returned_l2:
name: "Injectievermogen L2"
power_returned_l3:
name: "Injectievermogen L3"
Instead of only knowing the total power consumption of the house, I can see exactly how that load is distributed over L1, L2 and L3.
From monitoring to something more useful
This is where the project becomes particularly interesting.
The meter exposes the current average quarter-hour demand:
active_energy_import_current_average_demand:
name: "Huidige kwartierpiek"
And the maximum demand recorded during the running month:
active_energy_import_maximum_demand_running_month:
name: "Maandpiek"
These aren't values I'm reconstructing myself from thousands of Home Assistant samples.
They come directly from the meter through DSMR.
For my Flemish installation, those values are particularly interesting because peak demand is relevant to the capacity tariff.
But more importantly, they give Home Assistant information it could eventually act upon.
From monitoring to control:
And suddenly, the project becomes more than a way of making energy graphs.
It could become the foundation for an actual Energy Management System (EMS) in the future.
Instead of simply visualizing the quarter-hour peak, Home Assistant could eventually use this data to actively manage flexible loads — and, with a home battery added later, decide when storing or using energy makes the most sense.
The evolution:
Measure → Understand → Decide → Control
For example:
Quarter-hour demand approaching target
↓
Home Assistant
↓
postpone flexible load
↓
reduce the peak
The ESP32 isn't an EMS.
But it could provide some of the real-time data an EMS needs to make useful decisions.
From raw P1 data to one Home Assistant screen
Once the ESP32 was communicating correctly, ESPHome exposed the sensors through its native API and they became normal Home Assistant entities.
I then brought the useful information together in my own touchscreen interface.
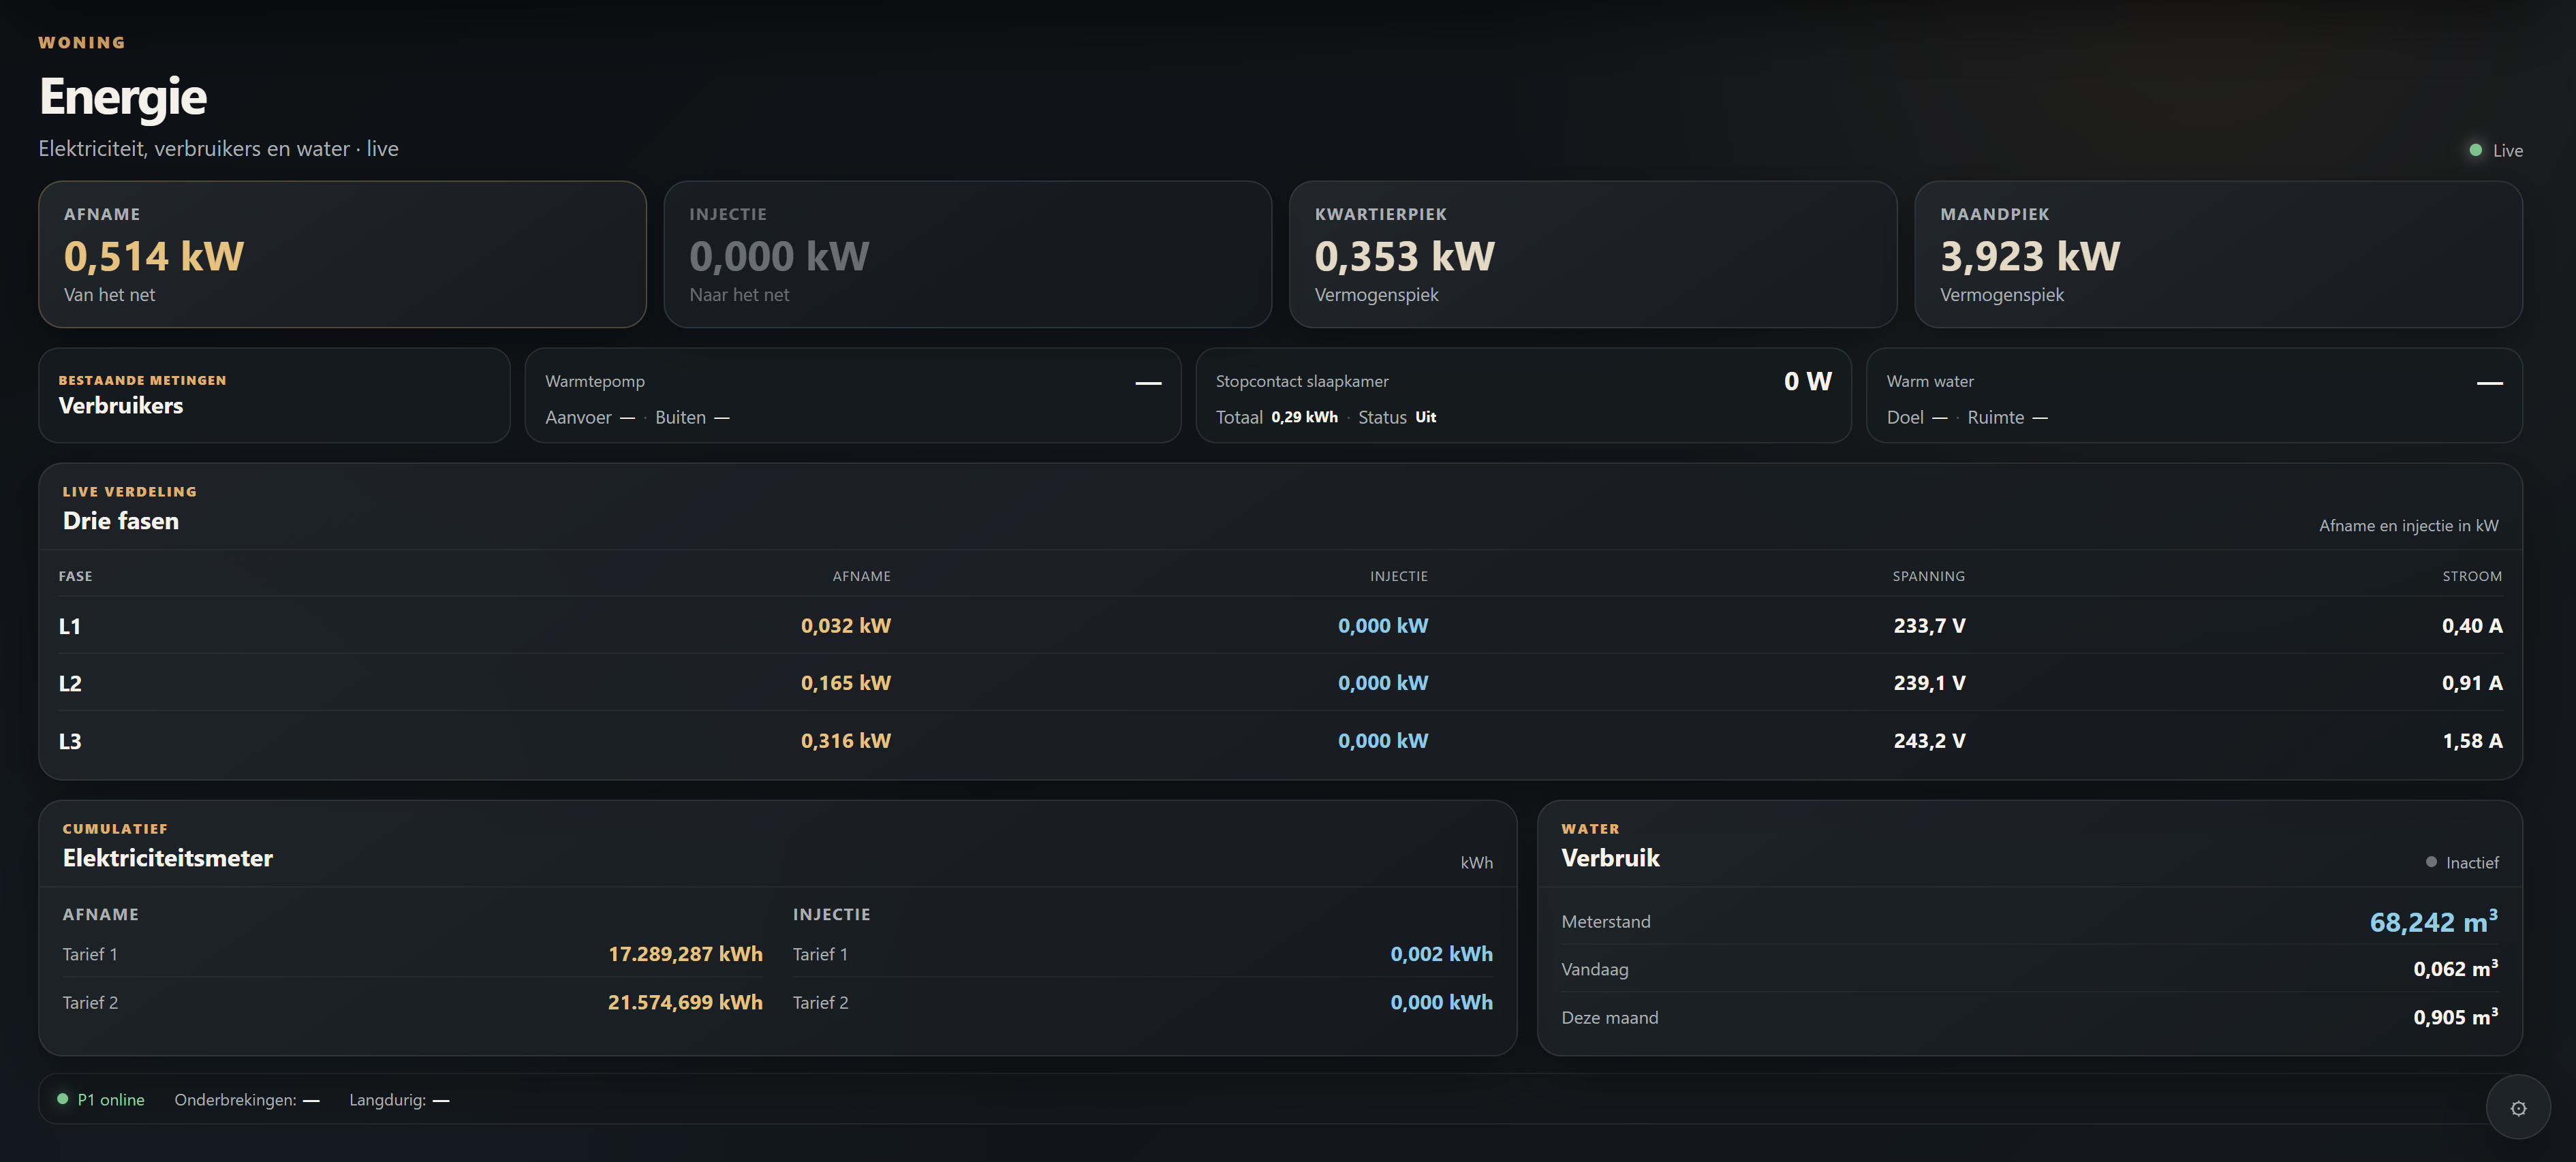
My current Home Assistant touchscreen energy view. Live grid import and export, quarter-hour and monthly peak, all three phases, cumulative electricity and water are fed by the P1 reader.
One screen now gives me:
live import and export
current quarter-hour demand
monthly peak
power per phase
voltage per phase
current per phase
cumulative tariff counters
cumulative water consumption
today's water consumption
monthly water consumption
current P1 connection status
The screenshot also illustrates why I wanted the raw data rather than a separate energy-monitoring app.
The meter isn't another isolated system anymore.
Its data has become part of the same interface as the rest of the house.
And the measurement path remains local.
And then there is the water meter
This turned out to be one of the more interesting parts of the project.
The P1 connection isn't necessarily limited to electricity. Additional meters can be exposed through the DSMR telegram as M-Bus devices.
In my case, that includes my water meter.
Selecting the water meter:
dsmr:
uart_id: p1_uart
max_telegram_length: 1700
water_mbus_id: 1
Then the actual sensor is simple:
water_delivered:
name: "Waterverbruik"
At that point Home Assistant knew the cumulative water-meter reading.
But I wanted something slightly more useful than a number that slowly increases.
Is water being used right now?
Turning a meter reading into "water is running"
The cumulative water value increases whenever new consumption is reported.
So I used that behaviour.
Step 1 — Create a 30-second timer:
timer:
p1_waterafname_actief:
name: P1 waterafname actief
duration: "00:00:30"
restore: false
Step 2 — Turn that timer into a binary sensor:
template:
- binary_sensor:
- name: Waterafname actief unique_id: p1_waterafname_actief device_class: running state: "{{ is_state('timer.p1_waterafname_actief', 'active') }}"
Step 3 — Restart the timer whenever the water meter increases:
automation:
-
id: p1_waterafname_actief_bij_stijgende_meterstand
alias: P1 waterafname actief bij stijgende meterstand
mode: restarttriggers:
- trigger: state entity_id: sensor.technische_ruimte_p1_energiemeter_waterverbruik
conditions:
- condition: template value_template: >- {{ trigger.from_state is not none and trigger.to_state is not none and is_number(trigger.from_state.state) and is_number(trigger.to_state.state) and trigger.to_state.state | float > trigger.from_state.state | float }}
actions:
- action: timer.start target: entity_id: timer.p1_waterafname_actief data: duration: "00:00:30"
The resulting logic:
Water meter increases
↓
Timer starts / restarts
↓
Water in use = ON
↓
No increase for 30 seconds
↓
Timer expires
↓
Water in use = OFF
It's a tiny bit of logic, but it turns a cumulative utility meter into something considerably more useful for automation.
I no longer only know how much water I've consumed.
Home Assistant can also tell whether water is being consumed right now.
Could this detect a water leak?
Potentially, it could become one input for such a system.
But I'm deliberately not calling this a leak detector.
A rising meter reading tells me that water is being consumed.
It doesn't tell me why.
Once Home Assistant has that information, however, it can be combined with other state:
Water continuously active
+
Nobody home
+
Unusually long duration
↓
Something worth investigating
That's a much better basis for an actual alert than simply assuming that every long water event is a leak.
Grid interruptions
I also expose the interruption counters from the electricity meter:
electricity_failures:
name: "Stroomonderbrekingen"
electricity_long_failures:
name: "Lange stroomonderbrekingen"
And the ESP32 itself exposes an online status:
binary_sensor:
- platform: status name: "Online"
That gives Home Assistant another small piece of information about both the electrical installation and the measurement path itself.
The complete data path
The finished architecture:
         Belgian digital meter
                  │
                  │ P1 / DSMR
                  ▼
            ESP32 + ESPHome
                  │
      ┌───────────┼───────────┐
      │           │           │
Electricity     Peaks       Water
      │           │           │
      └───────────┼───────────┘
                  │
             ESPHome API
                  │
                  ▼
            Home Assistant
                  │
        ┌─────────┴─────────┐
        │                   │
    Dashboard          Automations
                            │
                            ▼
                   Water active state
No external API is required for this measurement path.
No utility cloud needs to be queried.
The data travels a few metres instead of travelling across the internet and back.
About four hours from idea to working system
The part that surprised me most was how quickly the core system came together.
From the initial idea to seeing live smart-meter values inside Home Assistant took roughly four hours.
That included:
figuring out how to read the Belgian P1 connection
wiring the ESP32
testing power from the P1 connection
switching to separate power when that proved unreliable
discovering that the P1 port wasn't enabled
configuring the UART
configuring ESPHome's DSMR component
receiving a valid telegram
exposing the relevant electricity sensors
adding the ESP32 to Home Assistant
getting live three-phase measurements
exposing the peak-demand values
getting the water meter into Home Assistant
Some refinement came afterwards — particularly turning the water-meter changes into a useful live state and building the finished touchscreen interface around all the data.
But the core path:
meter → ESP32 → ESPHome → Home Assistant
was working in one session.
What I would do differently next time
If I had to build another one tomorrow, I would debug it in strict layers.
My debugging order would now be:
- Is the P1 port enabled? ↓
- Is the ESP32 powered reliably? ↓
- Is GPIO16 receiving valid UART data? ↓
- Can ESPHome parse a DSMR telegram? ↓
- Are the sensors appearing in Home Assistant?
In other words:
P1 meter
↓
power + physical connection
↓
UART / ESP32
↓
DSMR parser
↓
ESPHome API
↓
Home Assistant
💡 Lesson learned:
Prove one layer before debugging the next.
It sounds obvious afterwards.
Most useful debugging lessons do.
What's next?
Getting the data was only the first step.
Using it is more interesting.
The quarter-hour and monthly peak values could eventually feed into active load management.
I'm also looking at home battery storage, which makes live grid import and peak information even more useful.
Instead of merely displaying a rising quarter-hour peak, Home Assistant could eventually use that information to decide when to postpone a flexible load or when stored energy should be used.
The water data has similar potential.
Today's simple water active state could eventually become part of more sophisticated anomaly detection.
And because everything is already inside Home Assistant, those systems don't have to exist as isolated projects.
They can interact.
That's ultimately why I wanted the raw meter data locally in the first place:
Measure locally → understand what the house is doing → automate accordingly.
Not bad for an ESP32, an RJ12 cable and an afternoon of experimenting.
Relevant ESPHome configuration
For reference, this is the core configuration currently running on my ESP32:
esphome:
name: p1-meter
friendly_name: P1 Meter
esp32:
board: esp32dev
framework:
type: esp-idf
logger:
level: DEBUG
api:
ota:
- platform: esphome
wifi:
ssid: !secret wifi_ssid
password: !secret wifi_password
uart:
id: p1_uart
rx_pin:
number: GPIO16
inverted: true
baud_rate: 115200
rx_buffer_size: 1700
dsmr:
uart_id: p1_uart
max_telegram_length: 1700
water_mbus_id: 1
⚠️ Important:
The exact M-Bus IDs and hardware details can differ between installations. This is a description of my working installation, not a universal copy-paste wiring recipe.
For the software side, ESPHome documents the DSMR component and its available sensors here:
ESPHome DSMR documentation
For the Belgian physical P1 interface, use the official specifications rather than relying on cable colours:
Fluvius P1 technical specifications
Final thought
If you're running a Belgian P1 meter with Home Assistant too, I'm particularly interested in what you're doing with the quarter-hour peak and water data.
Getting the numbers into Home Assistant was the easy part.
Deciding what useful automations to build from them is the fun part.
☕ Did this save you some debugging time?
If you'd like to support more write-ups like this, you can buy me a coffee.


Top comments (3)
This is a really nice example of how a small hardware project can turn into something much more useful once the data is actually available.
I especially liked the debugging order at the end. Checking the P1 port, power, UART, DSMR parsing, and only then Home Assistant makes a lot more sense than trying to debug the whole stack at once. The “P1 port wasn't enabled” problem is also a good reminder that sometimes the software isn't the problem at all.
The water meter part was probably my favorite addition. Turning a cumulative reading into a simple “water is being used right now” state is a small piece of logic, but it makes the data much more useful for automation.
And keeping the whole path local is a big plus. Once the meter data is already available, there doesn't seem to be much reason to send it through another cloud just to get it back into your own home dashboard.
Four hours from a P1 port to a working Home Assistant setup is a pretty satisfying result. The next step toward using the peak-demand data for actual load management sounds even more interesting.
Thanks! The water detection was one of those small additions that turned out to be surprisingly useful. A cumulative meter reading is nice to have, but knowing whether water is being used right now opens up a lot more possibilities.
And exactly — getting the data into Home Assistant is really just the first step. The next challenge is using it to make decisions, especially around peak demand and eventually battery/load management.
That's where this little ESP32 project could become part of something much bigger. 😄
Exactly. I think that’s where these small projects become really interesting. The ESP32 itself isn’t the interesting part anymore once the data is available. The interesting part is what you can build on top of that data.
You go from measuring something, to understanding its state, then making a decision, and eventually letting the system act on that decision. That’s a very different mindset from simply building a dashboard.
The same pattern can apply far beyond energy: once different data sources become part of the same local system, they can start influencing each other. That’s when a small sensor project starts becoming an actual system.