
Authentication is one of the most fundamental features in modern applications—whether you’re logging into a website, accessing an API, or even verifying a one-time password. If you’re working within the Spring ecosystem, you’ve probably heard of Spring Security, the go-to framework for handling authentication and security.
But let’s be honest… Spring Security can feel overwhelming! 🌀 Between authentication providers, user details, and authentication managers, it’s easy to get lost. If you've ever found yourself wondering "Where does my password even get checked?"—you're not alone!
In this article, I’ll break down authentication in Spring Security into simple, easy-to-follow steps. We’ll compare a basic authentication flow (like checking a username and password) with how Spring Security handles each step under the hood. By the end, you'll have a clear understanding of what’s happening behind the scenes. 🚀
Let’s dive in! 🔍
Understanding Basic Authentication
Before we jump into how Spring Security handles authentication, let’s talk about why we need authentication in the first place. In most applications, you want to control access to certain features or data. That means you need a way to confirm that users are who they say they are. That’s exactly what authentication does!
In a computer system, authentication (“auth” for short) is the process that verifies that a user is who they claim to be. IBM What is Authentication? | IBM
Although web applications can be quite different from each other, the authentication flow is often very similar. A single, generalized flow might cover the vast majority of use cases. Here’s a diagram of a common authentication flow:
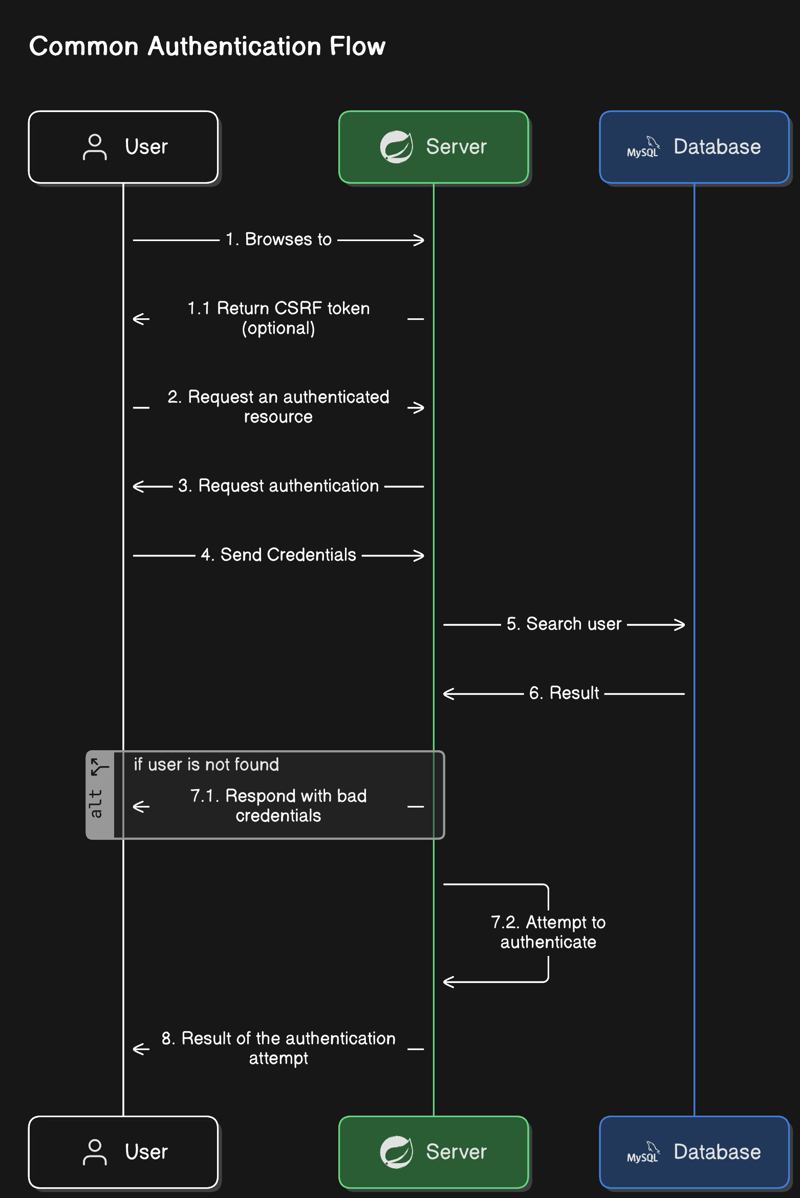
Let’s break it down step by step. 🏃♂️💨
Visiting the server
It all starts when a user visits your site or makes an initial request to your server. In some cases, the server may include a CSRF token in its response, depending on your security needs (these are steps 1 and 1.1 in the diagram).
Think of the CSRF token as a little “secret handshake” 🤝 that helps protect against certain security attacks.
Request an Authenticated Resource
Next, the user attempts to access a resource that requires authentication—for example, a page or an API endpoint that only logged-in users should see. The server then responds with a prompt for credentials, asking the user to prove they’re really who they claim to be.
- Commonly, these credentials are:
- Username and password
- Email (for sending a magic link)
- WebAuthn credentials (hardware security keys, etc.)
- Or any other unique proof of identity.
This is all covered in steps 2 to 4 in the diagram. 🛂
Search user
When the user’s credentials arrive at the server, the next step is to look them up in the database (or another storage system).
If the user doesn’t exist, the server immediately returns an error (steps 5 to 7.1).
If the user is found, we move on to the final phase: checking the validity of their credentials.
Authenticate
At this point, the server validates the credentials. The exact process depends on your chosen authentication method:
- Username & Password: The server will hash the incoming password and compare it with the hashed password stored in the database.
- Magic Link: The server checks if the link’s token is valid and hasn’t expired.
- WebAuthn: The server verifies the security challenge with the user’s device or browser.
If the credentials are valid, the server returns a success response along with some identifier—often a session cookie or a token (like a JWT)—so the user doesn’t have to log in again on every request. This corresponds to steps 7.2 and 8 in the diagram.
Think of this identifier as your “I’m logged in” badge. 🏷️
Now that you understand the core concepts, we’ll see how Spring Security manages each of these steps under the hood. Buckle up! 🚀
Mapping Authentication Steps to Spring Security Components
Now that we understand a typical authentication flow, let’s see how Spring Security tackles each step. Before diving in, let’s clear up one thing: if you've tried learning Spring Security before, you might have heard about a lot of additional concepts like CORS, the security filter chain, and more. But for this article, we’re keeping our focus solely on authentication. I’ll be showing you how Spring Security handles authentication in a REST API style. (I’ve personally never used Spring as a full-stack framework, so this approach suits my experience—but don’t worry, the concepts translate easily if you need a full-stack solution!)
Here’s an overall view mapping a standard authentication flow to Spring Security components:
| Authentication Flow | Spring Security Component |
|---|---|
| User submits credentials |
Authentication (e.g., UsernamePasswordAuthenticationToken) |
| Server searches for user | UserDetailsService |
| Check if user exists | UsernameNotFoundException |
| Verify credentials |
AuthenticationProvider (e.g., DaoAuthenticationProvider) |
| Authentication success/failure |
AuthenticationManager orchestrates this |
| Return authentication identifier | Typically handled by a session or token mechanism |
This is a high-level overview of how authentication works within Spring Security. I’ve intentionally skipped some details that we’ll dig into as we break down each part further. Let’s dive in!
Authentication
Every time a user accesses a protected resource, they must prove their identity using credentials. This is where the Authentication interface comes into play. According to the Spring docs, it “represents the token for an authentication request or for an authenticated principal once the request has been processed by the AuthenticationManager.authenticate(Authentication) method.”
The Authentication object contains:
- Credentials (e.g., a password)
- Permissions/Authorities
- Principal (a representation of the authenticated user)
- Authentication status (authenticated or not)
- And other details regarding the authentication request
A common implementation that you’ll likely use in many projects is the UsernamePasswordAuthenticationToken. Other examples include:
OneTimeTokenAuthenticationTokenAnonymousAuthenticationTokenJwtAuthenticationTokenBearerTokenAuthenticationToken
There are many more out there, or you can roll your own (though I recommend doing so only for learning purposes) 😊.
UserDetailsService
If you’ve spent any time with Spring and the MVC pattern, you’ve likely encountered the concept of services. These act as a bridge between your business logic and your database interactions. In Spring Security, the UserDetailsService is your go-to for retrieving user data.
The interface defines a single method: loadUserByUsername(String username). This method’s job is to:
Locate the user based on the provided username.
Return a UserDetails object representation of the user that focuses on authentication and authorization data.
Remember, your user entity can still have other attributes and extend different classes; the UserDetails interface just provides a focused view for security. You could technically bypass using UserDetailsService or UserDetails if you implement a custom authentication provider, but then you’d be fighting the framework’s conventions.
Spring even offers some default implementations:
-
InMemoryUserDetailsManager(great for prototyping, since it stores data only in memory) -
JdbcDaoImpl(retrieves user details from a database using JDBC queries) -
JdbcUserDetailsManager(an enhanced version of JdbcDaoImpl with additional features)
UsernameNotFoundException
When the UserDetailsService can’t find a user, it throws a UsernameNotFoundException. This exception is a subclass of AuthenticationException, the base class for all exceptions related to failed authentication attempts. Other exceptions in this family include:
BadCredentialsExceptionAuthenticationCredentialsNotFoundExceptionCompromisedPasswordException
These exceptions help Spring Security signal what went wrong during the authentication process ⚠️.
AuthenticationManager and AuthenticationProvider
Now we’re at the stage where we verify that the credentials are correct 🧐. This is handled by the AuthenticationManager, which processes an Authentication object (remember, the representation of your user’s credentials, whether authenticated or not).
The most common implementation of AuthenticationManager is the ProviderManager. This manager maintains a list of AuthenticationProvider instances and iterates over them until one can successfully handle the authentication request. Here’s a simplified snippet to illustrate this:
public Authentication authenticate(Authentication authentication) throws AuthenticationException {
    Class<? extends Authentication> toTest = authentication.getClass();
    AuthenticationException lastException = null;
    Authentication result = null;

    for (AuthenticationProvider provider : getProviders()) {
            if (!provider.supports(toTest)) {
                continue;
            }
            result = provider.authenticate(authentication);
            if (result != null) {
                copyDetails(authentication, result);
                break;
            }
        }
}
Notice how the ProviderManager checks each provider to see if it supports the type of authentication being attempted. It stops once it finds one that successfully authenticates the request ✅.
The AuthenticationProvider interface itself defines just two methods:
-
supports(Class<?> authentication): Checks if the provider can handle the given authentication type. -
authenticate(Authentication authentication): Contains the logic for verifying the credentials.
Spring Security provides several implementations, like DaoAuthenticationProvider for username/password checks or JwtAuthenticationProvider for JWT-based authentication. For example, a snippet from the JwtAuthenticationProvider might look like this:
    @Override
    public Authentication authenticate(Authentication authentication) throws AuthenticationException {
        BearerTokenAuthenticationToken bearer = (BearerTokenAuthenticationToken) authentication;
        Jwt jwt = getJwt(bearer);
        AbstractAuthenticationToken token = this.jwtAuthenticationConverter.convert(jwt);
        if (token.getDetails() == null) {
            token.setDetails(bearer.getDetails());
        }
        this.logger.debug("Authenticated token");
        return token;
    }

    @Override
    public boolean supports(Class<?> authentication) {
        return BearerTokenAuthenticationToken.class.isAssignableFrom(authentication);
    }
In this example, the provider casts the Authentication object to the expected type, processes the JWT, and converts it back to an authenticated token. If a provider returns null, the ProviderManager moves on to the next one. This mechanism ensures that your application finds the right way to authenticate each request 🔍.
Returning a response
At the end of the authentication process, your application needs to return a response. If you’re building your own implementation, this could mean:
- Setting a cookie in a cookie-based authentication.
- Returning a JWT token for stateless APIs.
- Or any other mechanism you choose.
For a quick example, you might create an AuthController with a login endpoint that accepts a record like this:
public record LoginRequest(String username, String passsword){}
This controller would create a UsernamePasswordAuthenticationToken, trigger the authentication process, and then return a response containing either a cookie or a token based on the result.
Diving Deeper: Exploring Spring Security’s Built-In Login Mechanism
So far, we’ve covered the essentials, and you could build your own authentication flow with these pieces. But if you’re curious about the “Spring way” of doing things, here’s a sneak peek into how Spring handles login by default.
Tip: If this next section feels a bit heavy or introduces additional concepts you’re not yet comfortable with, feel free to skip ahead and come back later. Understanding these concepts—even at a high level—will help you grasp how Spring Security works under the hood.
How Does Spring Security Handle Login?
Spring Security provides a default login mechanism, but how does it actually work?
When a user submits their credentials, the request is sent to the configured login endpoint.
Spring Security intercepts this request using a filter, specifically UsernamePasswordAuthenticationFilter.
The filter attempts authentication, following the flow we discussed earlier. If authentication succeeds, Spring Security stores the Authentication object in the SecurityContextHolder. Before responding to the client, the SecurityContextis persisted via a SecurityContextRepository. This sequence allows Spring Security to maintain authentication across multiple requests.

WOW that was a lot of info and new concepts in such a short amount of time right? Let’s, once again, define what we need and how those needs are solved by different components of spring.
First things first,
WHAT THE F*CK IS A FILTER?
Spring Security relies on a Security Filter Chain, a series of filters that process requests and responses. These filters handle security tasks such as authentication, authorization, and CSRF protection.
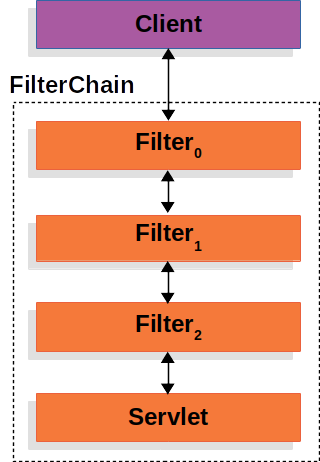
When a client makes an HTTP request:
- The request passes through multiple security filters.
- The request is authenticated and authorized.
- If allowed, it reaches the servlet for further processing.
Spring Boot automatically configures these filters, but you can inspect them with the following example:
    @Bean
    public UserDetailsService inMemoryUserDetails() {
        UserDetails admin = User.builder()
                .username("admin")
                .password("{noop}admin")
                .roles("ADMIN")
                .build();
        return new InMemoryUserDetailsManager(admin);
    }

    @Bean
    public SecurityFilterChain securityFilterChain(HttpSecurity http) throws Exception {
        http
                .authorizeHttpRequests(authorizeHttp -> {
                    authorizeHttp.requestMatchers("/login").permitAll();
                    authorizeHttp.anyRequest().authenticated();
                })
            .formLogin(withDefaults());
        return http.build();
    }
This configuration:
- Creates an in-memory admin user.
- Enables default login behavior.
- Allows access to /login while protecting other endpoints.
Exploring the Security Filter Chain
Spring Security manages filters using a Filter Chain Proxy, which contains one or more Security Filter Chains. The Security Filter Chain is Spring-specific and integrates deeply with the Spring framework, unlike the standard Servlet Filter Chain.
You can inspect the active Security Filter Chains using this endpoint:
    @GetMapping
    private Map<Integer, Map<Integer, String>> getSecurityFilterChainProxy(){
        Map<Integer, Map<Integer, String>> filterChains = new HashMap<>();

        int i = 1;
        for (SecurityFilterChain securityFilterChain : this.filterChainProxy.getFilterChains()){
            Map<Integer, String> filterChain = new HashMap<>();
            int j = 1;
            for (Filter filter : securityFilterChain.getFilters()){
                filterChain.put(j, filter.getClass().getName());
                j++;
            }
            filterChains.put(i, filterChain);
        }

        return filterChains;
    }
Do you remember how i explained the filters work? Well, I kinda lied, spring security actually uses a filter chain proxy to have the filters defined in the Security Filter Chain, which is different from the Filter Chain, while the former is a Spring Thingy and can then take advantage of other spring features like the ApplicationContext, and is actually the one you’ll be using 99.99% of the time, the later is a Servlet thing, the Security Filter Chain is called inside the Filter Chain, you don’t really have to worry too much about those details but if you do want to go deper you can read the spring security documentation on the Servlet Applicatoins / Architecture section
What this endpoint i showed you does is it will get the Security Filter Chains that are registerd in the Filter Chain Proxy (the one that spring wires inside the Servlet Filter Chain) and return the class names of the Filters inside the Security Filter Chain, you will get a response like this
{
    "1": {
        "1": "org.springframework.security.web.session.DisableEncodeUrlFilter",
        "2": "org.springframework.security.web.context.request.async.WebAsyncManagerIntegrationFilter",
        "3": "org.springframework.security.web.context.SecurityContextHolderFilter",
        "4": "org.springframework.security.web.header.HeaderWriterFilter",
        "5": "org.springframework.security.web.csrf.CsrfFilter",
        "6": "org.springframework.security.web.authentication.logout.LogoutFilter",
        "7": "org.springframework.security.web.authentication.UsernamePasswordAuthenticationFilter",
        "8": "org.springframework.security.web.authentication.ui.DefaultResourcesFilter",
        "9": "org.springframework.security.web.authentication.ui.DefaultLoginPageGeneratingFilter",
        "10": "org.springframework.security.web.authentication.ui.DefaultLogoutPageGeneratingFilter",
        "11": "org.springframework.security.web.savedrequest.RequestCacheAwareFilter",
        "12": "org.springframework.security.web.servletapi.SecurityContextHolderAwareRequestFilter",
        "13": "org.springframework.security.web.authentication.AnonymousAuthenticationFilter",
        "14": "org.springframework.security.web.access.ExceptionTranslationFilter",
        "15": "org.springframework.security.web.access.intercept.AuthorizationFilter"
    }
}
Key Filters in Spring Security
I’m not gonna explain every single filter but instead let’s go with the ones we care those being:
SecurityContextHolderFilter
Retrieves the SecurityContext for requests.CsrfFilter
Ensures CSRF tokens are included in requests (if enabled).LogoutFilter
Manages user logout by calling LogoutHandlers and redirecting upon success.UsernamePasswordAuthenticationFilter
Handles login requests, extracting credentials and passing them to authentication mechanisms.DefaultLoginPageGeneratingFilter
Generates the default login page.DefaultLogoutPageGeneratingFilter
Creates the default logout page.AnonymousAuthenticationFilter
Assigns anonymous authentication when no user is authenticated.ExceptionTranslationFilter
Converts AccessDeniedException and AuthenticationException into HTTP responses.AuthorizationFilter
Enforces authorization policies.
Configuring the Security Filter Chain
Below is an example of configuring key security filters:
    @Bean
    public SecurityFilterChain securityFilterChain(HttpSecurity http) throws Exception {
        http
                .securityContext(securityContextConfigurer ->
                        securityContextConfigurer.securityContextRepository(new MyCustonSecurityContextRepository())
                )
                .csrf(csrfConfigurer -> csrfConfigurer.disable())
                .logout(logoutConfigurer -> {
                    logoutConfigurer.logoutUrl("/logout");
                    logoutConfigurer.invalidateHttpSession(true);
                })
                .formLogin(loginConfigurer -> {
                            loginConfigurer.loginPage("/login");
                            loginConfigurer.failureForwardUrl("/login?error");
                            loginConfigurer.usernameParameter("username");
                        }
                )
                .anonymous(anonymousConfigurer -> {
                    anonymousConfigurer.principal("anonymous");
                })
                .exceptionHandling(exceptionHandlingConfigurer -> {
                    exceptionHandlingConfigurer.accessDeniedPage("/access-denied");
                })
                .authorizeHttpRequests(authorizeHttp -> {
                    authorizeHttp.requestMatchers("/login").permitAll();
                    authorizeHttp.anyRequest().authenticated();
                });
        return http.build();
    }
This configuration:
- Defines a custom SecurityContextRepository.
- Disables CSRF (if needed).
- Customizes login/logout behavior.
- Handles anonymous users and access denial.
- Enforces authentication for all routes except /login.
This is all good and great but let’s go a little deeper into how the spring team normally implements authentication inside filters, for this we dive into the implementation of the UsernamePasswordAuthenticationFilter, LogoutFilter, AnonymousFilter, SecurityContextHolderFilter and lastly SecurityContextRepository
SecurityContextHolderFilter
Ensures that the SecurityContext is correctly set before proceeding with request handling. Runs early in the filter chain and guarantees that any downstream filters can access security details.
    private void doFilter(HttpServletRequest request, HttpServletResponse response, FilterChain chain)
            throws ServletException, IOException {
        if (request.getAttribute(FILTER_APPLIED) != null) {
            chain.doFilter(request, response);
            return;
        }
        request.setAttribute(FILTER_APPLIED, Boolean.TRUE);
        Supplier<SecurityContext> deferredContext = this.securityContextRepository.loadDeferredContext(request);
        try {
            this.securityContextHolderStrategy.setDeferredContext(deferredContext);
            chain.doFilter(request, response);
        }
        finally {
            this.securityContextHolderStrategy.clearContext();
            request.removeAttribute(FILTER_APPLIED);
        }
    }
In the implementation you can see that it will check whether the filter has already been applied, if it hasn’t it will pass the method to load the context to the SecurityContextHolder and continue with the next filter.
SecurityContextRepository
- Restores and retrieves the SecurityContext during request processing.
- Works with session-based authentication to persist the SecurityContext between requests.
- Common implementations:
- HttpSessionSecurityContextRepository: Stores the SecurityContext in the HTTP session.
- RequestAttributeSecurityContextRepository: Stores the SecurityContext in request attributes.
AnonymousFilter
Assigns an anonymous Authentication object when no authenticated user is present. It ensures that unauthenticated users still have a valid SecurityContext. The anonymous authentication has a special role (ROLE_ANONYMOUS), allowing fine-grained access control.
Let’s look at a small part of the filter’s implementation
private SecurityContext defaultWithAnonymous(HttpServletRequest request, SecurityContext currentContext) {
    Authentication currentAuthentication = currentContext.getAuthentication();
    if (currentAuthentication == null) {
        Authentication anonymous = createAuthentication(request);
        if (this.logger.isTraceEnabled()) {
            this.logger.trace(LogMessage.of(() -> "Set SecurityContextHolder to " + anonymous));
        }
        else {
            this.logger.debug("Set SecurityContextHolder to anonymous SecurityContext");
        }
        SecurityContext anonymousContext = this.securityContextHolderStrategy.createEmptyContext();
        anonymousContext.setAuthentication(anonymous);
        return anonymousContext;
    }
    else {
        if (this.logger.isTraceEnabled()) {
            this.logger.trace(LogMessage.of(() -> "Did not set SecurityContextHolder since already authenticated "
                    + currentAuthentication));
        }
    }
    return currentContext;
}

protected Authentication createAuthentication(HttpServletRequest request) {
    AnonymousAuthenticationToken token = new AnonymousAuthenticationToken(this.key, this.principal,
            this.authorities);
    token.setDetails(this.authenticationDetailsSource.buildDetails(request));
    return token;
}
This two methods are the ones we actually care about for the purposes of this article, the defeaultWithAnonymous method will get the current authentication and check if it’s null, if it isn’t it logs that it wasn’t necessary to set the SecurityContextHolder, if it is, it creates an AnonymousAuthenticationToken and then an empty context and sets the authentication in it, finally it returns the SecurityContext, the anonymous token will use a key, a principal as a String (which you can configure as you saw in the example) and the details, the details willfrom the http request and those will be the ip address and the session id
UsernamePasswordAuthenticationFilter
This filter a little bit special, normally when you want to create a filter to add to the spring security filter chain you would extend your class with either GenericFilterBeanor OncePerRequestFilter but the filters that deal with broswer based http based authentications such as this filter or Oauth2LoginAuthenticationFilter, WebAuthnAuthenticationFilter, etc…, they extend a different class instead, the AbstractAuthenticationProcessingFilter this filter will require an AuthenticationManager to process the authentication request and a RequestMatcher to check if it should attempt authentication for the current request, it has three important methods the attemptAuthentication which will receive both the request and response objects and will perform the actual authentication, if the authentication passess the Authentication result will be placed into the SecurityContext and it will call a configured AuthenticationSuccessHandler and if it fails it will delegate to a configured AuthenticationFailurehandler
From the actual implementation of the UsernamePasswordAuthenticationFilter we see relatively how simple this is
@Override
    public Authentication attemptAuthentication(HttpServletRequest request, HttpServletResponse response)
            throws AuthenticationException {
        if (this.postOnly && !request.getMethod().equals("POST")) {
            throw new AuthenticationServiceException("Authentication method not supported: " + request.getMethod());
        }
        String username = obtainUsername(request);
        username = (username != null) ? username.trim() : "";
        String password = obtainPassword(request);
        password = (password != null) ? password : "";
        UsernamePasswordAuthenticationToken authRequest = UsernamePasswordAuthenticationToken.unauthenticated(username,
                password);
        // Allow subclasses to set the "details" property
        setDetails(request, authRequest);
        return this.getAuthenticationManager().authenticate(authRequest);
    }
It first checks if it must be a post request and then it obtains both the username and password, it creates an Authentication with the details from the request and lastly it passes this Authentication to the AuthenticationManager
now let’s see how this is used in the AbstractAuthenticationProcessingFilter
    private void doFilter(HttpServletRequest request, HttpServletResponse response, FilterChain chain) throws IOException, ServletException {
        if (!this.requiresAuthentication(request, response)) {
            chain.doFilter(request, response);
        } else {
            try {
                Authentication authenticationResult = this.attemptAuthentication(request, response);
                if (authenticationResult == null) {
                    return;
                }

                this.sessionStrategy.onAuthentication(authenticationResult, request, response);
                if (this.continueChainBeforeSuccessfulAuthentication) {
                    chain.doFilter(request, response);
                }

                this.successfulAuthentication(request, response, chain, authenticationResult);
            } catch (InternalAuthenticationServiceException failed) {
                this.logger.error("An internal error occurred while trying to authenticate the user.", failed);
                this.unsuccessfulAuthentication(request, response, failed);
            } catch (AuthenticationException ex) {
                this.unsuccessfulAuthentication(request, response, ex);
            }

        }
    }

    protected boolean requiresAuthentication(HttpServletRequest request, HttpServletResponse response) {
        if (this.requiresAuthenticationRequestMatcher.matches(request)) {
            return true;
        } else {
            if (this.logger.isTraceEnabled()) {
                this.logger.trace(LogMessage.format("Did not match request to %s", this.requiresAuthenticationRequestMatcher));
            }

            return false;
        }
    }
It will use the configured RequestMatcher to check if it should perform authentication and then it will call the attemptAuthentication method, if it is successful it will perform some aditional operations (not really important for the purposes of this article) and lastly it will use the succesfulAuthentication method which in turn will use the handler we passed, if it fails it will use the unsuccessfulAuthenticationmethod which uses our failure handler
protected void successfulAuthentication(HttpServletRequest request, HttpServletResponse response, FilterChain chain,
            Authentication authResult) throws IOException, ServletException {
        SecurityContext context = this.securityContextHolderStrategy.createEmptyContext();
        context.setAuthentication(authResult);
        this.securityContextHolderStrategy.setContext(context);
        this.securityContextRepository.saveContext(context, request, response);
        if (this.logger.isDebugEnabled()) {
            this.logger.debug(LogMessage.format("Set SecurityContextHolder to %s", authResult));
        }
        this.rememberMeServices.loginSuccess(request, response, authResult);
        if (this.eventPublisher != null) {
            this.eventPublisher.publishEvent(new InteractiveAuthenticationSuccessEvent(authResult, this.getClass()));
        }
        this.successHandler.onAuthenticationSuccess(request, response, authResult);
    }
Here we can see that it will do some aditional logic like event publishing, remember me services, etc…, but the part i want to highlight is the save of the context using the SecurityContextRepository this bean comes from the configuration, so let’s talk a little about the configuration of these special filters.
The default implementations of these filters are typically configured with the HttpSecurity builder spring provides for the SecurityFilterChain configuration, more specifically it will use special classes that extend the AbstractAuthenticationFilterConfigurer like the FormLoginConfigurer and such, allow me to show a small part of the code in this abstract class:
@Override
public void configure(B http) throws Exception {
    ...
    SecurityContextConfigurer securityContextConfigurer = http.getConfigurer(SecurityContextConfigurer.class);
    if (securityContextConfigurer != null && securityContextConfigurer.isRequireExplicitSave()) {
        SecurityContextRepository securityContextRepository = securityContextConfigurer
            .getSecurityContextRepository();
        this.authFilter.setSecurityContextRepository(securityContextRepository);
    }
    this.authFilter.setSecurityContextHolderStrategy(getSecurityContextHolderStrategy());
    F filter = postProcess(this.authFilter);
    http.addFilter(filter);
}
As you can see here it will use another configurer to get the repository that is going to be needed to save (and restore) the sessions if it was configured as such, do you remember the filter chain configuration example I showed where i provided a configuration example for each of the relevant filters? well, in that example the .securityContext() method is the SecurityContextConfigurer, let’s go see what repository it uses by default
SecurityContextRepository getSecurityContextRepository() {
    SecurityContextRepository securityContextRepository = getBuilder()
        .getSharedObject(SecurityContextRepository.class);
    if (securityContextRepository == null) {
        securityContextRepository = new DelegatingSecurityContextRepository(
                new RequestAttributeSecurityContextRepository(), new HttpSessionSecurityContextRepository());
    }
    return securityContextRepository;
}
As you can see here, it will use either the one you pass to the configuration or a DelegatingSecurityContextRepository one which is composed of the RequestAttributeSecurityContextRepository (it persits the context on the current request only) and the HttpSessionSecurityContextRepository (it persits the context on the http session) if you didn’t configure one, although there are some small extra details they are not exactly a must to understand the rest.
LogoutFilter
It uses a series of LogoutHandlers which will be used in the order they are specified, after a succesful logout it will perform a redirect using either the LogoutSuccessHandler or the logoutSuccessUrl configured.
The implementation of this filter is pretty similar to the previous one so instead of showing it I willl show you the implementation of a logout handler that spring provides.
@Override
    public void logout(HttpServletRequest request, HttpServletResponse response, Authentication authentication) {
        Assert.notNull(request, "HttpServletRequest required");
        if (this.invalidateHttpSession) {
            HttpSession session = request.getSession(false);
            if (session != null) {
                session.invalidate();
                if (this.logger.isDebugEnabled()) {
                    this.logger.debug(LogMessage.format("Invalidated session %s", session.getId()));
                }
            }
        }
        SecurityContext context = this.securityContextHolderStrategy.getContext();
        this.securityContextHolderStrategy.clearContext();
        if (this.clearAuthentication) {
            context.setAuthentication(null);
        }
        SecurityContext emptyContext = this.securityContextHolderStrategy.createEmptyContext();
        this.securityContextRepository.saveContext(emptyContext, request, response);
    }
This code comes from the SecurityContextLogoutHandler which is one of the default ones spring security uses, it will assert that there is a request, if configured it will invalidate the session, then it will clear the context and if set, it will also clear the authentication it will also use the SecurityContextRepository to update the context to unauthenticated.
Conclusion & What’s Next
So far we’ve explored the key components involved in Spring Security’s authentication flow, from simple things like the Authentication interface to more complext parts like the SecurityContextRepository, by understanding how these parts work together we can gain a deeper insight into how Spring Security manages authentication behind the scenes and allows you to write your own implementations or decide whether you should you the default ones or not.
Looking ahead, I plan to write follow-up articles exploring custom authentication implementations, such as integrating alternative authentication mechanisms beyond username-password authentication. I may also cover different Spring Security configurations, including OAuth2, JWT-based authentication, and fine-grained access control strategies.
If you’re interested in diving deeper into these topics, stay tuned for upcoming posts where we’ll explore practical examples and real-world use cases. 🚀
Do keep in mind that i’m by no means an expert in either security or spring so I will need lots and lots of documentation which means posting each article will take time, please comment any questions or sugestions you may have I'd be glad to read your thoughts 😁, with nothing else left to say, bye and best regards. 🎉🎉🎉

Top comments (0)