
Cover page from Tutorials Dojo
Did you know that 70% of career decisions happen on a whim while binge-watching cat videos at 2 AM? That's exactly how I stumbled upon the Cloud Resume Challenge, a beginner friendly way to introduce yourself to AWS!
This is my attempt at the Cloud Resume Challenge by Forrest Brazzeal, which involves a simple project specification utilizing AWS.
In this article, I will discuss what I did to complete the challenge, and also with the added complexity of using Terraform, instead of AWS Cloud Formation as specified in the challenge.
Project Outcome:
What is the Challenge?
The Cloud Resume Challenge is about following a project specification using AWS, that results in a Resume site.
The challenge encourages the use of various AWS services, along with some CI/CD tools too, but you can personalize the project by swapping out certain tools or services. For example:
- CloudFormation -> Terraform
- GitHub Actions -> GitLab CI/CD
- Route 53 -> Cloudflare
And if you're a student checkout the Github Education Pack. It has a lot of free perks like free domains.
The goal is to make everything work together seamlessly in the end, entirely depending on your interpretation of the project specifications.
Tackling the Challenge
The challenge consists of 16 parts, but I'll simplify it into five key sections:
- Building the Frontend: Designing your resume site and setting it up with S3, CloudFront, and Route 53.
- Building the Backend: Manually provisioning backend resources, including AWS Lambda, API Gateway, and DynamoDB.
- Automating with GitHub Actions: Implementing CI/CD for the frontend.
- Infrastructure as Code (IaC): Converting your backend into IaC using Terraform.
- Deploying Unit Tests: Ensuring your code is robust before deployment.
Finally, enjoy the results and prepare for the AWS Certified Cloud Practitioner (CCP) exam or any other certification!
Building the Frontend
You can use any framework you're comfortable with, such as plain HTML, CSS, and JavaScript. For this project, I used Next.js, ShadcnUI, TypeScript, and Tailwind CSS. However, this article will focus on the cloud setup rather than designing the website. So, feel free to go with any basic look or take time to design it.
Once you've designed your resume website and populated it with your data, you can manually provision the necessary AWS resources to host your site.
Before using AWS
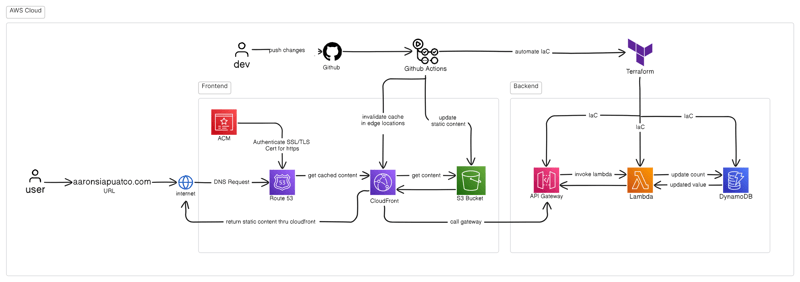
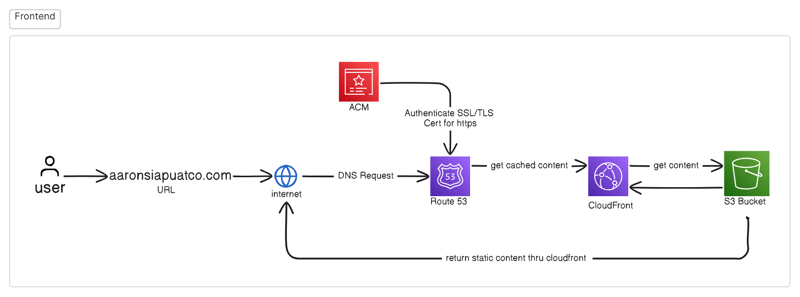
Now, most people I saw following the challenge went directly into creating AWS resources in the console. However, I think it would be better if first diagrammed and saw the bigger picture of what you are building.
So, here is what the frontend architecture would look like:
For those who have not yet created their AWS accounts, you can
follow this guide.
Once I got the bigger picture, I knew that I had to start in this order, S3 bucket -> CloudFront -> Route53 -> ACM. And all the little steps in between.
Configuring S3 with Cloudfront, ACM & Route53.
S3: Storage for our static files, or the frontend assets we made.
- When naming the S3 bucket, make it unique, all S3 buckets can be accessed if the URL is matched.
- Don't forget to enable static web hosting
- Disable block all public access
Goal: Have a S3 endpoint to access the frontend assets.

Disclaimer
Don't worry if the site isn't secure yet(HTTP). It is simply the default for S3 buckets. In the later steps, we are going to use Cloudfront
Route53: After registering the domain
Cloudfront & ACM: Service that delivers your content through its edge locations or caching.
- Linkage of Cloudfront to the S3 endpoint.
- Create a TLS/SSL certificate for the domain
IMPORTANT: Always configure the right policies for each of the AWS resource you utilize, or create roles using the root account.
Now you should have a resume site with HTTPS!
Building the Backend
With the front-end in place, it's time to set up the back-end. The backend involves creating and configuring services that will allow your resume site to handle dynamic content and store data. For this challenge, we'll manually provision the following AWS resources:
- AWS Lambda: For running serverless functions.
- API Gateway: To expose your Lambda functions as HTTP endpoints.
- DynamoDB: To store and retrieve data, such as the number of visitors to your site.
And the backend diagram would look something like this:
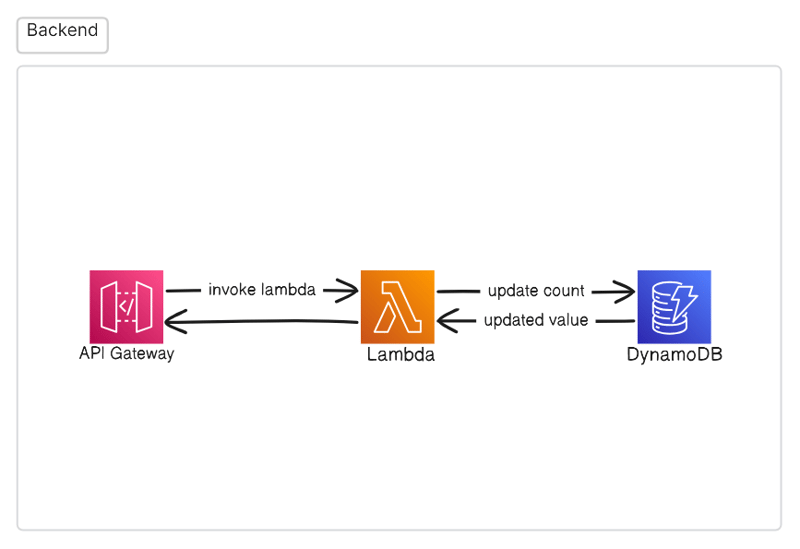
Now, setting up the table was easy, making a Lambda interact with it was easy too, I just had to recall some python and understand the boto3 library.
Lambda: A serverless service that runs the code once it receives a request to it.
Step 3: Write the Lambda Function Code
- In the Lambda console, scroll down to the Function code section.
- Replace the default code with the following:
   import json
   import boto3

   def lambda_handler(event, context):
       dynamodb = boto3.resource('dynamodb')
       table = dynamodb.Table('ResumeVisitorCount')

       response = table.update_item(
           Key={'id': 'visitor_count'},
           UpdateExpression='ADD visits :inc',
           ExpressionAttributeValues={':inc': 1},
           ReturnValues='UPDATED_NEW'
       )

       return {
           'statusCode': 200,
           'body': json.dumps('Visitor count updated')
       }
Now, all we have to do is setup the API gateway, I used an HTTP API, and configured it to the lambda function. Once created, we should test the endpoint of our API, with something like postman, in order to check if the API can talk with the real world.
You should see something similar to:
   {
       "statusCode": 200,
       "body": "\"Visitor count updated\""
   }
Then, once it can communicate with the outside world, let us create a hook from our frontend code to invoke our API, and update the count on the website.
And with that, your backend setup is complete! Your site is now capable of interacting with AWS services to perform dynamic actions, such as tracking visitor counts.
Terraform (IaC)
After manually provisioning our resources to understand how they work, it's time to embrace Infrastructure as Code with Terraform. This was one of the more challenging aspects of the project, but also one of the most valuable skills to develop.
Unlike the AWS Console where default settings often suffice, Terraform requires explicitly defining each resource characteristic. This means understanding your resources at a deeper level.
Key Components of the Terraform Configuration
My Terraform setup includes several important elements:
- Provider Configuration: Setting up the AWS provider with region and credential files
   terraform {
     required_providers {
       aws = {
         source  = "hashicorp/aws"
         version = "~> 5.0"
       }
     }
   }

   provider "aws" {
     region = "ap-southeast-1"
     # Credential configuration
   }
- DynamoDB Table: Creating the visitor counter table with the appropriate attributes and billing mode
   resource "aws_dynamodb_table" "Guests" {
     name         = "Guests"
     hash_key     = "SiteID"
     billing_mode = "PAY_PER_REQUEST"
     attribute {
       name = "SiteID"
       type = "S"
     }
   }
-
Lambda Function: This part required special attention:
- Creating IAM roles and policy attachments for Lambda to access DynamoDB
-
Packaging the Lambda code: Using
archive_filedata source to zip the Lambda code directory - Configuring the Lambda function with environment variables to reference the DynamoDB table
-
API Gateway: Setting up the HTTP API that exposes the Lambda function
- Configuring CORS to allow frontend access
- Creating the integration between API Gateway and Lambda
- Setting up routes for HTTP methods
- Deploying the API to a stage
Important Terraform Considerations
When implementing this with Terraform, I learned several important lessons:
-
Lambda Packaging: Lambda code must be zipped before deployment. The
archive_filedata source automates this process:
   data "archive_file" "lambda" {
     type        = "zip"
     source_dir  = "${path.module}/lambda"
     output_path = "${path.module}/lambda.zip"
   }
IAM Permissions: Correctly setting up IAM roles and policies is crucial for services to communicate with each other
Resource Dependencies: Terraform automatically handles dependencies between resources, but understanding the order of creation is important
State Management: Unlike manual deployment, Terraform maintains a state file that tracks all resources, making updates and destruction much easier
API Gateway Configuration: Setting up the correct integration between API Gateway and Lambda requires careful configuration of routes and permissions
By implementing the infrastructure with Terraform, I gained the ability to recreate the entire backend stack with a single command and make consistent, version-controlled changes to the infrastructure.
The complete Terraform code is available in my GitHub repository, but these key components illustrate the approach to automating the infrastructure deployment.
Automating with GitHub Actions
With the backend and frontend set up, the next step is to automate your deployment process using GitHub Actions. This ensures that every time you push changes to your repository, the updated code is automatically deployed.
Step 1: Set Up a GitHub Actions Workflow
- In your GitHub repository, navigate to the Actions tab and click New workflow.
- Select Set up a workflow yourself.
- Replace the default YAML file with the following:
   name: Deploy to S3 and Invalidate CloudFront

   on:
     push:
       branches:
         - main

   jobs:
     deploy:
       runs-on: ubuntu-latest

       steps:
         - name: Checkout code
           uses: actions/checkout@v2

         - name: Configure AWS credentials
           uses: aws-actions/configure-aws-credentials@v1
           with:
             aws-access-key-id: ${{ secrets.AWS_ACCESS_KEY_ID }}
             aws-secret-access-key: ${{ secrets.AWS_SECRET_ACCESS_KEY }}
             aws-region: us-east-1

         - name: Sync files to S3
           run: |
             aws s3 sync ./frontend s3://your-bucket-name --delete

         - name: Invalidate CloudFront cache
           run: |
             aws cloudfront create-invalidation --distribution-id your-distribution-id --paths "/*"
Tada! You have now automated deployment!
Conclusion
If you are a beginner, and are looking to use a variety of services in the cloud. I recommend this challenge as it teaches you the essence of AWS services, IaC, and web development. Plus it's also a way to have an online hardcoded resume hosted on cloud! A bit over-engineered for a resume, but at least it is something that can last.

Top comments (0)