
In this series of articles I’ll tell you how to create a Custom View like an artist. I’ve prepared a creative task for you and we’ll do it together. In Part I, I’ll give you a succinct account of your options when you can’t use UI components from the standard Android SDK. Sorry, but I won’t let you touch the brushes during the first lesson. This time, we will consider the requirements, choose the approach, build the basic logic, and prepare our canvas. In the next part, we’ll get straight to the View drawing and optimisation. So get comfortable and focus on creating something unique.
Imagine you need to create a complex UI that contains multiple visual components. Something like this:

What do we have here?
- Chart: A dynamic element, continuously receiving new values and changing accordingly. Charts can be used to show currency change online or data collected by some sensor.
- Current state marker: This smoothly follows the changes in the chart.
- Text: Showing current values.
The main feature of our Custom View is that the chart updates live as new values are added. Markers must change smoothly, and that means that View implementation won’t be easy.
In the Revolut app, we use these charts for things like screens showing currencies, trading, and analytics.

Ways of creating a non-standard component
This chart comprises visual components that you won’t find in the Android SDK. What options do you have when the standard components don’t behave the way you need them to, or they’re not optimised for your tasks?
Option 1. Customize the standard components. This is the most obvious and preferable way of solving the task unless you need to add some new logic.
Option 2. Use a Github library. This is a great option if you’ve found a good library.
Option 3. Inherit and extend. This allows you to add new logic by writing the code yourself. However, this is not the easiest way to solve our problem because many things that you may want to adjust have private or package-private access in the Android SDK API. If the package-private access method is used, you may place a new component within the same package as its parent — but you can hardly call this a beautiful solution.
Option 4. Inherit a View from a ViewGroup and inflate the layout you already use. This method works when you need to create a component with several simpler constituents. For example, a widget where you can enter the sum of money.

Option 5. Inherit from a View and create a widget from scratch. This is the method we’re going to use. It’s the most flexible, but the most difficult — it requires that you know the ins and outs.
What is the View and how does it work?
Every visual component of the UI is associated with a base parent View or with its child―so they all follow the same rules.
A View exists only in connection with an Activity/Fragment, and has its own lifecycle.

- Inflating a View from an .xml file
- Attaching the View to a ViewGroup
- Defining the layout
- Drawing
- User interaction
- Detaching from the screen
Now let’s take a look at each of the steps in detail.
Inflation
A View can be created from code or inflated from a layout XML file. Depending on your case, you should call the corresponding type of Constructor. We are inflating the View from XML, so our Constructor will look as follows:
public View(Context context,
            AttributeSet attrs,
            int defStyleAttr,
            int defStyleRes)
Here you specify the context through which your View can access the resources. Then add AttributeSet to use attributes specified in the XML file. You can use defStyleAttr to add a reference to a style resource that supplies default values for the View. If defStyleAttr is 0, or cannot be found in the theme, then the style is applied according to the resource ID set in defStyleRes.
This is how all this looks in Java
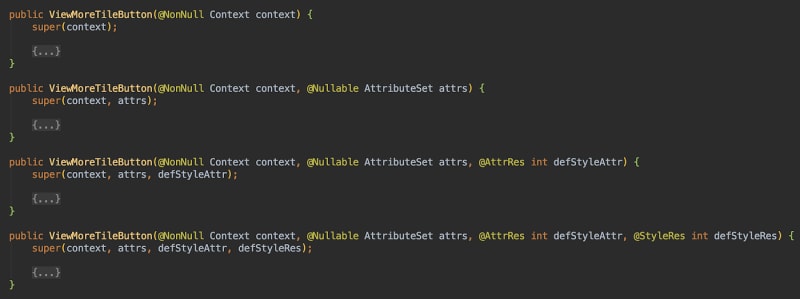
And in Kotlin

Pay attention that some Android views (e.g. TextView) may have different behaviour on different constructors and this simplifacation may break this.
E.g. this constructor of TextView passes default style but will never be called with @JvmOverloads trick:
public TextView(Context context, @Nullable AttributeSet attrs) {
    this(context, attrs, com.android.internal.R.attr.textViewStyle);
}
Specify custom attributes
First of all, add the declarable-style tag to your resources, and define each attribute by specifying its name and format. Usually the file with these values is called attrs.xml.
<declare-styleable name="CustomView">
    <attr name="circleRadius" format="dimension" />
    <attr name="circleLabel" format="string"/>
    <attr name="showLabel" format="boolean"/>
    <attr name="circleColor" format="color"/>
    <attr name="circleDrawable" format="reference"/>
    <attr name="circleColorType">
        <flag name="none" value="0" />
        <flag name="fill" value="1" />
        <flag name="stroke" value="2" />
        <flag name="fillStroke" value="3" />
    </attr>
</declare-styleable>
In the XML layout, these attributes will look as follows:
app:circleRadius="5dp"
app:circleDrawable="@drawable/ic_bell"
app:circleColorType="fillStroke"
…
Then you should use the obtainStyledAttributes(AttributeSet, int[], int, int) API to retrieve XML attributes at the construction of the View. Retrieved attributes will be used for drawing on canvas. You also have to remember to add recycle() to clear all the data associated with this TypedArray:
TypedArray a = c.obtainStyledAttributes(attrs, R.styleable.CustomLayoutLP);
            position = a.getInt(R.styleable.CustomLayoutLP_layout_position, position);
            a.recycle();
If you use the android-ktx set of Kotlin extensions, you don’t have to worry about recycling.
context.withStyledAttributes(attrs, R.styleable.YourCustomViewClass) {
    radius = getDimension(R.styleable.CustomView_circleRadius, fallback)
    showLabel= getDimension(R.styleable.CustomView_showName, fallback)
    colorType= getInteger(R.styleable.CustomView_colorType, colorType)
}
Finalizing inflation
After all the attributes have been inflated from XML, the onFinishInflate() method is called. It won’t be called if you create View programmatically.
Attaching the View to a ViewGroup
A ViewGroup is a special view that contains other views called children. The view group is the base class for layouts and views containers.
The onAttachedToWindow callback means that the view will be shown on the screen. Calling of onAttachedToWindow guarantees calling of onDetachedFromWindow at view termination. When you may need this callback? If you subscribe to events within the view, onDetachedFromWindow stops subscriptions when the view is not displayed anymore and thus frees up memory.
There’s a case when onAttachedToWindow is not called. Let’s take a step-by-step look at this case:
- You defined the view within the xml layout referred to in the Activity’s setContentView.
- You start the app. The Activity is created and the layout is inflated. Upon inflation, our view is created.
- The finish() method is called for some reason in onCreate().
- The Activity shuts down with onDestroy(). The view lifecycle never starts.
Why might this be frustrating? Imagine that the subscription to some events inside your view happened not in onAttachedToWindow, but in the constructor’s code or the onFinishInflate callback. The view lifecycle didn’t start, and the onDetachedFromWindow callback didn’t happen. Without onDetachedFromWindow, the subscription to changes won’t be terminated, leading to memory overload.
Preparing a canvas
Your next step is getting a Canvas object on which you can draw your view. To do this, you’ll need to override the onDraw() method of the View class. Here is what you need to know about onDraw.
- The screen refreshes at the standard rate of 60 Hz, so we have about 16 ms per frame.
- The onDraw callback is just one of the steps of the frame rendering, so we actually have less than 16 ms for onDraw.
- The onDraw() method is invoked only when invalidate() is being called which does not happen every 16 ms.
- A call to onDraw() is made on the main thread.
All this leads us to the following conclusions:
- You cannot create objects within onDraw()- otherwise the Garbage Collector (GC) may get stuck. Further, you can’t draw until the GC method has executed, and its execution may take a long time in this case.
- Calculation processes must be minimized to ensure the method runtime doesn’t take a long time.
While preparing our Canvas, we need to define what we’re going to draw. We have the following:
 Dynamic background containing dozens of circles
 Marker and text reflecting the current state
 And the chart
The chart occupies the whole width of the screen. Our task requires that the chart has the right indent. We can do this by using Canvas.clipRect(left, top, right, bottom).
canvas.clipRect(0f, 0f, clipWidth, height)
returns the following result:
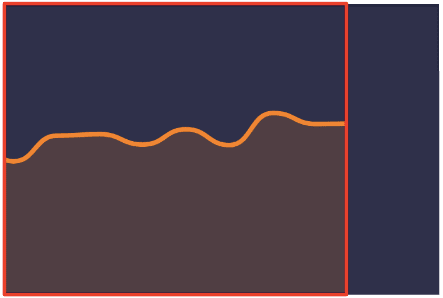
The red frame selects the area that will be sent to the function.
Now that you’ve learned what options are available when you can’t use standard Android SDK components, you’re ready to learn how to draw the chart. But that’s for another time!
In the next part, we’ll get straight to drawing the chart. We’ll learn how to specify the logic of display and animation, delve into hardware acceleration, learn to draw smooth lines, use profiling, and more. After the first start of the app with the new chart, we’ll single out a few performance problems — then I’ll show you the solutions.

Top comments (0)