I woke up one day morning, and I was thinking all night :D : what is better, React Native , Or Flutter for mobile apps developments?
Actually I wanted to to give a try to make exactly the same application in both frameworks
I did the one with React native and I am in progress to create the one with flutter,
the estimated spent time to build it with React Native was about 16 hours.
Now I am going with it in flutter I already spent 9 hours and I am almost done with it! ( I will share it as well )
After installation and setting up the environment based on React Native Documentation
Then we create a new project:
npx react-native init MoviesApp
I used as well the React Native Navigation , which is an external library for navigation between screens in the mobile app
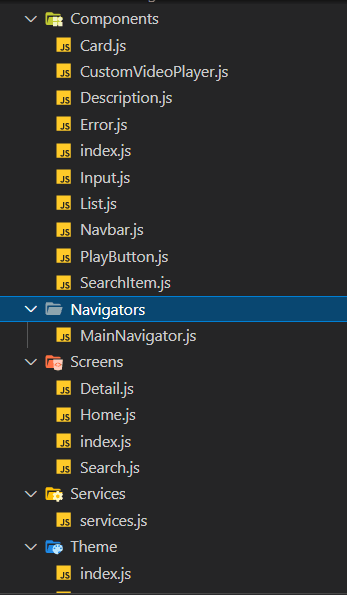
the structure of the app looks like:
The entry point of the project is the APP.js , I was just calling another component for the navigation and add the page stacks
import React, {useEffect, useState} from 'react';
import {ActivityIndicator, SafeAreaView, StatusBar, Text, View} from 'react-native';
import {NavigationContainer} from '@react-navigation/native';
import MainNavigator from './src/Navigators/MainNavigator';
import {ThemeColors} from './src/Theme';
import Toast from 'react-native-toast-message';

// API
import {apiKey} from './src/utils';

const colors = ThemeColors.colors;

const App = () => {
  const [ready, setReady] = useState(false);

  useEffect(() => {
    if (apiKey.api_key) {
      setReady(true);
    }
    return () => {
      setReady(false);
    };
  }, []);

  return (
    <View style={{flex: 1, backgroundColor: colors.background}}>
      <StatusBar hidden={true} />
      {ready ? (
        <NavigationContainer>
          <MainNavigator />
        </NavigationContainer>
      ) : (
        // Just to check to insert your own Api Key. This would not go to customer
        <View>
          <ActivityIndicator size={'large'} />
          <Text style={{fontSize: 18, color: colors.white}}>
            Make sure you inserted your own API Key
          </Text>
          <Text style={{fontSize: 18, color: colors.white}}>
            Located at src/utils/keys
          </Text>
        </View>
      )}
      <Toast ref={ref => Toast.setRef(ref)} />
    </View>
  );
};

export default App;
and the Main stack navigation component I call it with the screen compoennts :
import React from 'react';
import {createStackNavigator} from '@react-navigation/stack';
import {Home, Detail, Search} from '../Screens';
import {Navbar} from '../Components';

// Theme
import {ThemeColors} from '../Theme';
const colors = ThemeColors.colors;

const Stack = createStackNavigator();

function MainStack() {
  return (
    <Stack.Navigator
      headerMode="screen"
      screenOptions={{
        headerStyle: {elevation: 0},
        cardStyle: {backgroundColor: colors.background},
      }}>
      <Stack.Screen
        name="Home"
        component={Home}
        options={{
          // Add a custom Header to stack navigation
          header: ({navigation}) => <Navbar navigation={navigation} />,
          headerTransparent: true,
        }}
      />
      <Stack.Screen
        name="Detail"
        component={Detail}
        options={{
          header: ({navigation}) => (
            <Navbar main={false} navigation={navigation} />
          ),
          headerTransparent: true,
        }}
      />
      <Stack.Screen
        name="Search"
        component={Search}
        options={{
          header: ({navigation}) => (
            <Navbar main={false} navigation={navigation} />
          ),
          headerTransparent: true,
        }}
      />
    </Stack.Navigator>
  );
}

export default function MainNavigator() {
  return <MainStack />;
}
I have created the full explanation of the movies app creation after diving in many small details :
- Setting up the environment correctly
- Navigate between screens
- Navigate to screens dynamically
- Use of The Movie Database API
- Add custom styles
- Component base development
- React Hooks
- Functional Components
- Get Movies by genre
- Lists
- Search Movie Method
- Image Galleries
- Video Player and its commands
Full Course and Explanation about Building React Native Movies App


Top comments (0)