
AWS Amplify is a framework that lets you develop a web or mobile application quickly, by accessing the backend cloud services offered by AWS. In this article, we are going to learn how to use AWS Amplify in React Native by building a fully functional login and registration flow.
This tutorial is going to take a look at one of the most important features of a mobile application – the authentication. You know the scenario. You need to store some amount of user information (credentials) for them to get back and re-use the application rather than creating a new account.
Please make sure to have an AWS account before you begin this tutorial. If you don’t, please sign up for one.
What is AWS Amplify?
Amazon Web Service is a technology that provides cloud services. Since its launch in 2017, Amplify has come a long way in terms of providing a set of services in the form of the toolchain. It is also open source.
To build authentication into a React Native and Expo application with Amplify you first need to install the AWS Amplify CLI. Open a terminal window and execute the command below to install the CLI. We are going to install it as a global module.
npm install -g @aws-amplify/cli
Using Amplify’s CLI tool you are going to find several really helpful CLI plugins and services that you can enable with one click when integrating with a framework like React Native. Services such as GraphQL and REST APIs, authentication UI as well as backend support, storage, hosting, and many more are made available by Amplify’s CLI.
Getting Started with React Native and AWS Amplify
Start by creating a new application project. We are going to Expo CLI to generate the project. Open a terminal window and create a new React Native app.
npx expo-cli init expo-amplify-example
This command creates a new directory called expo-amplify-example. You can name it whatever you want. Inside this directory, you are going to find a complete React Native + Expo SDK project generated. Please note that, on running the above command, you’ll be asked by the CLI which template to use. This tutorial uses a blank template from the managed workflow. If you are familiar with any other template, feel free to choose that.
Expo CLI is a command-line utility to create React Native apps with no build configuration. The reason we’re relying on it is that, first, it’s an awesome tool for such use cases.
Create a New AWS IAM User
Once signed in the AWS account, run the below command from a terminal window. This command asks you to sign in to the AWS Console.
amplify configure
This opens up the AWS console dashboard. Go back to the terminal and press the enter key to continue. This leads you through a bunch of questions in order to configure a user account to use Amplify with the React Native application.
- Choose a region : us-east-2
- Specify the username of the new IAM user : expo-amplify
On entering the username, press enter and the AWS console opens again in a browser window for you to add a user.

In the above screen, make sure that Programmatic access is checked. It allows the new user to have access to create resources in the form of different APIs and tools, providing you with an access key and secret key. Then click on the button Next: Permissions. In the screen below, notice that a policy has been selected by default. Let the default settings as applied. This provides you full access to AWS services by enabling the AWS user (the current user you are creating) to be an administrator.

Then, click on Next: Tags. No modifications are required for the current use case.
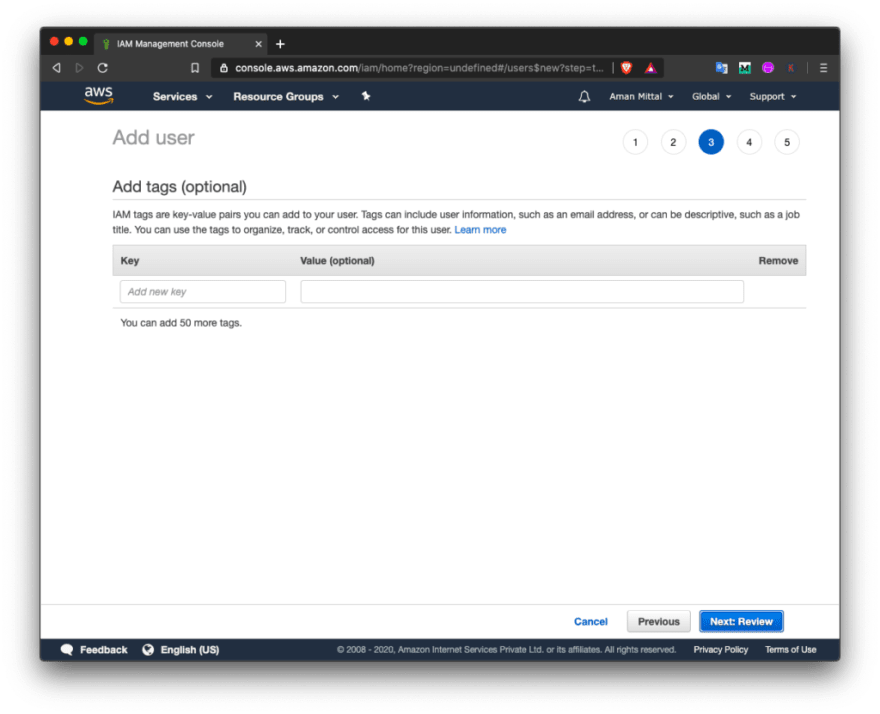
Then, click on Next: Review. Again, no modifications are required. Click on the Create user button and you are directed to a new page where you find the Access Key and Secret Key. Go to your terminal window, press the enter key and when prompted enter the Access Key and the Secret Key sequentially. It is going to ask for a profile name. You can enter the project name or the username here.

Pressing enter for the last time creates a new AWS user.

Integrating AWS Amplify in React Native
To initialize AWS Amplify with the React Native app, run the following command that in return prompts you for some more questions. Go back to the terminal window and run the initialization command as below:
amplify init
After running this command, you are prompted with configuration questions. For the current demo, we are choosing all the default options. For your reference, you can find the options listed next to the question as shown below:

After the Amplify SDK initialization process is complete, notice there are some new file changes inside the project directory. A new directory called amplify/ that stores any local or cloud changes, is added to the root directory of the React Native project. A new file called aws-exports.js appears at the root that you do not have commit at a public Github repository. The amplify init command takes care of this. It is going to update the .gitignore file in the React Native project.
To integrate Amplify SDK with the Expo or React Native app, install the following dependencies. Go back to the terminal window and execute the command:
yarn add aws-amplify aws-amplify-react-native
The package aws-amplify allows you to make requests to the auth and API services provided by AWS. The other package aws-amplify-react-native is framework-specific and contains ready-to-use UI components.
After these dependencies are installed, open the App.js file and add the following import statements.
// after other import statementsimport Amplify from 'aws-amplify';import config from './aws-exports';Amplify.configure(config);
That’s it to integrate Amplify with the Expo app.
Adding Amplify Authentication Resource
Amplify uses Amazon Cognito for authentication. Amazon Cognito is a fully-featured user directory that handles user registration, login, and account recovery. Amplify interfaces with Cognito User Pools to store user information, including social providers like Facebook, Google, and so on.
To add a user authentication with Amplify, start by running the command from a terminal window.
amplify add auth
After running the command, you are prompted with the following set of questions:
Do you want to use the default authentication and security configuration? Default configurationHow do you want users to be able to sign in? EmailDo you want to configure advanced settings? No, I am done.
The first option is to choose the default authentication and security configuration. Let’s leave to default. The second option is to use an auth provider. In our case, let’s selected Email. You can also add a social provider like Facebook or Google Sign-in.
Now run the following command to publish all the local changes to AWS in order to create a user pool.
amplify push
You get the following screen after you execute the above command. shows the details of the current working environment which is dev and displays the status of the resource currently using which is Auth.

Execution of command may take some time to push the changes to enable and create the user pool. Initializing the user authentication setup using Amazon Cognito is complete.
Building the Registration and Login UI
Amplify comes with a High Order Component called withAuthenticator that is used to wrap the root component of the React Native app. Import it in the App.js file and then use it to wrap the App function component.
// ... after other import statementsimport { withAuthenticator } from 'aws-amplify-react-native';// ... contents of App componentfunction App() { return ( <View style={styles.container}> <Text>  +  = React Native + Amplify </Text> <StatusBar style="auto" /> </View> );}// wrap the App component as shown belowexport default withAuthenticator(App);
The withAuthenticator component renders the App component after a successful user sign-in, and it prevents non-sign-in users to interact with your app. It automatically detects the authentication state and updates the UI.
Now, go back to the terminal window and start the Expo development server using the yarn start command.
Once the app is loaded, you are going to get the following initial screen with some UI components already provided by the HOC used to wrap the App component.
Since there are no users, if you try to sign in, you won’t get access.

AWS Amplify is so awesome in this manner that they even provide basic and useful details like when you attempt to sign in with a wrong user name, or a user name that does not exist, an error message is displayed.
Click on the Sign-Up button below the Sign In button to go the registration screen and register a new user.

Make sure to enter a valid email in the fields Username and Email. It sends a verification code for the user to create a new account.

Once the new user account is created, you are going to be re-directed back to the Sign In screen. To sign in, enter the same credentials you registered a new user with.
On successful sign-in, you are going to see the main application.

Adding a Logout Functionality with AWS Amplify in React Native
To use the default UI component for signing out the user from the React Native app, you have to pass a second argument to the withAuthenticator High Order component when it wraps the App component.
Modify the App.js file:
export default withAuthenticator(App, true);
This displays a sign-out button as shown below.

The aws-amplify package also comes with a component called Auth that can be used to create custom sign out buttons and use the same functionality as provided by the High Order Component.
Start by importing the Auth object in the App.js file. Then, inside the App function, create a new asynchronous handler method called signOut which uses the Auth.signOut() method.
The custom method then is used as the value of the onPress prop on a Button component from react-native.
// other import statementsimport { withAuthenticator } from 'aws-amplify-react-native';function App() { async function signOut() { try { await Auth.signOut(); } catch (error) { console.log('Error signing out: ', error); } } return ( <View style={styles.container}> <Text>  +  = React Native + Amplify </Text> <Button title="Sign Out" color="tomato" onPress={signOut} /> <StatusBar style="auto" /> </View> );}// make sure to remove the second argumentexport default withAuthenticator(App);
Here is the output you are going to get after this step:

On pressing the sign out button you are directed back to the login screen.

Creating a Custom Authentication Flow with React Navigation Library
This section onwards let’s learn how to create a custom authentication flow using React Navigation and create custom screens to sign-in, sign-up, confirm verification code, and sign out a user.
Start by adding the react-navigation library in the React Native app. Go back to the terminal window and install the following dependencies.
expo install @react-navigation/native @react-navigation/stack react-native-gesture-handler react-native-reanimated react-native-screens react-native-safe-area-context @react-native-community/masked-view
Once the dependencies are installed, create the following directory structure. The screens/ directory contains all the different screen components. The components/ contains two re-usable components that are going to be used to build form screens.
├──src/│ └──screens/│ └── SignIn.js│ └── SignUp.js│ └── ConfirmSignUp.js│ └── Home.js| └──components/│ └── AppButton.js│ └── AppTextInput.js
Let’s start by building the re-usable components first. Add the following code snippet in AppButton.js file:
import React from 'react';import { StyleSheet, Text, TouchableOpacity } from 'react-native';export default function AppButton({ title, onPress }) { return ( <TouchableOpacity style={styles.button} onPress={onPress}> <Text style={styles.buttonText}>{title}</Text> </TouchableOpacity> );}const styles = StyleSheet.create({ button: { marginVertical: 10, borderRadius: 25, justifyContent: 'center', alignItems: 'center', padding: 15, width: '80%', backgroundColor: 'tomato' }, buttonText: { color: 'white', fontSize: 18, fontWeight: '600', textTransform: 'uppercase' }});
The button component consists of a TouchableOpacity and a Text component that receives the label of the button and onPress handler method as props from the screen component it is going to be used in. Similarly, in the file AppTextInput.js add the code snippet that is going to display a TextInput field along with an icon on the left of the input field. To display the icon, let’s use the package @expo-vector-icons.
import React from 'react';import { View, StyleSheet, TextInput } from 'react-native';import { MaterialCommunityIcons } from '@expo/vector-icons';export default function AppTextInput({ leftIcon, ...otherProps }) { return ( <View style={styles.container}> {leftIcon && ( <MaterialCommunityIcons name={leftIcon} size={20} color="#6e6869" style={styles.icon} /> )} <TextInput style={styles.input} placeholderTextColor="#6e6869" {...otherProps} /> </View> );}const styles = StyleSheet.create({ container: { backgroundColor: '#f9f9f9', borderRadius: 25, flexDirection: 'row', padding: 15, marginVertical: 10 }, icon: { marginRight: 10 }, input: { width: '80%', fontSize: 18, color: '#101010' }});
In the next section, let’s build the first screen to allow a user to sign-in.
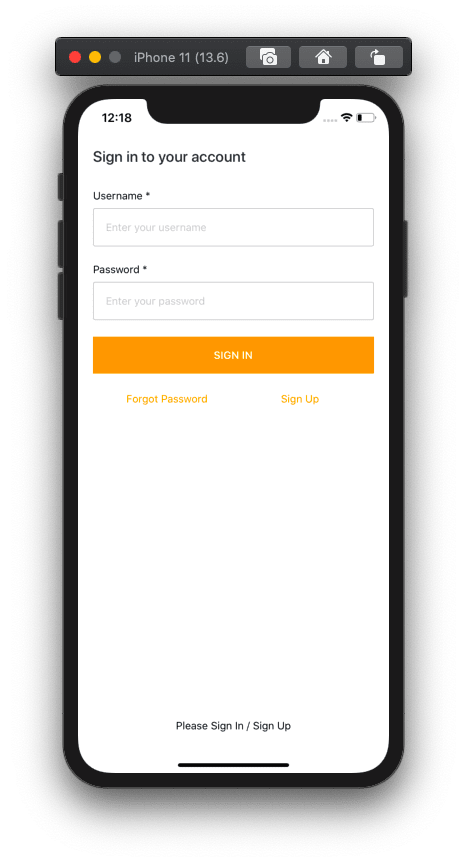
Creating a Custom Sign In Screen
TheSignIn.jsfile is going to contain two input fields and two buttons to let the user enter their credentials to log into the app. The screen is going to be similar in terms of working as you might have seen in an earlier default Sign-In screen that comes with Amplify’s High Order ComponentwithAuthenticator.
TheAuthmodule fromaws-amplifycontains all the methods to use with custom navigation flow. For example, in the code snippet below you are going to findAuth.signIn(username, password);to allow a user log into the app. The two arguments are going to be the user’s credentials coming from the sign-in form. To keep track of the values forusernameandpasswordfields, let’s use React HookuseState.
Ignore theupdateAuthStateprop for now. It becomes more clear on is it being used and for what when the configuration of the navigation flow is complete.
import React, { useState } from 'react';import { View, Text, TouchableOpacity, StyleSheet } from 'react-native';import { Auth } from 'aws-amplify';import { SafeAreaView } from 'react-native-safe-area-context';import AppTextInput from '../components/AppTextInput';import AppButton from '../components/AppButton';export default function SignIn({ navigation, updateAuthState }) { const [username, setUsername] = useState(''); const [password, setPassword] = useState(''); async function signIn() { try { await Auth.signIn(username, password); console.log('  Success'); updateAuthState('loggedIn'); } catch (error) { console.log('  Error signing in...', error); } } return ( <SafeAreaView style={styles.safeAreaContainer}> <View style={styles.container}> <Text style={styles.title}>Sign in to your account</Text> <AppTextInput value={username} onChangeText={text => setUsername(text)} leftIcon="account" placeholder="Enter username" autoCapitalize="none" keyboardType="email-address" textContentType="emailAddress" /> <AppTextInput value={password} onChangeText={text => setPassword(text)} leftIcon="lock" placeholder="Enter password" autoCapitalize="none" autoCorrect={false} secureTextEntry textContentType="password" /> <AppButton title="Login" onPress={signIn} /> <View style={styles.footerButtonContainer}> <TouchableOpacity onPress={() => navigation.navigate('SignUp')}> <Text style={styles.forgotPasswordButtonText}> Don't have an account? Sign Up </Text> </TouchableOpacity> </View> </View> </SafeAreaView> );}
The second button is going to navigate the user to the Sign-Up screen using thenavigation.navigate()function fromreact-navigationlibrary.
Add the followingstylesobject:
const styles = StyleSheet.create({ safeAreaContainer: { flex: 1, backgroundColor: 'white' }, container: { flex: 1, alignItems: 'center' }, title: { fontSize: 20, color: '#202020', fontWeight: '500', marginVertical: 15 }, footerButtonContainer: { marginVertical: 15, justifyContent: 'center', alignItems: 'center' }, forgotPasswordButtonText: { color: 'tomato', fontSize: 18, fontWeight: '600' }});
Making a Custom Sign Up Screen
Creating a custom sign-up screen, you can control what user data or credentials you require for them to create a new account with your app. The custom sign-up screen code snippet is going to have three fields:username,password, andemail.
TheAuth.signUp({ username, password, attributes: { email } });is the method that successfully allows the user to create a new account. Theattributesobject can have other fields such asphone_numberor other custom fields. The values passed through this object are always optional. With React HookuseStateyou can keep track of as many attributes as your app require.
Do note that the Amazon Cognito does not dynamically create custom attributes. In order to use a custom attribute, it has to be created in the user pool. More information on how to do this process with Amplify CLI is in theAmplify’s documentation here.
Open the fileSignUp.jsand add the following code snippet:
import React, { useState } from 'react';import { View, Text, TouchableOpacity, StyleSheet } from 'react-native';import { Auth } from 'aws-amplify';import { SafeAreaView } from 'react-native-safe-area-context';import AppTextInput from '../components/AppTextInput';import AppButton from '../components/AppButton';export default function SignUp({ navigation }) { const [username, setUsername] = useState(''); const [password, setPassword] = useState(''); const [email, setEmail] = useState(''); async function signUp() { try { await Auth.signUp({ username, password, attributes: { email } }); console.log('  Sign-up Confirmed'); navigation.navigate('ConfirmSignUp'); } catch (error) { console.log('  Error signing up...', error); } } return ( <SafeAreaView style={styles.safeAreaContainer}> <View style={styles.container}> <Text style={styles.title}>Create a new account</Text> <AppTextInput value={username} onChangeText={text => setUsername(text)} leftIcon="account" placeholder="Enter username" autoCapitalize="none" keyboardType="email-address" textContentType="emailAddress" /> <AppTextInput value={password} onChangeText={text => setPassword(text)} leftIcon="lock" placeholder="Enter password" autoCapitalize="none" autoCorrect={false} secureTextEntry textContentType="password" /> <AppTextInput value={email} onChangeText={text => setEmail(text)} leftIcon="email" placeholder="Enter email" autoCapitalize="none" keyboardType="email-address" textContentType="emailAddress" /> <AppButton title="Sign Up" onPress={signUp} /> <View style={styles.footerButtonContainer}> <TouchableOpacity onPress={() => navigation.navigate('SignIn')}> <Text style={styles.forgotPasswordButtonText}> Already have an account? Sign In </Text> </TouchableOpacity> </View> </View> </SafeAreaView> );}
The above component is going to have following styles:
const styles = StyleSheet.create({ safeAreaContainer: { flex: 1, backgroundColor: 'white' }, container: { flex: 1, alignItems: 'center' }, title: { fontSize: 20, color: '#202020', fontWeight: '500', marginVertical: 15 }, footerButtonContainer: { marginVertical: 15, justifyContent: 'center', alignItems: 'center' }, forgotPasswordButtonText: { color: 'tomato', fontSize: 18, fontWeight: '600' }});
Building a Custom Verification Code Screen
Once the user creates a new account, they are directed to the Confirm Sign Up screen which is going to ask for the verification code. TheAuth.confirmSignUp()method is used in this case. It takes two arguments:usernameandauthCode. TheauthCodeis what gets sent to the user’s email as the verification code.
Add the following code snippet to the fileConfirmSignUp.js.
import React, { useState } from 'react';import { View, Text, StyleSheet } from 'react-native';import { Auth } from 'aws-amplify';import { SafeAreaView } from 'react-native-safe-area-context';import AppTextInput from '../components/AppTextInput';import AppButton from '../components/AppButton';export default function ConfirmSignUp({ navigation }) { const [username, setUsername] = useState(''); const [authCode, setAuthCode] = useState(''); async function confirmSignUp() { try { await Auth.confirmSignUp(username, authCode); console.log('  Code confirmed'); navigation.navigate('SignIn'); } catch (error) { console.log( '  Verification code does not match. Please enter a valid verification code.', error.code ); } } return ( <SafeAreaView style={styles.safeAreaContainer}> <View style={styles.container}> <Text style={styles.title}>Confirm Sign Up</Text> <AppTextInput value={username} onChangeText={text => setUsername(text)} leftIcon="account" placeholder="Enter username" autoCapitalize="none" keyboardType="email-address" textContentType="emailAddress" /> <AppTextInput value={authCode} onChangeText={text => setAuthCode(text)} leftIcon="numeric" placeholder="Enter verification code" keyboardType="numeric" /> <AppButton title="Confirm Sign Up" onPress={confirmSignUp} /> </View> </SafeAreaView> );}
In this screen, you can add more business logic to handle scenarios such as when the verification code entered by the user does not match the code sent to the user’s email. Once the verification code matches, the user is re-directed to the sign-in screen. The component is going to have the following styles:
const styles = StyleSheet.create({ safeAreaContainer: { flex: 1, backgroundColor: 'white' }, container: { flex: 1, alignItems: 'center' }, title: { fontSize: 20, color: '#202020', fontWeight: '500', marginVertical: 15 }});
Adding a Home Screen with Sign Out Button
The last screen in the current navigation flow is going to be a home screen with some text and a sign out button. The handler method behind the sign out button is the same as you have seen in the earlier sections of this tutorial. Add the following code snippet to Home.js file:
import React from 'react';import { View, Text, StyleSheet, Button } from 'react-native';import { Auth } from 'aws-amplify';export default function Home({ updateAuthState }) { async function signOut() { try { await Auth.signOut(); updateAuthState('loggedOut'); } catch (error) { console.log('Error signing out: ', error); } } return ( <View style={styles.container}> <Text>  + </Text> <Button title="Sign Out" color="tomato" onPress={signOut} /> </View> );}const styles = StyleSheet.create({ container: { flex: 1, alignItems: 'center', marginTop: 20 }});
Checking User’s Logged In State
The App.js file is going to contain all the custom navigation flow as well default Amplify configuration. Open the file and start by adding the following import statements:
import React, { useState, useEffect } from 'react';import { ActivityIndicator, View } from 'react-native';import Amplify, { Auth } from 'aws-amplify';import { NavigationContainer } from '@react-navigation/native';import { createStackNavigator } from '@react-navigation/stack';import config from './aws-exports';import SignIn from './src/screens/SignIn';import SignUp from './src/screens/SignUp';import ConfirmSignUp from './src/screens/ConfirmSignUp';import Home from './src/screens/Home';Amplify.configure(config);
The navigation flow is going to be divided into two stacks. The first stack is called AuthenticationNavigator and has all screens related when the user is not logged in.
The second stack navigator is called AppNavigator that has only one screen: the Home screen. This screen is only available if a user successfully logs in.
const AuthenticationStack = createStackNavigator();const AppStack = createStackNavigator();const AuthenticationNavigator = props => { return ( <AuthenticationStack.Navigator headerMode="none"> <AuthenticationStack.Screen name="SignIn"> {screenProps => ( <SignIn {...screenProps} updateAuthState={props.updateAuthState} /> )} </AuthenticationStack.Screen> <AuthenticationStack.Screen name="SignUp" component={SignUp} /> <AuthenticationStack.Screen name="ConfirmSignUp" component={ConfirmSignUp} /> </AuthenticationStack.Navigator> );};const AppNavigator = props => { return ( <AppStack.Navigator> <AppStack.Screen name="Home"> {screenProps => ( <Home {...screenProps} updateAuthState={props.updateAuthState} /> )} </AppStack.Screen> </AppStack.Navigator> );};
Let’s create a function component called Initializing which is going to be responsible to display a loading indicator when checking the state whether the user is logged in or not.
const Initializing = () => { return ( <View style={{ flex: 1, justifyContent: 'center', alignItems: 'center' }}> <ActivityIndicator size="large" color="tomato" /> </View> );};
To check the state whether the user is logged in or not, in the App component defines a state variable called isUserLoggedIn. It has a default value of initializing which means that when the state of user’s auth is being checked, the loading indicator is shown.
function App() { const [isUserLoggedIn, setUserLoggedIn] = useState('initializing'); // ...}
Amplify’s Auth object provides a method called currentAuthenticatedUser() to check whether the user is logged or not in real-time. Add an asynchronous handler method called checkAuthState which is going to process this task. Based on the result from the method, set the user’s logged-in state by updating the value of the state variable using setUserLoggedIn(). On success, update the value to loggedIn. If there is an error or the user is not logged in, update the value to loggedOut.
The useEffect Hook is going to take care of executing the asynchronous handler method on the initial render.
Add another handler method called updateAuthState that is going to be passed as props to two screens: Home and SignIn. Passing the prop is helpful since the state of auth changes at these two particular screens. Once the user signs in, update the value of setUserLoggedIn to loggedIn using the prop and vice versa when the user signs out.
function App() { // ... useEffect(() => { checkAuthState(); }, []); async function checkAuthState() { try { await Auth.currentAuthenticatedUser(); console.log('  User is signed in'); setUserLoggedIn('loggedIn'); } catch (err) { console.log('  User is not signed in'); setUserLoggedIn('loggedOut'); } } function updateAuthState(isUserLoggedIn) { setUserLoggedIn(isUserLoggedIn); } // ...}
Then, return and wrap all the different conditions based on the value of isUserLoggedIn state variable inside NavigationContainer from the react-navigation library.
function App() { { // ... return ( <NavigationContainer> {isUserLoggedIn === 'initializing' && <Initializing />} {isUserLoggedIn === 'loggedIn' && ( <AppNavigator updateAuthState={updateAuthState} /> )} {isUserLoggedIn === 'loggedOut' && ( <AuthenticationNavigator updateAuthState={updateAuthState} /> )} </NavigationContainer> ); }}export default App;
Running the AWS Amplify React Native Mobile App
To start the Expo development server, execute the command yarn start. Go back to the simulator device or any other device you are using, and you are going to be welcome by the following SignIn screen.

To create a new user, go to the SignUp screen. On successful sign-up, it is going to ask to verify the auth code.

Once the code is verified, you are re-directed to the SignIn screen. On a successful log-in, you are going to see the Home screen.

Summary
It has been a long post but we wanted to cover all the aspects to get started with setting up and configuring user authentication with AWS Amplify, Expo, and React Native apps.
As you can see the AWS Amplify framework, which bridges access to the AWS cloud services is an extremely powerful library, allowing us to implement critically secure features such as login, registration and logout with only a few lines of code, and in no time.
At Instamobile, we are building ready to use React Native apps, backed by various backends, such as AWS Amplify or Firebase, in order to help developers make their own mobile apps much more quickly.
The post Building a React Native App with AWS Amplify | Authentication appeared first on instamobile.

Top comments (0)