
The hard part of creating a good single player game is the implementation of a challenging but not unbeatable opponent. In case of quizzes, the opponent is a knowledge base. Let’s use the huge amount of geological knowledge bases to create a geo quiz game.
The idea is as follows:
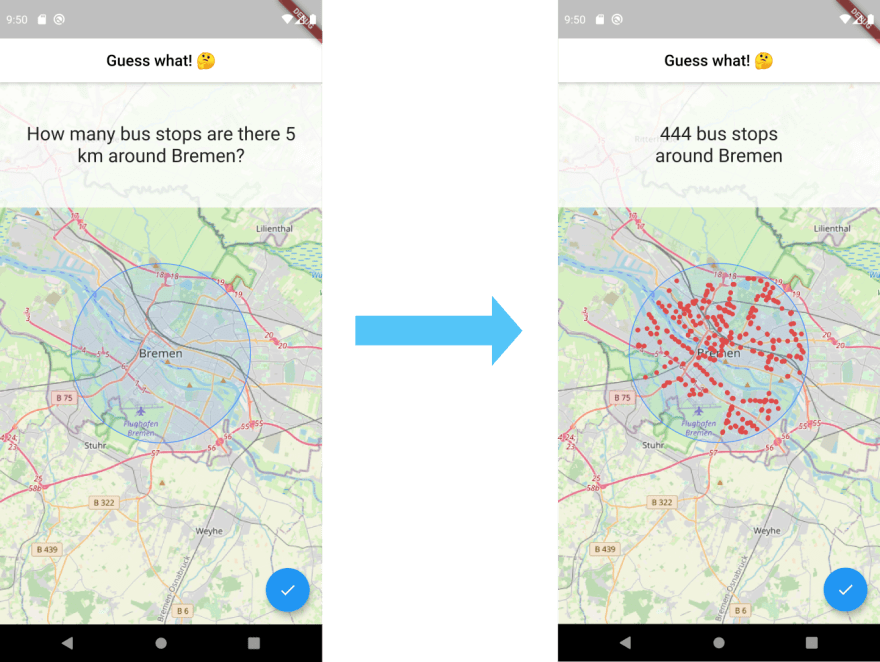
The user is presented a random city or town on a map that has a circle on top indicating a radius. The user is then asked to guess the amount of random entity types within that area (for example: How many McDonald’s do you think are inside of that radius?). The user makes a guess, taps a button and is presented with the correct answer.
You would be surprised how hard it is to actually guess the correct amount!
So basically there are two different screens that look like this:
So what are the pieces we need to put together for this to work:
- Display a map inside of the app
- Display a certain radius around a given center
- Choose a random city or town (fetching its coordinates)
- Get the coordinates of all entities of a certain type inside of an area
Fetching the geo data
Before we start implementing anything with Flutter, let’s take care of getting the geo data we need.
There are quite some options we can choose from but if we require our API to be free and open source, the options decrease. Luckily, there is a huge collaborative project called OpenStreetMap. It is said to have more than 6000 contributors every day that voluntarily enhance the data. The data might not be as accurate as it is for Google Maps for some areas, but in any case it’s sufficient for our use case.
OpenStreetMap itself provides a REST API, but this is primarily for editing and updating map data. An alternative is Overpass API. It is a read-only API that gives the data consumer access to the underlying data of OSM, which is exactly what we want.
Let’s get familiar with the API. Unlike common web services like REST or SOAP, this API has its own query language called Overpass QL. The idea is to have a quantity of statements that manipulate the set containing the resulting nodes (or ways or relations).
Nodes are described using tags, which are basically key value pairs. For example places have the tag “population” with the number of citizens as the key.
Every statement written in Overpass QL ends with a semicolon.
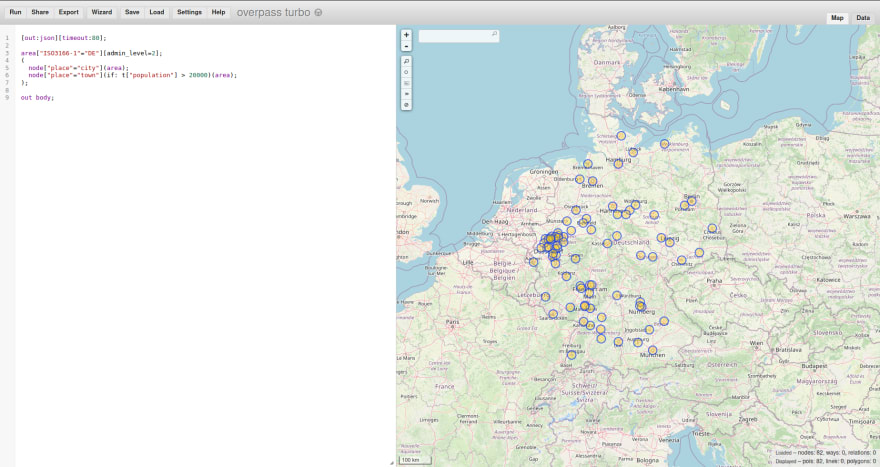
Before we dive too deep into the semantics of the language, I will explain some basics based on a real working query:
[out:json][timeout:80];

area["ISO3166-1"="DE"][admin_level=2]->.germany;
(
  node["place"="town"](if: t["population"] > 20000)(area.germany);
  node["place"="city"](area.germany);
);

out;
We start by defining the output format (JSON in this case). We also define a timeout of 80 seconds because the query will take some time to be completed. That’s because the result set will be quite big.
We then define an area. That’s because otherwise, we would query the whole world which would take too long. In our case, it’s the area with the tag “DE” for the key “ISO3166-1”. This norm defines the country codes. That means we restrict the area to Germany (country code: DE).
Within brackets we define the result set. We let it consist of all nodes with the tag being either town (with a population greater than 20.000) or city.
More information about places can be found in the official wiki.
But how do we test if our query produces a proper result? Thanks to Martin Raifer, there is a website called Overpass Turbo. This website lets the user query the overpass API and inspect the results on an embedded map (or as raw data).
The visualized response as JSON looks as follows (shortened to the first two elements):
{
   "version":0.6,
   "generator":"Overpass API 0.7.56.7 b85c4387",
   "osm3s":{
      "timestamp_osm_base":"2020-10-26T12:50:03Z",
      "timestamp_areas_base":"2020-10-26T11:40:02Z",
      "copyright":"The data included in this document is from www.openstreetmap.org. The data is made available under ODbL."
   },
   "elements":[
{
  "type": "node",
  "id": 12101533,
  "lat": 49.6810158,
  "lon": 8.6227577,
  "tags": {
    "ele": "115",
    "is_in": "Bergstraße,Darmstadt,Hessen,Bundesrepublik Deutschland,Europe",
    "name": "Bensheim",
    "name:de": "Bensheim",
    "name:ru": "Бенсхайм",
    "openGeoDB:loc_id": "14285",
    "place": "town",
    "population": "39642",
    "wikidata": "Q14872"
  }
},
{
  "type": "node",
  "id": 13355228,
  "lat": 48.7427584,
  "lon": 9.3071685,
  "tags": {
    "alt_name": "Esslingen",
    "is_in": "Esslingen,Stuttgart,Baden-Württemberg,Bundesrepublik Deutschland,Europe",
    "name": "Esslingen am Neckar",
    "name:ru": "Эсслинген-на-Неккаре",
    "openGeoDB:loc_id": "16357",
    "openGeoDB:postal_codes": "73728,73730,73732,73733,73734",
    "place": "town",
    "population": "92261",
    "wikidata": "Q3786"
  }
},
    ...
   ]
}
We may not need all of the information, but what we definitely need for our game are the coordinates (lon and lat) and the name.
Implementation
The main part of the implementation is about the geo data. Let’s start with the static data we acquired by executing the previous query and then proceed with dynamic API calls.
Fetching cities and towns
The geo data we just fetched, is static. There won’t be lots of positional changes regarding the towns and cities in Germany in the next years. That’s why we download the data once and access that local data on the file system instead of making a new request to the Overpass API every time.
We take the JSON from the response and put it into a file. Then we create a new project and put it in a folder that we name “assets”:

I downloaded both the German and English cities and put their respective JSON files in a directory called “locations”, which is located directly under the assets folder.
We also need to edit the pubpsec.yml to make the files under the assets folder accessible during runtime:
assets:
    - assets/locations/
Let’s create a service that encapsulates the functionalities that are connected to geographic locations:
import 'dart:convert';

import 'package:flutter/services.dart' show rootBundle;

class GeoService {
  GeoService({
    this.fileName = 'cities_de'
  }): assert(fileName != '');

  final String fileName;

  List<Location> _cachedList;

  Future<List<Location>> getLocations() async {
    if (_cachedList == null) {
      Map<dynamic, dynamic> json = await _getJsonFromFile(fileName);
      _cachedList = _jsonToLocations(json);
    }

    return _cachedList;
  }

  Future<Map<dynamic, dynamic>> _getJsonFromFile(String fileName) async {
    String jsonString = await rootBundle.loadString('assets/locations/$fileName.json');

    return jsonDecode(jsonString);
  }

  List<Location> _jsonToLocations(Map<dynamic, dynamic> json) {
    List<Location> locations = [];

    for (var element in json["elements"]) {
      locations.add(
        Location.fromJson(element)
      );
    }

    return locations;
  }
}

class Location {
  final double longitude;
  final double latitude;
  final String name;

  Location({
    this.longitude,
    this.latitude,
    this.name,
  });

  Location.fromJson(Map<dynamic, dynamic> json) :
    longitude = json['lon'],
    latitude = json['lat'],
    name = json['tags']['name'];
}
We add one public method to our newly created service: getLocations(). This method returns a list of a new model named Location, which holds the coordinates and a name.
The service’s constructor argument is the file name. Since we have a file for German cities (cities_de) and one for English cities (cities_en), we let the caller decide, which one to use and let the German cities be the fallback.
For converting JSON to the Location model, we follow the official guidelines on serializing JSON inside model class and add a fromJson() method.
We then iterate over every child of the elements key inside the JSON data.
Fetching entities
When a new task in the game starts, we need to fetch the respective entities in the given area around the city. The request looks like this:
[out:json][timeout:25];

(
  node["brand"="McDonald's"]["amenity"="fast_food"]["cuisine"="burger"](around:50000,52.520008,13.404954);
);
out body;
In this example, we query all the McDonald’s restaurants that are in a 50 km radius around Berlin.
Let’s abstract from the text form of the query by creating a OverpassQuery class, that holds the parts of the query we need:
class OverpassQuery {
  String output;
  int timeout;
  List<SetElement> elements;

  OverpassQuery({
    this.output,
    this.timeout,
    this.elements
  });

  Map<String, String> toMap() {
    String elementsString = '';

    for (SetElement element in elements) {
      elementsString += '$element;';
    }

    String data = '[out:$output][timeout:$timeout];($elementsString);out;';

    return <String, String> {
      'data': data
    };
  }
}

class SetElement {
  final Map<String, String> tags;
  final LocationArea area;

  SetElement({
    this.tags,
    this.area
  });

  @override
  String toString() {
    String tagString = '';

    tags.forEach((key, value) {
      tagString += '["$key"="$value"]';
    });

    String areaString = '(around:${area.radius},${area.latitude},${area.longitude})';

    return 'node$tagString$areaString';
  }
}

class LocationArea {
  final double longitude;
  final double latitude;
  final double radius;

  LocationArea({
    this.longitude,
    this.latitude,
    this.radius
  });
}

class ResponseLocation {
  double longitude;
  double latitude;
  String name;
  String city;
  String street;

  ResponseLocation({
    this.longitude,
    this.latitude,
    this.name,
    this.city,
    this.street,
  });

  ResponseLocation.fromJson(Map<dynamic, dynamic> json) {
    this.longitude = json['lon'];
    this.latitude = json['lat'];

    Map<String, dynamic> tags = json['tags'];

    if (tags == null) {
      return;
    }

    this.name = json['tags']['name'];
    this.city = json['tags']['addr:city'];
    this.street = json['tags']['addr:street'];
  }
}

class QueryLocation {
  final double longitude;
  final double latitude;

  QueryLocation({
    this.longitude,
    this.latitude,
  });
}
We know that a query (at least the one we need) consists of three parts:
- Options (timeout; output format)
- Defining the result set
- Instruction to output the data
The most relevant part is defining the result set. This is modeled as a list of SetElements. Every SetElement has a list of Tags (being a String Map) and an to limit the space.
A crucial part of our OverpassQuery is the toMap() method because this method brings the query into a form that can be used as the body of our HTTP request to the Overpass API.
Now that we have a class representing an OverpassQuery, let’s use this query to perform an actual request to the Overpass-API. So in addition to the query class, we add an API class:
import 'dart:convert';

import 'package:xml/xml.dart';
import 'package:http/http.dart';

import '../models/overpass_query.dart';


class OverpassApi {
  static String _apiUrl = 'overpass-api.de';
  static String _path = '/api/interpreter';

  Future<List<ResponseLocation>> fetchLocationsAroundCenter(QueryLocation center, Map<String, String> filter, double radius) async {
    Request request = Request('GET', Uri.https(_apiUrl, _path));
    request.bodyFields = _buildRequestBody(center, filter, radius);

    String responseText;

    try {
      StreamedResponse response = await Client()
          .send(request)
          .timeout(const Duration(seconds: 5));

      responseText = await response.stream.bytesToString();
    }
    catch (exception) {
      print(exception);
      return Future.error(exception);
    }

    var responseJson;

    try {
      responseJson = jsonDecode(responseText);
    }
    catch (exception) {
      String error = '';
      final document = XmlDocument.parse(responseText);
      final paragraphs = document.findAllElements("p");

      paragraphs.forEach((element) {
        if (element.text.trim() == '') {
          return;
        }

        error += '${element.text.trim()}';
      });

      return Future.error(error);
    }

    if (responseJson['elements'] == null) {
      return [];
    }

    List<ResponseLocation> resultList = [];

    for (var location in responseJson['elements']) {
      resultList.add(ResponseLocation.fromJson(location));
    }

    return resultList;
  }

  Map<String, String> _buildRequestBody(QueryLocation center, Map<String, String> filter, double radius) {
    OverpassQuery query = new OverpassQuery(
      output: 'json',
      timeout: 25,
      elements: [
        SetElement(
          tags: filter,
          area: LocationArea(
            longitude: center.longitude,
            latitude: center.latitude,
            radius: radius
          )
        )
      ],
    );

    return query.toMap();
  }
}
There is a lot going on in this class so I will explain step by step:
The only public method we have is fetchLocationsAroundCenter(). This method receives a location, a filter and a radius. A filter is a list of an associative array (Map). This represents the tag filters. This is useful if we e. g. only want to fetch the trees. A tree in OSM is determined by the tag "natural": "tree". A McDonald’s entity is determined by "brand": "McDonald's".
So the filter Map says: only if the tags of the entities meet the structure of the given map, they will be queried.
The radius argument determines the km around the center in which the filtered entities should be searched.
The _buildRequestBody()‘s responsibility is to convert the given OverpassQuery to a valid body that meets the requirements of the HTTP-Library of Dart. In this case, the bodyFields field of the Request is basically a Map<String, String>. That’s why this is the return value of our method.
Now why do we need XML-parsing here? Well, the API acts a little bit strange here. In case of success, the response is a JSON string. If there was an error, it’s embedded into an XML document. That’s the reason why try to parse the JSON string. If there was an error parsing it, we know there was an error, parse the XML document and extract the error from the XML. Otherwise, we return the “elements” value from the JSON.
Putting everything in the GeoService
Now that we have an API class that handles Overpass-API requests for us, we need to use that class in our GeoService:
class GeoService {
  GeoService({
    @required this.overpassApi,
    this.fileName = 'cities_de'
  }): assert(overpassApi != null);

  final OverpassApi overpassApi;
  final String fileName;

  ...

  Future<List<Location>> getEntitiesInArea({
    Location center, SearchType type, double radiusInMetres = 5000
  }) async {
    List<ResponseLocation> fetchResult = await this.overpassApi.fetchLocationsAroundCenter(
      QueryLocation(
        longitude: center.longitude,
        latitude: center.latitude
      ),
      type.tags,
      radiusInMetres
    );

    List<Location> result = [];

    fetchResult.forEach((element) {
      result.add(
        Location(
          longitude: element.longitude,
          latitude: element.latitude,
          name: element.name
        )
      );
    });

    return result;
  }

  ...

}
With the constructor now expecting the OverpassAPI class in its constructor, we are now able to call it inside our newly created function. We pass the QueryLocation, the tags and the radius and iterate over the result set, turning it into a List<Location>.
Search types
As an observant reader you might have noticed that the getEntitiesInArea() method of our GeoService expects a SearchType. This is a class we haven’t introduced yet. The idea is to have different search types like trees, bars etc. of which a random one is picked when the user wants a new geo guessing exercise round and passed to the API call.
For this, we need a place to define the available search types and a service that returns them.
Let’s define a search_types.json that is located under assets/ and define our search types like this:
{
  "elements": [
    {
      "name": {
        "singular": "bar",
        "plural": "bars"
      },
      "tags": {
        "amenity": "bar"
      }
    },
    {
      "name": {
        "singular": "pub",
        "plural": "pubs"
      },
      "tags": {
        "amenty": "pub"
      }
    },
    {
      "name": {
        "singular": "McDonald's",
        "plural": "McDonald's"
      },
      "tags": {
        "brand": "McDonald's",
        "amenity": "fast_food",
        "cuisine": "burger"
      }
    },
    {
      "name": {
        "singular": "street lamp",
        "plural": "street lamps"
      },
      "tags": {
        "highway": "street_lamp"
      }
    },
    {
      "name": {
        "singular": "tree",
        "plural": "trees"
      },
      "tags": {
        "natural": "tree"
      }
    },
    {
      "name": {
        "singular": "memorial",
        "plural": "memorials"
      },
      "tags": {
        "historic": "memorial"
      }
    },
    {
      "name": {
        "singular": "bus stop",
        "plural": "bus stops"
      },
      "tags": {
        "highway": "bus_stop"
      }
    },
    {
      "name": {
        "singular": "fire station",
        "plural": "fire stations"
      },
      "tags": {
        "amenity": "fire_station"
      }
    },
    {
      "name": {
        "singular": "bench",
        "plural": "benches"
      },
      "tags": {
        "amenity": "bench"
      }
    },
    {
      "name": {
        "singular": "village",
        "plural": "villages"
      },
      "tags": {
        "place": "village"
      }
    },
    {
      "name": {
        "singular": "post box",
        "plural": "post boxes"
      },
      "tags": {
        "amenity": "post_box"
      }
    },
    {
      "name": {
        "singular": "recycling container",
        "plural": "recycling containers"
      },
      "tags": {
        "amenity": "recycling"
      }
    }
  ]
}
By having a JSON file with its search type definitions, we have a very extendible game.
Apart from the tags the search type should have, we also define the singular and plural of the word so that we can display meaningful sentences with the search type like: “How many bars are around Hamburg?”
Now we need a service to retrieve these search type from the JSON file and put it into a new class:
import 'dart:convert';

import 'package:flutter/services.dart' show rootBundle;

class SearchTypeService {
  List<SearchType> _cachedList;

  Future<List<SearchType>> getSearchTypes() async {
    if (_cachedList == null) {
      List<dynamic> json = await _getJsonFromFile('search_types');
      _cachedList = _jsonToSearchTypes(json);
    }

    return _cachedList;
  }

  Future<List<dynamic>> _getJsonFromFile(String fileName) async {
    String jsonString = await rootBundle.loadString('assets/$fileName.json');

    return jsonDecode(jsonString)['elements'];
  }

  List<SearchType> _jsonToSearchTypes(List<dynamic> json) {
    List<SearchType> searchTypes = [];

    for (var element in json) {
      searchTypes.add(
        SearchType.fromJson(element)
      );
    }

    return searchTypes;
  }
}

class SearchType {
  String singular;
  String plural;
  Map<String, String> tags;

  SearchType({
    this.singular,
    this.plural,
    this.tags
  });

  SearchType.fromJson(Map<dynamic, dynamic> json) {
    this.singular = json['name']['singular'];
    this.plural = json['name']['plural'];

    Map<String, String> tags = new Map();

    json['tags'].forEach((key, value) {
      tags[key] = value;
    });

    this.tags = tags;
  }
}
This happens in a similar fashion like the GeoService fetches the cities from the cities_xx.json.
Displaying a map
Now it’s time to actually display a map in the UI. Because we are working with OSM, we can’t use the google_maps_flutter package. Instead, we are going to use flutter_map. It’s an implementation of the popular Javascript library Leaflet. Let’s add this dependency to our pubspec:
dependencies:
  flutter:
    sdk: flutter

  http: 0.12.2
  xml: 4.5.1
  flutter_map: 0.10.1+1
Now that we have the possibility to display a map, we are going to implement the main widget, showing the map and enabling the user to interact with the quiz:
import 'dart:math';

import 'package:flutter/material.dart';
import 'package:flutter_geo_guesser/api/overpass_api.dart';
import 'package:flutter_geo_guesser/services/geo_service.dart';
import 'package:flutter_geo_guesser/services/search_type_service.dart';
import 'package:flutter_map/flutter_map.dart';
import 'package:latlong/latlong.dart';

class Quiz extends StatefulWidget {
  @override
  _QuizState createState() => _QuizState();
}

class _QuizState extends State<Quiz> {
  final MapController _mapController = new MapController();
  final OverpassApi _overpassApi = new OverpassApi();
  GeoService _geoService;

  List<SearchType> _searchTypes = [];
  List<Location> _locations = [];

  Location _currentLocation;
  List<Location> _entities = [];
  SearchType _currentType;
  bool _answered = false;

  @override
  void initState() {
    _geoService = new GeoService(overpassApi: _overpassApi);

    WidgetsBinding.instance.addPostFrameCallback((timeStamp) async {
      _initialize();
    });

    super.initState();
  }

  @override
  Widget build(BuildContext context) {
    return Scaffold(
      appBar: AppBar(
        backgroundColor: Colors.white,
        title: Center(child: Text("Guess what! 🤔", style: TextStyle(color: Colors.black))),
      ),
      body: Center(
        child: Stack(
          children: [
            _getMap(),
            _getTopContainer()
          ],
        )
      ),
      floatingActionButton: FloatingActionButton(
        onPressed: _proceed,
        child: Icon(Icons.check),
      ),
    );
  }

  ...

}
First, we’re initializing a bunch of member variables. The first three are just to keep single instances of the controller and services we are using. These are initialized once.
_searchedTypes and _locations represent the static data we are reading from our JSON files (cities_xy.json and search_types.json).
The rest of the variables exist to store the current state of the quiz. This is necessary so that we can adjust what the widget shows accordingly.
The main layout is pretty simple: we have a Stack with the map at the bottom and a top container on top. This container shows either the current quiz question (“How many entities of type xy are there around z?”) or the answer (“There are x entitites of type y around z”).
The FloatingActionButton exists to let the user proceed. Either to the next question or from the unanswered state to answered state.
Let’s have a look at the _initialize() method we are calling inside of initState() after the first frame was rendered:
void _initialize() async {
    _searchTypes = await SearchTypeService().getSearchTypes();
    _locations = await _geoService.getLocations();

    _getNewLocation();
    _getNewSearchType();
  }

  void _getNewLocation() {
    if (_locations.isEmpty) {
      return;
    }

    setState(() {
      _currentLocation = _locations[Random().nextInt(_locations.length)];
    });

    _mapController.move(
        new LatLng(_currentLocation.latitude, _currentLocation.longitude),
        11
    );
  }

  void _getNewSearchType() {
    _currentType = _searchTypes[Random().nextInt(_searchTypes.length)];
  }
Initially, we are fetching the search types we have set in our search_type.json. We also fetch the locations from cities_xx.json. After that, we let our algorithm choose a new random location and let the MapController move there which centers this location in our map. After having chosen a new location, we also choose a new SearchType.
Now that we’ve had a look at the initialization, let’s inspect what happens when the user taps the FloatingActionButton which calls the _proceed() method:
void _proceed() async {
    if (_answered == true) {
      _showNewQuestion();
      return;
    }

    _answerQuestion();
  }

  void _showNewQuestion() {
    setState(() {
      _getNewLocation();
      _getNewSearchType();
      _entities = [];
      _answered = false;
    });
  }

  Future _answerQuestion() async {
    _indicateLoading();

    _entities = await GeoService(overpassApi: _overpassApi).getEntitiesInArea(
        center: _currentLocation,
        type: _currentType
    );

    Navigator.of(context).pop();

    setState(() {
      _answered = true;
    });
  }
There are two states in which the FAB can be tapped: when the current question is display or when the current answer is displayed.
We differentiate these two states by evaluation the _answered variable.
If _answered equals true, it means that tapping the FAB should display a new question. That’s why we choose a new location, a new search type and reset the entities and the answered flag.
Otherwise, if _answered equals false, we need to display the answer to the previous question. First, we indicate a loading because the following procedure can take some time as it’s out of our control how quickly the Overpass API responds to our query. Then we fetch the entities in the current location, await the result, dismiss the loading indicator and set the _answered flag to true.
Great! Now that we have the necessary data in place, we’re only left to use this data to display a map that visualizes it.
FlutterMap _getMap() {
    return FlutterMap(
      mapController: _mapController,
      options: new MapOptions(
        interactive: false,
        center: _currentLocation != null ? new LatLng(_currentLocation.latitude, _currentLocation.longitude) : null,
        zoom: 11,
      ),
      layers: [
        new TileLayerOptions(
            urlTemplate: "https://{s}.tile.openstreetmap.org/{z}/{x}/{y}.png",
            subdomains: ['a', 'b', 'c']
        ),
        new MarkerLayerOptions(
          markers: _getMarkers(),
        ),
        new MarkerLayerOptions(
          markers: _getAreaMarkers(),
        ),
      ],
    );
  }

  List<Marker> _getMarkers() {
    List<Marker> markers = [];

    for (Location location in _entities) {
      markers.add(
          new Marker(
            width: 6,
            height: 6,
            point: new LatLng(location.latitude, location.longitude),
            builder: (ctx) =>
            new Container(
              decoration: BoxDecoration(
                  shape: BoxShape.circle,
                  color: Colors.red
              ),
            ),
          )
      );
    }

    return markers;
  }

  List<Marker> _getAreaMarkers() {
    if (_currentLocation == null) {
      return [];
    }

    return [new Marker(
      width: 230.0,
      height: 230.0,
      point: new LatLng(_currentLocation.latitude, _currentLocation.longitude),
      builder: (ctx) =>
      new Container(
        decoration: BoxDecoration(
            shape: BoxShape.circle,
            color: Colors.blue.withOpacity(0.1),
            border: Border.all(color: Colors.blueAccent)
        ),
      ),
    )];
  }

  Container _getTopContainer() {
    return Container(
      alignment: Alignment.topCenter,
      child: Container(
          padding: EdgeInsets.all(32),
          height: 160,
          alignment: Alignment.center,
          width: double.infinity,
          color: Colors.white.withOpacity(0.8),
          child: Text(
            _getText(),
            style: TextStyle(fontSize: 24),
            textAlign: TextAlign.center,
          )
      ),
    );
  }

  String _getText() {
    if (_currentLocation == null) {
      return '';
    }

    if (_currentType == null) {
      return '';
    }

    if (_answered == false) {
      return "How many ${_currentType.plural} are there 5 km around ${_currentLocation.name}?";
    }

    return "${_entities.length.toString()} ${_currentType.plural}\naround ${_currentLocation.name}";
  }
The FlutterMap itself receives the controller and some MapOptions. We don’t want the map to be interactive (that would include the ability to pan and zoom) because it would make things too easy for the user. If we have a _currentLocation, we want the center to be this location.
Without layers, the map does not display anything. That’s why we need to specify them. At the bottom we want the OSM map to be displayed (Leaflet supports other providers as well).
On top of that, we display a red dot for every entity of the current SearchType.
Last but not least, we display the area circle indicating the radius in which we are searching for the current SearchType. Being semi-transparent, it still displays the underlying red dots.
Result
That’s it, we’re done. Let’s look at the result from the user perspective:
Final words
The existing map plugins make it very easy to embed a map into a Flutter app. Utilizing the enormous amount of free data provided by the Overpass API in combination with a map plugin, we were able to create a quiz game that makes the user guess how many entities of a certain type surround a given town or city.
The application is kept extendable. All of the static data like cities and search types is stored in separate JSON files instead of the code.

Top comments (0)