
If you're creating a blog, you probably want to show a preview of your blog posts on your homepage. One of the most important parts of the preview is the post description. However, you may have noticed that descriptions of different lengths can break the layout, making the homepage look inconsistent. But worry not, there's a solution to this problem - the TailwindCSS Line Clamp plugin.
What is the TailwindCSS Line Clamp plugin?
TailwindCSS Line Clamp provides utilities for visually truncating text after a fixed number of lines. It allows you to specify how many lines of text should be visible before truncating, which is useful when you want to display a preview of your blog post.
Installation
As of Tailwind CSS v3.3, the line-clamp utilities are included in the framework by default, so the plugin is no longer required. However, if you're using an older version of Tailwind CSS, you can still install the plugin from npm:
npm install -D @tailwindcss/line-clamp
Then, add the plugin to your tailwind.config.js file:
module.exports = {
  theme: {
    // ...
  },
  plugins: [
    require("@tailwindcss/line-clamp"),
    // ...
  ],
}
Usage
You can use the line-clamp-{n} utilities to specify how many lines of text should be visible before truncating. For example:
<p class="line-clamp-3">
  Lorem ipsum dolor sit amet, consectetur adipiscing elit. Aliquam eget nibh et
  nisi bibendum porttitor. Sed id pretium felis. In ultrices, velit vitae
  imperdiet auctor, massa dolor dapibus lectus, sit amet luctus mi nunc in
  velit. Aenean quis lobortis odio. Vivamus luctus ex non nulla consequat, a
  tincidunt sapien facilisis.
</p>
This will show only the first 3 lines of the paragraph and then add an ellipsis to indicate that there is more content. To remove the line-clamping, you can use the line-clamp-none utility. For example:
<p class="line-clamp-3 md:line-clamp-none">
  Lorem ipsum dolor sit amet, consectetur adipiscing elit. Aliquam eget nibh et
  nisi bibendum porttitor. Sed id pretium felis. In ultrices, velit vitae
  imperdiet auctor, massa dolor dapibus lectus, sit amet luctus mi nunc in
  velit. Aenean quis lobortis odio. Vivamus luctus ex non nulla consequat, a
  tincidunt sapien facilisis.
</p>
This will show the first 3 lines of the paragraph on small screens and the entire paragraph on medium screens and above.
Note that the line-clamp-{n} utility sets other properties like display and overflow in addition to -webkit-line-clamp, which are not unset by line-clamp-none. So depending on what you're trying to achieve, you may need to explicitly override those properties with utilities like flex or overflow-visible as well.
Example
Here's an example of how you can use the line-clamp-{n} utility as part of a blog post card component:
<p class="line-clamp-2 text-slate-600">{post.description}</p>
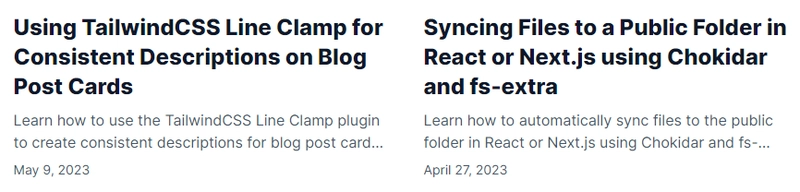
No matter how long the description, it takes 2 lines at most. This is what it looks like:
With the TailwindCSS line-clamp, you can easily create consistent and visually pleasing blog post descriptions on your website. Try it out today and see the difference it can make! 🚀

Top comments (0)