I have always been a fans of Diablo and have been playing the Diablo II Expansion on and off for years. One thing in the Diablo II, Diablo Clone(DC), is definitely the most exciting event in the world of Diablo. I cannot stress enough that how frustrated I was whenever I missed a hunting event.
So.....what could I do for this? huh.....why not make an tiny application for DC notification? How hard could it be? It must be very easy. Let's do it😁
Let's see the result first 😁
and how we add the PWA website as an app-like onto mobile desktop
In this article, I will demonstrate:
1. How to make a Windows Service with C# .Net Core 2. How to use Netlify Lambda function (Powered by AWS Lambda. Simplified by Netlify) as a server-less back-end 3. Convert a Gatsbyjs website to Progressive Web App(PWA) 4. How to integrate Push Notification into the PWA 5. Use Fauna Database to store push subscriptions.
Notice: this article is not a step by step tutorial on topics e.g. converting website to PWA. Those topics have been beautifully written in a succinct approach by others. Instead I will provide my thoughts and helpful references for you to glue the parts together and complete this project.
Initially, I was thinking of flashing a LED light when the DC event is happening and playing a music for selling Stone of Jordan and a different music for Diablo walks the earth. Then setting up my old Arduino components exhausted all my interests on it plus I won't be able to get notified when I'm not at home, so I dropped the LED light idea.
Then I turned around and had a look at what I had: a Gatsby + Netlify CMS website. Interestingly, I even found that the Gatsbyjs Netlify CMS template that I'm using supports Netlify CMS Function~!😍 Then this opens a door for me to use the lambda function as a server-less back-end so that I could do more interesting things.
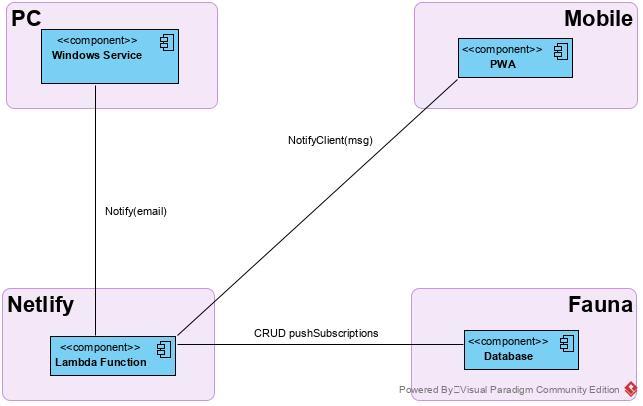
So this is how the project works:
👉when events of selling Stone of Jordan and Diablo walks the earth happen, a file located under a folder let's say: d:\games\diablo2\dc.txt will be updated with the room name, game server ip, my character's name and the date and time will be recorded inside this file.
👉a Windows Service keeps track of the changes of this file and will notify the server-less Netlify Lambda function
👉the Netlify Lambda function then push out notifications to all related subscribers
So how does this all fit together? Okay, let's have a look what the project look like:
Project Architecture
Section 1: Windows Service
For the Windows Service project, its main task is monitoring the dc.txt file and notify the Netlify Function(NF) once the content of this file is changed.
Why makes it a Windows Service?
Because I would like to have a service running in background and continuously keeps tracking of the file and informs the NF once the events happened. In addition, I am lazy, I do not want to manually run this project every time myself, instead once my laptop started, run the service automatically.
Okay, enough talky talk, let's rock and roll:
Open Visual Studio 2019 and create a Worker Service project
services.AddConfiguration<DCMonitorConfiguration>(hostContext.Configuration, "DCMonitor"); is not necessary if you don't mind a little bit hard-coding stuff in a personal project.
Now open the Worker.cs, change it to something like this:
publicclassWorker:BackgroundService{privatereadonlyILogger<Worker>_logger;privatereadonlystringTargetFile=@"d:\games\Diablo2\dc.txt";privatereadonlystringPushEndpoint="https://yourwebsite.com/.netlify/functions/";privatereadonlystringNotifyEmail="youremail@gmail.com";privatereadonlyHttpClient_httpClient;privateFileSystemWatcher_fileWatcher;publicWorker(ILogger<Worker>logger,IHttpClientFactoryhttpClientFactory){_logger=logger;_httpClient=httpClientFactory.CreateClient();_httpClient.DefaultRequestHeaders.Add("User-Agent","DCMonitorSvc");_httpClient.BaseAddress=newUri(PushEndpoint);}protectedoverrideasyncTaskExecuteAsync(CancellationTokenstoppingToken){try{_logger.LogInformation("Worker running at: {time}",DateTimeOffset.Now);awaitTask.Delay(1000,stoppingToken);}catch(Exceptionex){_logger.LogError($"Worker error at {DateTime.Now}{Environment.NewLine}{ex.Message}");}}publicoverrideTaskStartAsync(CancellationTokencancellationToken){try{//System.Diagnostics.Debugger.Launch();_fileWatcher=SetupFileWatcher(TargetFile);returnbase.StartAsync(cancellationToken);}catch(Exceptionex){_logger.LogError($"Worker error at {DateTime.Now}{Environment.NewLine}{ex.Message}");returnTask.FromResult(ex);}}publicoverrideTaskStopAsync(CancellationTokencancellationToken){_fileWatcher.EnableRaisingEvents=false;_fileWatcher.Dispose();returnbase.StopAsync(cancellationToken);}privateFileSystemWatcherSetupFileWatcher(stringtargetFile){varwatcher=newFileSystemWatcher(targetFile,"*.txt");watcher.NotifyFilter=NotifyFilters.LastAccess|NotifyFilters.LastWrite|NotifyFilters.FileName|NotifyFilters.CreationTime|NotifyFilters.DirectoryName;// Add event handlers.watcher.Changed+=OnChanged;// Begin watching.watcher.EnableRaisingEvents=true;returnwatcher;}privateasyncvoidOnChanged(objectsource,FileSystemEventArgse){// Specify what is done when a file is changed, created, or deleted.Console.WriteLine($"File: {e.FullPath}{e.ChangeType} at {DateTime.Now}");if(e.ChangeType==WatcherChangeTypes.Changed){try{varfileContent=File.ReadAllText(e.FullPath);varparts=fileContent.Split('|');// 2020-08-08 16:59:00|AcA|aca-123|398120|112if(!string.IsNullOrWhiteSpace(fileContent)){awaitAlert(fileContent);}}catch(Exceptionex){Console.WriteLine($"File is in use.{Environment.NewLine}{ex.Message}");}}}privateasyncTaskAlert(stringnotificationContent){stringurl=$"alert?dc={notificationContent}&email={NotifyEmail}";varresponse=await_httpClient.GetAsync(url);response.EnsureSuccessStatusCode();}}
So what I have done here is:
Defining the StartAsync(), StopAsync() and Execute() functions as they map to start/stop the Windows Service we are developing. Most importantly, we create a FileWatcher which keeps tracking of the file(dc.txt) under the game folder and sends out notifications by calling an endpoint which I will cover in the next section.
Once the project is built, register this Windows Service in a command line like this:
# Register your Windows Service>sc.execreateDCMonitorbinPath="to-your-windows-service.exe"# Delete your Windows Service>sc.exedeleteDCMonitor
Then open press Win button and type Service to open the Services panel and start your very own Windows Service:
You can make it automatic so that it starts once PC starts.
Go to Task Manager, you should be able to find your Windows Service under background processes
......
Section 2: Progressive Web App + Push Notification
In this section, I will provide references on how to set up a Gatsby.js + Netlify CMS website and add support to Service Worker so that we can turn the website into a Progressive Web App(PWA). Then I will set up Push Notification so that the PWA will be able to notify users when the delicious Diablo Clone events happens.
I use this gatsby-starter-netlify-cms template to start building my personal blog website. The reason is very simple, with a few steps of configuration, I am able to have a fully functional blog website. It also has the real-time preview functionality which enables me to see how my blog looks like when I am still in writing.
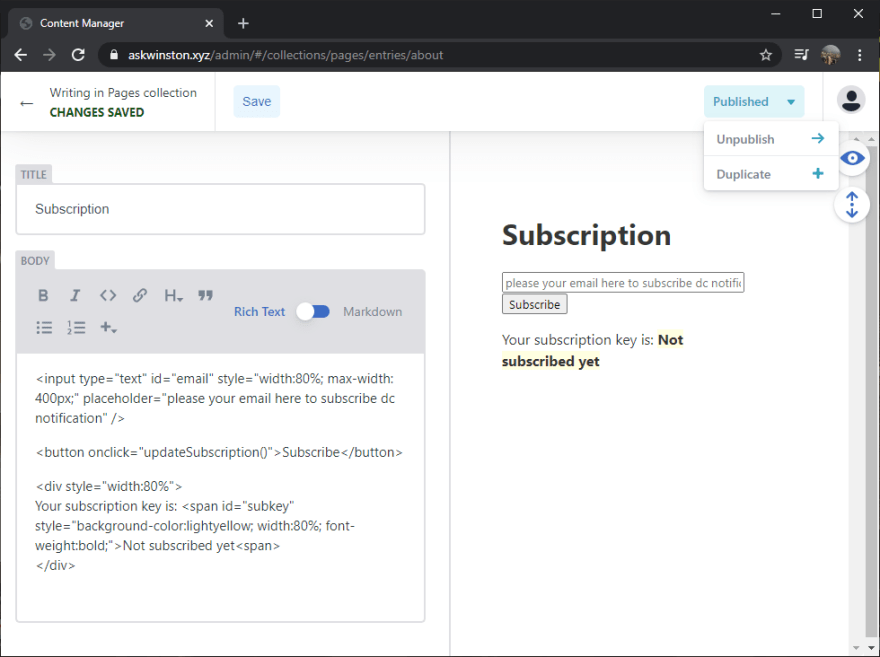
What is more interesting is, I can even use the Blog editor to add html components on a page on the fly! This means for simple UI changes, I do not even need any IDEs, simply just open my website's admin panel and write a few lines of code, then clicks Publish, the new html components will be immediately added onto my website. How cool it is~! 🤩
To give you a bit of idea about how it looks like:
PWA
Adding Service Worker and convert our normal website to PWA has been made incredibly easy. Digital Ocean has written a great article which helps me a lot on converting my Gatsby website to PWA, I will not repeat what has been written there, so follow the tutorial here:
Notes: on section 4, the old approach doesn't work anymore, so don't stop there, go ahead use the VAPID approach, everything will be fine 😉
When talking about push notification, there are 2 actions: Push and Notifying. Once I speak it out, it seems obvious, but back then I was not aware of these. So here is my learning notes:
The Push events happen at server side, the Notifying part happens at client side.
So let's do the client side part. In the project under the staticfolder add a file helpers.js:
asyncfunctionaskForPermission(){console.log("ask for permission");if(!("Notification"inwindow)){console.log("This browser does not support notifications!");thrownewError("This browser does not support notifications!");}conststatus=awaitNotification.requestPermission();console.log("Notification permission status:",status);returnstatus==="granted";}functionurlB64ToUint8Array(){constapplicationServerPublicKey="";constpadding="=".repeat((4-(applicationServerPublicKey.length%4))%4);constbase64=(applicationServerPublicKey+padding).replace(/\-/g,"+").replace(/_/g,"/");constrawData=window.atob(base64);constoutputArray=newUint8Array(rawData.length);for(leti=0;i<rawData.length;++i){outputArray[i]=rawData.charCodeAt(i);}returnoutputArray;}// Subscribe user is actually subscribing push registrationasyncfunctionsubscribeUser(swRegistration){constapplicationServerKey=urlB64ToUint8Array();try{constsubscription=awaitswRegistration.pushManager.subscribe({userVisibleOnly:true,applicationServerKey:applicationServerKey,});console.log("User has subscribed successfully");returnsubscription;}catch(subscribeError){if(Notification.permission==="denied"){console.warn("Permission for notifications was denied");}else{console.error("Failed to subscribe the user: ",subscribeError);}returnnull;}}asyncfunctiongetSubscription(){try{constswRegistration=awaitnavigator.serviceWorker.ready;letpushSubscription=awaitswRegistration.pushManager.getSubscription();// if not found from pushManager, then we subscribe the user right nowif(!pushSubscription){pushSubscription=awaitsubscribeUser(swRegistration)}pushSubscription=pushSubscription.toJSON();document.getElementById("subkey").textContent=pushSubscription.keys.auth;returnpushSubscription;}catch(error){console.log("getSubscription() error: ",error);returnnull;}}functionvalidateEmail(email){constre=/^(([^<>()[\]\\.,;:\s@\"]+(\.[^<>()[\]\\.,;:\s@\"]+)*)|(\".+\"))@((\[[0-9]{1,3}\.[0-9]{1,3}\.[0-9]{1,3}\.[0-9]{1,3}\])|(([a-zA-Z\-0-9]+\.)+[a-zA-Z]{2,}))$/;constvalid=re.test(email);returnvalid;}asyncfunctionupdateSubscriptionOnServer(pushSubscriptionObject){leturl="";try{url="https://yourwebsite.netlify.app/.netlify/functions/updateSubscription";awaitfetch(url,{method:"POST",// *GET, POST, PUT, DELETE, etc.mode:"no-cors",// no-cors, *cors, cors, same-origincache:"no-cache",// *default, no-cache, reload, force-cache, only-if-cachedcredentials:"same-origin",// include, *same-origin, omitheaders:{"Content-Type":"application/json;charset=utf-8",},redirect:"follow",// manual, *follow, errorreferrerPolicy:"no-referrer",// no-referrer, *no-referrer-when-downgrade, origin, origin-when-cross-origin, same-origin, strict-origin, strict-origin-when-cross-origin, unsafe-urlbody:JSON.stringify(pushSubscriptionObject),// body data type must match "Content-Type" header});returntrue;}catch(ex){console.log("saveReg() catch block:",ex);returnfalse;}}asyncfunctionupdateSubscription(){try{constallowed=awaitaskForPermission();if(!allowed)return;letsubscription=awaitgetSubscription();if(!subscription)return;// emailconstemail=getEmail();if(!email||!validateEmail(email)){alert("huh...so how are you going to receive notifications?");return;}letextra={email:email};subscription.extra=extra;constsuccessful=awaitupdateSubscriptionOnServer(subscription);if(successful)alert("you have successfully subscribed to the DC monitor");elsealert("shit happens, try it later");}catch(err){console.log("updateSubscription() failed: ",err);}};functiongetEmail(){console.log("getEmail()");letemail=document.getElementById("email").value;constpathname=window.location.pathname;console.log("the current location is: ",pathname);if(pathname.indexOf("/about")>=0){email=document.getElementById("email").value;}if(localStorage){if(!email){email=localStorage.getItem("dc_email");}else{localStorage.setItem("dc_email",email);}}if(email){document.getElementById("email").value=email;}console.log("getEmail(): ",email);returnemail;};
So what we do here is:
we need to ask user's permission to do push notification.
get push subscription for this user from pushManager, if this user hasn't subscribed, then subscribe the user
patch the email onto the push subscription object, so that later we can target specific users for different notifications.
finally we save the updated push notification object into Fauna Database
In order to make the Javascript code available to the html components we added from the Blog editor, I have to put the script under static folder as all files under this folder will be kept as is. If I put the helpers.js under src folder, then the functions will be uglified then the function names will be simplified and I won't be able to reference them from the html code. Ideally, I would like to hide the public and private keys from the code and use Environment variables, but I have not figured it out. So please let me know if you are sure you know how to import the env variables for files under static folder. I have tried the dotenv, but had no luck.
......
Section 3: Netlify Functions
The features of Netlify Functions(NF) fits well as our server-less back-end. The idea is: our Windows Service calls the serverless functions and the functions will then notify the subscribed users.
Let's open lambda folder and add a file called: dcalert.js
constwebPush=require("web-push");const{getSubscriptions,removeSubscription,getResponse,getSubscriptionsByEmail}=require("./utils/utils.js");constvapidPublicKey=process.env.VAPID_PUBLIC_KEY;constvapidPrivateKey=process.env.VAPID_PRIVATE_KEY;constnotificationOptions={TTL:60,// TODO 4.3b - add VAPID detailsvapidDetails:{subject:`mailto:${process.env.VAPID_EMAIL}`,publicKey:vapidPublicKey,privateKey:vapidPrivateKey,},};asyncfunctionnotifySubscriber(pushSubscription,dc){try{constresponse=awaitwebPush.sendNotification(pushSubscription,dc,notificationOptions);if(response.statusCode%200<=1){console.log(`notification successfully sent at ${(newDate()).toString()}`,response);returntrue;}else{console.log(`notification sent at ${(newDate()).toString()} with status code ${response.statusCode}`,response);console.log("error: ",err);returnfalse;}}catch(ex){if(ex.statusCode===410){// the subscription has expired or gone, then we remove the subscription from our databaseconstauth=pushSubscription.keys.auth;constdeleted=awaitremoveSubscription(auth);if(deleted){console.info(`subscription ${auth} has expired or gone, removed from database.`);returnfalse;}else{console.error(`failed to remove expired subscription ${auth}`);returnfalse;}}else{console.log("error: ",ex);returnfalse;}}}functionvalidateRequest(event){constuserAgent=event.headers["user-agent"];constdc=event.queryStringParameters.dc;if(!userAgent||!dc)returnfalse;returntrue;}module.exports.handler=asyncfunction(event,context){if(!validateRequest(event))returngetResponse(400,"bad request");constuserAgent=event.headers["user-agent"];constdc=event.queryStringParameters.dc;constemail=event.queryStringParameters.email;if(!dc){returngetResponse(400,'notification content cannot be empty');}letsubscriptions=[];if(!email){subscriptions=awaitgetSubscriptions();}else{subscriptions=awaitgetSubscriptionsByEmail(email);}if(!subscriptions){returngetResponse(200,'No subscriber to notify');}letsuccessfulCounter=0;for(letpushSubscriptionofsubscriptions){constsuccessful=awaitnotifySubscriber(pushSubscription,dc);successfulCounter+=successful?1:0;}if(successfulCounter===subscriptions.length){returngetResponse(200,`notification has been sent to all ${subscriptions.length} clients`);}elseif(successfulCounter===0){returngetResponse(500,`sending notification has failed`);}else{returngetResponse(200,`notification has been sent to ${successfulCounter} out of ${subscriptions.length} clients`);}};
What happens here is, once a Http request hits this api endpoint, it does
validation against the request.
get subscriptions according to whether we passed in an email or not, via setting the email, we will be able to control sending notifications to all our subscribers or just a particular user.
iterate through the subscriptions and send out notifications.
One thing I'd like to point out is, push subscriptions could expire at some time, so we need to clean up those expired subscriptions. How do I handle this is when sending out notification, it will error out if the subscription has gone. I then use it as a chance to clean our the expired subscription. So take a look at catchsection of notifySubscriber().
tl;dr
Also I was thinking that in order to save time storing subscriptions into cache on the server with the lambda functions would be okay to me, then I was stuck at there for many hours.....puffy eyes, sleepless night....😫.
The reason why it doesn't work is each lambda function doesn't share cache, so a subscription created by endpoint saveSubscription() will not be accessible by another function.
In general we need to think of each run of a Netlify Function (or any AWS Lambda function) as being completely stateless. This includes the in-memory data of the running Node.js process. We can put things in memory and read them out of memory freely but only within the context of that single run. So thesaveSubscriptions()may work, but that memory will be erased quickly after that run is over.
Then how about saving them into a text file......not working.... Once again, puffy eyes, sleepless night.....😫
The reason is the file system on Lambda function server is read only.
This pushed me to the final solution: Fauna Database. It has free tier and recommended by Netlify, plus I always wanted to try this kind of NoSql like, non-structural database.
Look back what I have done so far, I have basically tried the JAM Stack with all these fantastic tools, it doesn't harm to add in one more fancy component into my project🤗🤗
......
Section 4: Fauna Database
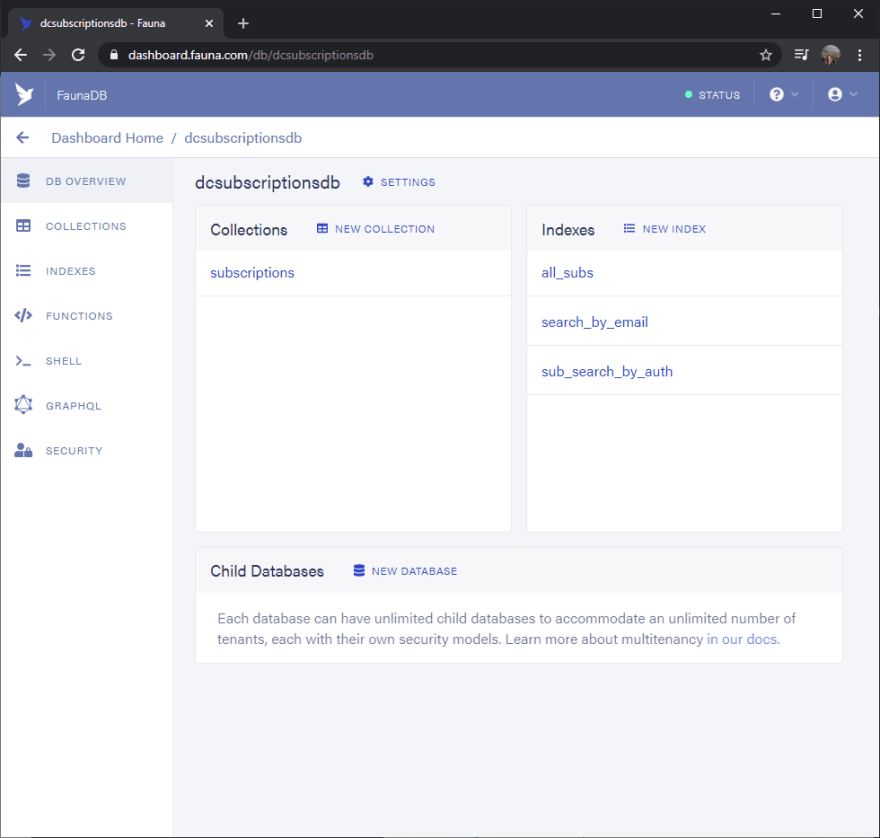
Go to Fauna website and create an account, then log in it, you will see something like this:
Shell is your friend to quickly try out queries and we can easily convert the FQL query to Javascript code.
This is how the shell looks like:
I have a utils.js file which does all the database CRUD operations. Found out how to do it in Javscript from the Netlify-Faunadb-example Github repository.
Create abootstrap.js script under scripts folder:
/* bootstrap database in your FaunaDB account */
const faunadb = require('faunadb')
const chalk = require('chalk')
const insideNetlify = insideNetlifyBuildContext()
const q = faunadb.query

console.log(chalk.cyan('Creating your FaunaDB Database...\n'))

// 1. Check for required enviroment variables
if (!process.env.FAUNADB_SERVER_SECRET) {
  console.log(chalk.yellow('Required FAUNADB_SERVER_SECRET enviroment variable not found.'))
  console.log(`Make sure you have created your Fauna databse with "netlify addons:create fauna"`)
  console.log(`Then run "npm run bootstrap" to setup your database schema`)
  if (insideNetlify) {
    process.exit(1)
  }
}

// Has var. Do the thing
if (process.env.FAUNADB_SERVER_SECRET) {
  createFaunaDB(process.env.FAUNADB_SERVER_SECRET).then(() => {
    console.log('Fauna Database schema has been created')
    console.log('Claim your fauna database with "netlify addons:auth fauna"')
  })
}

/* idempotent operation */
function createFaunaDB(key) {
  console.log('Create the fauna database schema!')
  const client = new faunadb.Client({
    secret: key
  })

  /* Based on your requirements, change the schema here */
  return client.query(q.Create(q.Ref('classes'), { name: '<your-lovely-database>' }))
    .then(() => {
      return client.query(
        q.Create(q.Ref('indexes'), {
          name: 'all_subs',
          source: q.Ref('classes/<your-lovely-database>')
        }))
    }).catch((e) => {
      // Database already exists
      if (e.requestResult.statusCode === 400 && e.message === 'instance not unique') {
        console.log('Fauna already setup! Good to go')
        console.log('Claim your fauna database with "netlify addons:auth fauna"')
        throw e
      }
    })
}

/* util methods */

// Test if inside netlify build context
function insideNetlifyBuildContext() {
  if (process.env.DEPLOY_PRIME_URL) {
    return true
  }
  return false
}
The above script creates the database for you, just replace the database name and also add FAUNADB_SERVER_SECRET into your .env file like this:
FAUNADB_SERVER_SECRET=your-precious-secret-key
Also you could set up your environment variables on Netlify directly:
Then add a command script into package.json to run the bootstrap script:
One thing needs to mention is: all searches with Fauna DB are done by indexes. So that means if I would like to search push subscriptions by email, then I need to create an index for it.
To give you an idea about how the FQL query looks like and how the converted Javascript code look like:
Now you should have a rough idea about how the whole project works and how these components work together to achieve the instant push notification.
Looking back at the very beginning of this project, the whole idea started as a small push notification for Diablo Clone, I had never thought that this project could expand to across so many technical stacks and took me so many sleepless nights and efforts to complete.
Finally, I hope you enjoy this article and make your very own PWA with Push notification enabled 🤩.
Latest comments (0)
Subscribe
For further actions, you may consider blocking this person and/or reporting abuse
We're a place where coders share, stay up-to-date and grow their careers.


Latest comments (0)