This article is a follow-up to my previous article on containerizing an Aspnet.core API and MySQL database with docker-compose. In this article, we are going to be going one step further by deploying the Web API to Kubernetes.
I have split this process into two parts for brevity.
- Part 1. Setting up Kubernetes and Kubernetes Dashboard using Docker Desktop.
- Part 2. Deploying the.NetCore Web API and MySQL container to Kubernetes.
This tutorial assumes you know about the basic principles of Docker and Kubernetes. If you do not you can check my previous articles on Docker and Kubernetes. Or check out this awesome video Kubernetes Architecture Explained. I will try to explain some terms as we go ahead.
Setting up Local Kubernetes using Docker Desktop
- Install Docker. here.
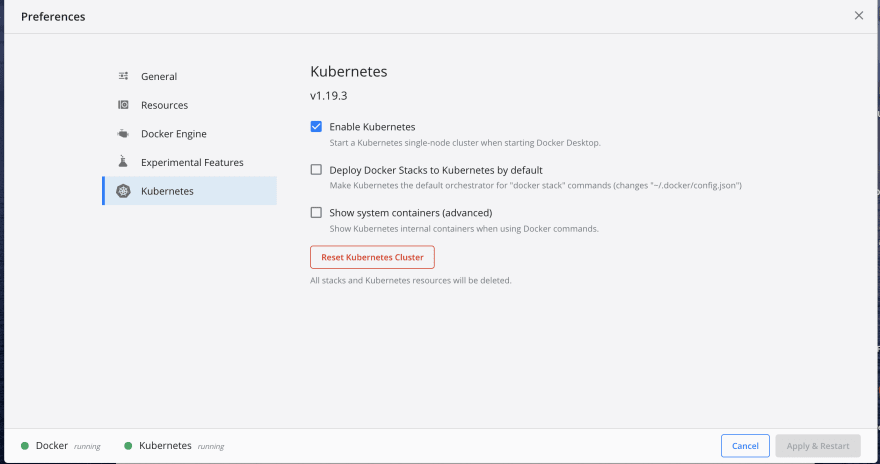
- Click on the Docker icon and go to the Preferences window as shown below. Click on the Kubernetes icon.

- Check on the Enable Kubernetes option and then hit the Apply and Restart button as shown below:
- You should see both Docker Desktop and Kubernetes running. You now have:
- A standalone Kubernetes server and client.
Checking Out The Installation
- A Node provides computing power to the Kubernetes system. In this case, your node is your computer system.
- A cluster is a collection of nodes that share computing resources within themselves. Your Local Kubernetes server is a single-node cluster and is not configurable.
- Pod- Kubernetes packages deployments into a higher-level structure called a pod. A pod is basically a collection of containers.
Execute the following commands from the terminal to check out your Kubernetes Installation.
$ kubectl version
Client Version: version.Info{Major:"1", Minor:"19", GitVersion:"v1.19.3", GitCommit:"1e11e4a2108024935ecfcb2912226cedeafd99df", GitTreeState:"clean", BuildDate:"2020-10-14T12:50:19Z", GoVersion:"go1.15.2", Compiler:"gc", Platform:"darwin/amd64"}
Server Version: version.Info{Major:"1", Minor:"19", GitVersion:"v1.19.3", GitCommit:"1e11e4a2108024935ecfcb2912226cedeafd99df", GitTreeState:"clean", BuildDate:"2020-10-14T12:41:49Z", GoVersion:"go1.15.2", Compiler:"gc", Platform:"linux/amd64"}
Check for the cluster-info
We have one cluster which automatically becomes our Kubernetes Master.
 $ kubectl cluster-info

Kubernetes master is running at https://kubernetes.docker.internal:6443
KubeDNS is running at https://kubernetes.docker.internal:6443/api/v1/namespaces/kube-system/services/kube-dns:dns/proxy
Check for the nodes in the cluster
$  kubectl get nodes
NAME             STATUS   ROLES    AGE   VERSION
docker-desktop   Ready    master   30m   v1.19.3
Installing the Kubernetes Dashboard
The Kubernetes Dashboard gives us a Visual representation of our Kubernetes system.
Run this command to install it.
$ kubectl apply -f https://raw.githubusercontent.com/kubernetes/dashboard/v2.1.0/aio/deploy/recommended.yaml

namespace/kubernetes-dashboard created
serviceaccount/kubernetes-dashboard created
service/kubernetes-dashboard created
secret/kubernetes-dashboard-certs created
The Dashboard application will get deployed as a Pod in the Kube-system namespace. We can get a list of all our Pods in that namespace via the following command:
$  kubectl get pods --namespace=kube-system
NAME                                     READY   STATUS    RESTARTS   AGE
coredns-f9fd979d6-9f7mb                  1/1     Running   0          36m
coredns-f9fd979d6-bxlkw                  1/1     Running   0          36m
etcd-docker-desktop                      1/1     Running   0          35m
kube-apiserver-docker-desktop            1/1     Running   0          35m
kube-controller-manager-docker-desktop   1/1     Running   0          35m
kube-proxy-g8mwq                         1/1     Running   0          36m
kube-scheduler-docker-desktop            1/1     Running   0          35m
storage-provisioner                      1/1     Running   0          35m
vpnkit-controller                        1/1     Running   0          35m
Start your Dashboard Server with
$ kubectl proxy

Starting to serve on 127.0.0.1:8001
Open your Dashboard and navigate to
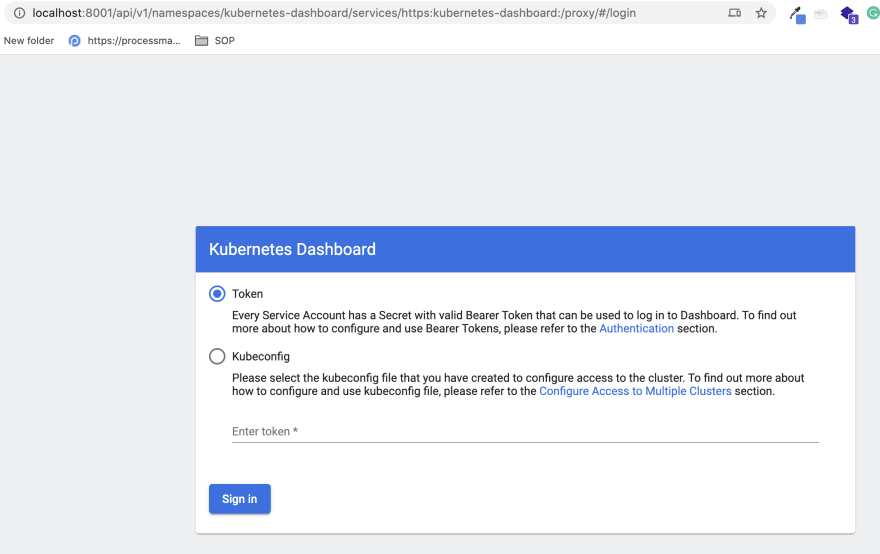
http://localhost:8001/api/v1/namespaces/kubernetes-dashboard/services/https:kubernetes-dashboard:/proxy/#/login
If you get a 503 error just wait for about 5mins and refresh
You should see the authentication page for your dashboard.
Create a cluster-admin service account
You can create a service account with the cluster-admin role that will have access to all your resources.
- Create a service account and call it (cluster-admin-dashboard-sa)
$ kubectl create serviceaccount cluster-admin-dashboard-sa


serviceaccount/cluster-admin-dashboard-sa created
- Bind the service account to a cluster role as a cluster admin
$ kubectl create clusterrolebinding cluster-admin-dashboard-sa \
  --clusterrole=cluster-admin \
  --serviceaccount=default:cluster-admin-dashboard-sa

clusterrolebinding.rbac.authorization.k8s.io/cluster-admin-dashboard-sa created
(cluster-admin-dashboard-sa) now has the privileges of a cluster-admin in Kubernetes.
- Create a Token with the cluster-admin-dashboard-sa credentials.
- To get the secret for creating the token run this command.
$ kubectl get secret | grep cluster-admin-dashboard-sa

cluster-admin-dashboard-sa-token-k95tz   kubernetes.io/service-account-token   3      9d
- Get the Bearer Token
Remember to use your own token as generated from the cli.
$ kubectl describe secret cluster-admin-dashboard-sa-token-k95tz


Name:         cluster-admin-dashboard-sa-token-k75tz
Namespace:    default
Labels:       <none>
Annotations:  kubernetes.io/service-account.name: cluster-admin-dashboard-sa
              kubernetes.io/service-account.uid: 7055ee38-1bc6-4fe9-ac3d-075040cc4f3f

Type:  kubernetes.io/service-account-token

Data
====
ca.crt:     1025 bytes
namespace:  7 bytes
token:      eyJhbGciOiJSUzI1NiIsImtpZCI6IlQwY0prajRPYUttSzdEYU45RmUwQ3JEdG16VS1TbVZVRDRpS0lQLWZDU2cifQ.eyJpc3MiOiJrdWJlcm5ldGVzL3NlcnZpY2VhY2NvdW50Iiwia3ViZXJuZXRlcy5pby9zZXJ2aWNlYWNjb3VudC9uYW1lc3BhY2UiOiJkZWZhdWx0Iiwia3ViZXJuZXRlcy5pby9zZXJ2aWNlYWNjb3VudC9zZWNyZXQubmFtZSI6ImNsdXN0ZXItYWRtaW4tZGFzaGJvYXJkLXNhLXRva2VuLWs3NXR6Iiwia3ViZXJuZXRlcy5pby9zZXJ2aWNlYWNjb3VudC9zZXJ2aWNlLWFjY291bnQubmFtZSI6ImNsdXN0ZXItYWRtaW4tZGFzaGJvYXJkLXNhIiwia3ViZXJuZXRlcy5pby9zZXJ2aWNlYWNjb3VudC9zZXJ2aWNlLWFjY291bnQudWlkIjoiNzA1NWVlMzgtMWJjNi00ZmU5LWFjM2QtMDc1MDQwY2M0ZjNmIiwic3ViIjoic3lzdGVtOnNlcnZpY2VhY2NvdW50OmRlZmF1bHQ6Y2x1c3Rlci1hZG1pbi1kYXNoYm9hcmQtc2EifQ.tS3fscFJAzzUuObtwq59A9PtADpeEyuJk1KnfAfWfFTmBMS5J9lcVv6wQfU1GY3a4pza062BLef8AG619zYIC4diY5yzXt1n5qjcXwdMGe_pCu-uDx-AWKRgWe744Jc7UF2mdJoavzy0ttIZN6eEiQVvCtK6bTiNe9GQIGsFwBm8H1JlW9TuZ8nFWrWgezkOb9FjgdamkLM8B8h302NiI--Coj3KL_eTPUvELJ0orZ7weaLmoqjHB7QgJyFXDzBZjqkiKdJu9I5vpPoRCwymPC9iujF42LrYUaPp-MuC3l6SCWgRDcvMPG1m1F1XA1uAHJn3UITPzMlCLCqbbuHMMA
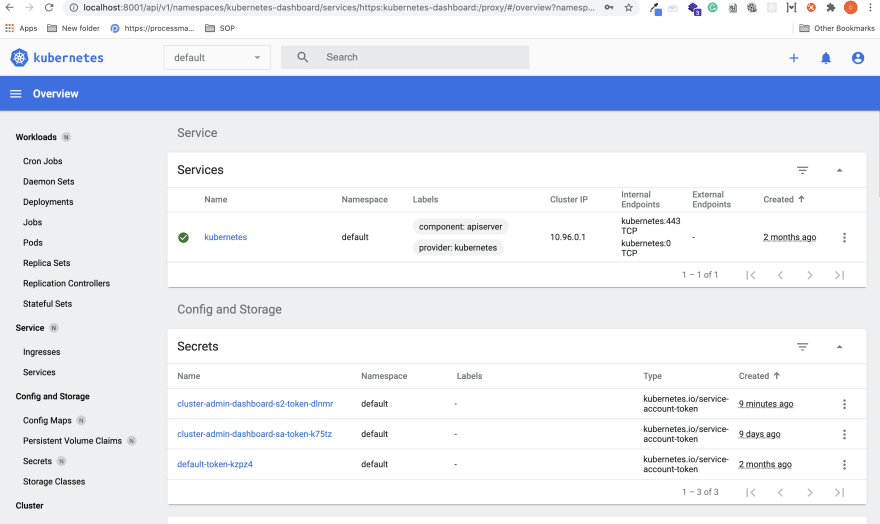
- Use the token to log into the dashboard.
You should see this.
Congratulations you have Successfully set up Kubernetes and configured your Kubernetes Dashboard on your Local System. In part 2 of this article, we will be deploying our Asp.Net Web Api and MySQL Container to Kubernetes. Check it out here


Latest comments (0)