
In this first post, I am kicking off a series of blog posts on how to define and manage infrastructure-as-code using Terraform. If you have not used it before, it is not a problem, I will cover from fundamentals concepts to advanced concepts (Terraform has a great documentation too). Terraform is an open source tool that allows you to define infrastructure for a variety of cloud providers (e.g. Google Cloud, DigitalOcean, Azure, AWS, etc) using a declarative and simple programming language, in addition we can manage and deploy that infrastructure using a powerful CLI commands. After reading this series of blog posts you will be able to save time / money when creating infrastructure due to the great benefits to reuse modules, code that Terraform allows.
I’ve created a diagram in order to illustrate what infrastructure we are going to create in these series of blog posts:
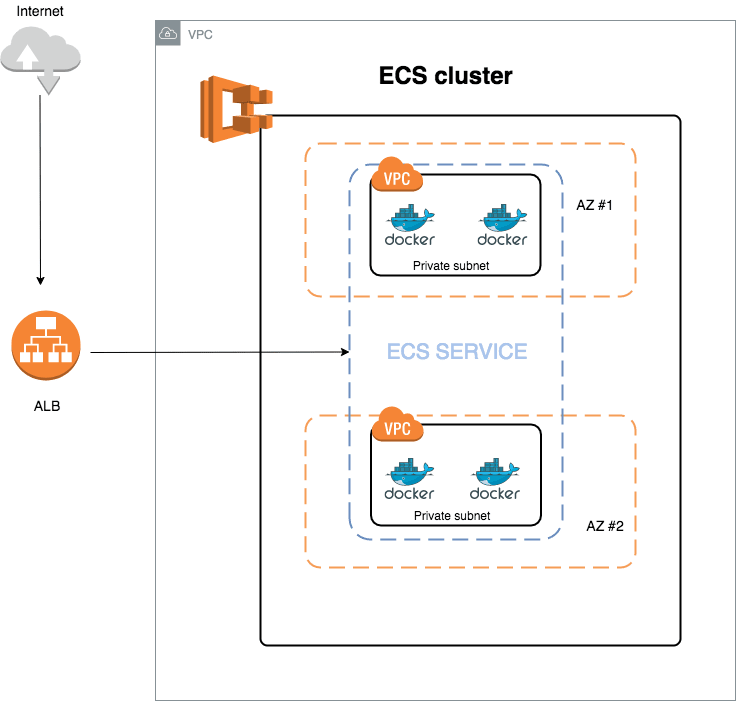
- Virtual private cloud: I want to have our cluster inside a VPC because I want to take over of networking and security stuff of my inf
- Application Load Balancer: It redirects and balances the traffic to my ECS cluster.
- Public and private subnets. ECS: A cluster based on EC2 instances. Here we will create tasks and services in order to deploy our containers.
- Auto Scaling group: Our ECS cluster needs to scale up/down.
- Cloud watch: We need to store and show docker containers’ logs. In addition we will create alerts in order to warn about cpu/memory leaks.
Before starting to talk about Terraform, it is important to know what infrastructure-as-code (IaC) is.
DevOps Zone defines IaC as follows:
Infrastructure as Code (IaC) is a method of provisioning IT infrastructure that combines automation with virtualization. In an IaC system, configurations are managed and provisioned through machine-readable definition files that generate service components. It has delivered a much more reliable and flexible approach to scripting or the manual setup of a VM or container. Automation has also significantly removed the potential for human error when configuring the server. While at the same time, delivering the ability to easily redeploy an IaC system which makes it easy to reuse and refine further over time. More info here.
In my own words, I think that IaC means to manage, configure your IT infrastructure using configuration files. Infrastructure as Code (IaC) is a strategy of provisioning IT infrastructure that combines automation with virtualization. It treats infrastructure setup as code rather than a manual process to configure software and hardware. Simpler words, you can create a Virtual Machine on AWS using a couple of code lines. Here is where Terraform comes in.
Terraform lets you build, change and version infrastructure safely and efficiently. In addition, it has a great documentation, go there for more details.
Terraform has different cloud providers such as Alibaba, AWS, GCP, Microsoft Azure, PaaS. Each provider is responsible for exposing API interactions and resources. Think of a resource like a VM, VPC, Subnet, Cluster, etc. Ok, I know that you love coding, it is the time.
To install Terraform, find the appropriate package (https://www.terraform.io/downloads.html) for your system and download it. Terraform is packaged as a zip archive. The next step is to unzip the package. Terraform runs as a single binary named terraform. The last step is to make sure that the terraform binary is available on the PATH.
Make sure that Terraform was configured correctly using the following command on your terminal console:
terraform
You should see the following console’s output after running the above command:
$ terraform
Usage: terraform [--version] [--help] <command> [args]

The available commands for execution are listed below.
The most common, useful commands are shown first, followed by
less common or more advanced commands. If you're just getting
started with Terraform, stick with the common commands. For the
other commands, please read the help and docs before usage.

Common commands:
    apply              Builds or changes infrastructure
    console            Interactive console for Terraform interpolations
# ...
Our infrastructure will be created on AWS but Terraform can manage many providers, in addition we could include multiple providers in a single configuration but it is not our focus for this blog post. If you don’t have an AWS account, go ahead, you can create AWS free-tier account, meaning it will be free. The next step is to configure (or create if it doesn’t exist) the file named ~/.aws/credentials (Mac OS or Linux) or %UserProfile%.aws\credentials on a Windows system, there you must put your AWS credentials:
[default]
aws_access_key_id = <YOUR_KEY_ID>
aws_secret_access_key = <YOUR_SECRET_KEY>
You should never put your credentials in the Terraform’s code, remember that your credentials are private, keep it in mind.
Next step is to create a workspace, I will name it “terraform-ecs-workshop”. Move into your new workspace and create the next 3 files with “tf” extension (Terraform extension):
main: Where we will put our code in order to create our resources and infrastructure.
variables: All variables that your “main” file will need as parameters.
outputs: You could want to return something from your resources created.
For example: Resource’s name, id, arn, etc. The idea is that someone or something can use it value returned as a parameter for another functionality.
Those 3 files together seems a module or a function in whatever programming language. Terraform wants that you reuse code and avoid duplicate it as much as you can, for this reason, Terraform works with modules. A module is a resource that you could share with others and reuse its functionality when you need it. Terraform has its own modules by provider, for example, the most common VPC’s module in AWS is https://github.com/terraform-aws-modules/terraform-aws-vpc. We will use it module later in order to create a VPC because we don’t want to reinvent the wheel, I want to save me a lot of code lines and it module creates the resources that I want. If you see the above module, you will find the files that I explained above. Remember, try to apply the DRY concept (Don't Repeat Yourself ), you should think to reuse your code and this approach is the most indicated for it.
Ok ok, I know, a lot of theory but it is important. Once I created your workspace and the 3 files above mentioned, it is the time to configure them. Go to variables file and write the following:
variable "region" {
   type = string
   description = "Region where we will create our resources"
   default     = "us-east-1"
}

#Availability zones
variable "azs" {
  type = list(string)
  description = "Availability zones"
}
We have defined 2 variables, first one is the region to use and the second one the availability zones that we want to use. The format of a variable must be declared using a variable block:
variable "example" {
 type: Type of value for the variable. More info here
 description: Documentation of the variable.
 default: Value per default of the variable.
}
You could create a variable without the above attributes mentioned but I recommend using them because defining a type you are restricting the content of your variable, it is easier to read and understand for other developers. Describe the variables is and will always be a good practice, so use description attribute. In addition, the default attribute tells you “I am a variable optional, if you don’t assign me anything I assume that you want to use my default value”. If you want your variable be mandatory to ignore the default attribute.
It is time to go to the main.tf file:
provider "aws" {
 profile    = "default"
 region     = var.region
}

module "vpc" {
  source = "terraform-aws-modules/vpc/aws"

  name = "my-vpc"
  cidr = "10.0.0.0/16"

  azs             = var.azs
  private_subnets = ["10.0.1.0/24", "10.0.2.0/24"]
  public_subnets  = ["10.0.101.0/24", "10.0.102.0/24"]

  enable_nat_gateway = true

  tags = {
    Terraform = "true"
    Environment = "dev"
  }
}
The provider attribute defines which cloud provider Terraforms will use, in our case, it is AWS.
The module attribute imports all the functionality of one specific module. In our case, we are using the VPC’s terraform module. We are setting the parameters that it module needs in order to create a VPC. I always go to the documentation of each module to understand them. Important: You can use remote modules or you own local modules. Using the “source” parameter you define where it module is located.
The last step for this blog post is to create our VPC on AWS. Run the “terraform init” command In the same directory as the main.tf file you created (which initializes various local settings and data that will be used by subsequent commands).
terraform init
Initializing modules...
Downloading terraform-aws-modules/vpc/aws 2.17.0 for vpc...
- vpc in .terraform/modules/vpc/terraform-aws-modules-terraform-aws-vpc-5358041

Initializing the backend...

Initializing provider plugins...
- Checking for available provider plugins...
- Downloading plugin for provider "aws" (hashicorp/aws) 2.32.0...
The following providers do not have any version constraints in configuration,
so the latest version was installed.
To prevent automatic upgrades to new major versions that may contain breaking
changes, it is recommended to add version = "..." constraints to the
corresponding provider blocks in configuration, with the constraint strings
suggested below.
* provider.aws: version = "~> 2.32"

Terraform has been successfully initialized!
You may now begin working with Terraform. Try running "terraform plan" to see
any changes that are required for your infrastructure. All Terraform commands
should now work.
If you ever set or change modules or backend configuration for Terraform,
rerun this command to reinitialize your working directory. If you forget, other
commands will detect it and remind you to do so if necessary.
After creating the resources, you have the chance to see how many resources you will create, you can do it using the “terraform plan” command:
var.azs
  Availability zones

  Enter a value: ["us-east-1a","us-east-1b"]

Refreshing Terraform state in-memory prior to plan...
The refreshed state will be used to calculate this plan, but will not be
persisted to local or remote state storage.


------------------------------------------------------------------------

An execution plan has been generated and is shown below.
Resource actions are indicated with the following symbols:
  + create

Terraform will perform the following actions:

  # module.vpc.aws_eip.nat[0] will be created
  + resource "aws_eip" "nat" {
      + allocation_id     = (known after apply)
      + association_id    = (known after apply)
      + domain            = (known after apply)
      + id                = (known after apply)
      + instance          = (known after apply)
      + network_interface = (known after apply)
      + private_dns       = (known after apply)
      + private_ip        = (known after apply)
      + public_dns        = (known after apply)
      + public_ip         = (known after apply)
      + public_ipv4_pool  = (known after apply)
      + tags              = {
          + "Environment" = "dev"
          + "Name"        = "my-vpc-us-east-1a"
          + "Terraform"   = "true"
        }
      + vpc               = true
    }

  ...
    # module.vpc.aws_vpc.this[0] will be created
  + resource "aws_vpc" "this" {
      + arn                              = (known after apply)
      + assign_generated_ipv6_cidr_block = false
      + cidr_block                       = "10.0.0.0/16"
      + default_network_acl_id           = (known after apply)
      + default_route_table_id           = (known after apply)
      + default_security_group_id        = (known after apply)
      + dhcp_options_id                  = (known after apply)
      + enable_classiclink               = (known after apply)
      + enable_classiclink_dns_support   = (known after apply)
      + enable_dns_hostnames             = false
      + enable_dns_support               = true
      + id                               = (known after apply)
      + instance_tenancy                 = "default"
      + ipv6_association_id              = (known after apply)
      + ipv6_cidr_block                  = (known after apply)
      + main_route_table_id              = (known after apply)
      + owner_id                         = (known after apply)
      + tags                             = {
          + "Environment" = "dev"
          + "Name"        = "my-vpc"
          + "Terraform"   = "true"
        }
    }

Plan: 20 to add, 0 to change, 0 to destroy.
After running the “terraform plan” command. Could you see the console input shown below?
var.azs
  Availability zones

  Enter a value:
Do you know what is that? Of course, Terraform is asking you for the azs variable (This variable is a list, I used ["us-east-1a","us-east-1b"]). This variable is not optional like region variable. Because we did not assign any value to region variable, Terraform will use its default value.
Hurry up, run the “terraform apply” in order to create your resources. Again Terraform will ask for azs variable, in addition will ask you:
Do you want to perform these actions?
  Terraform will perform the actions described above.
  Only 'yes' will be accepted to approve.

  Enter a value:
Type “yes”. If all is good, you could see one message like the following one:
Apply complete! Resources: 20 added, 0 changed, 0 destroyed.
Go to AWS console -> VPC -> Your VPC. You should see “my-vpc” resource created.
Niceeeee!!! Congrats, you created one resource on AWS by Terraform. In addition you already know the basic syntax, modules; it is a good step for your operations career. Next blog post I will continue creating other resources, keep stunned. BTW, if you want to destroy your resources, use “terraform destroy”.
See you soon.

Top comments (0)