
This article explores and explains dependency injection with different approaches, from the worst way of doing it to using a library to handle the process.
Introduction
For a while now, I've been trying to explain the concept and usage of dependency injection to my teammates. I've tried a few approaches, but I realized I've never made myself clear. I noticed that using frameworks and libraries during these explanations made the challenge even greater. So, I've decided to explain using TypeScript and doing things more manually. Come along with me.
Our Context
Throughout the explanation, we will be using a simple Node.js project with Express and TypeScript. In this project, we will have three modules of examples. Think of these three modules separately, even though they are in the same project. Each module is responsible for an example scenario. This code will be available on my GitHub if you want to play around with it a bit.
Project Structure
In the project structure, we have the index.ts which is the application's entry point, the application's routes file, and the shared folder with components that would be shared among various modules, we have the "docs" folder with a JSON file for you to import into Insomnia and test the requests. Lastly, we have the "modules" folder where we have three subfolders: example1, example2, and example3, each representing a scenario. Within each "example" folder, there are DTOs, Entities, a repository, and a useCase. This structure will be repeated for the other modules with very specific changes.
Example 1
Starting with example 1, we have the class UserRepository, which is responsible for the methods to interact with the database. In this example, we have the method createUser simulating the creation of a record.

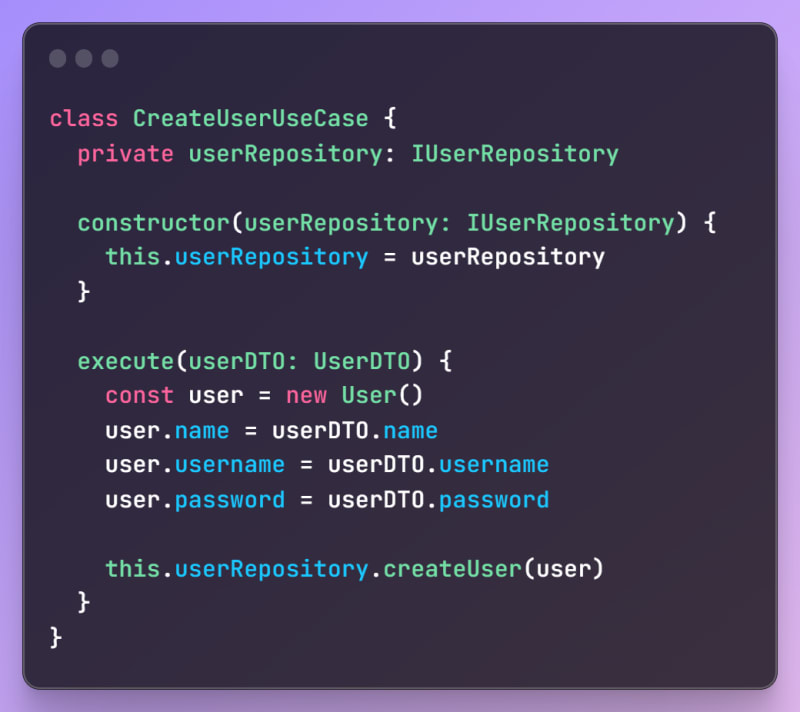
In the sequence, we have the CreateUserUseCase class responsible for the business rule associated with user creation and for calling the repository to perform the registration of information.

Note that the above class is dependent on the previously mentioned UserRepository class, as it receives it in its constructor and uses it during the execution of the execute() method.
Finally, we have the CreateUserController class that is responsible for receiving the request data, performing the necessary processing, and passing this information to the CreateUserUseCase class. It also provides the appropriate response to the user.
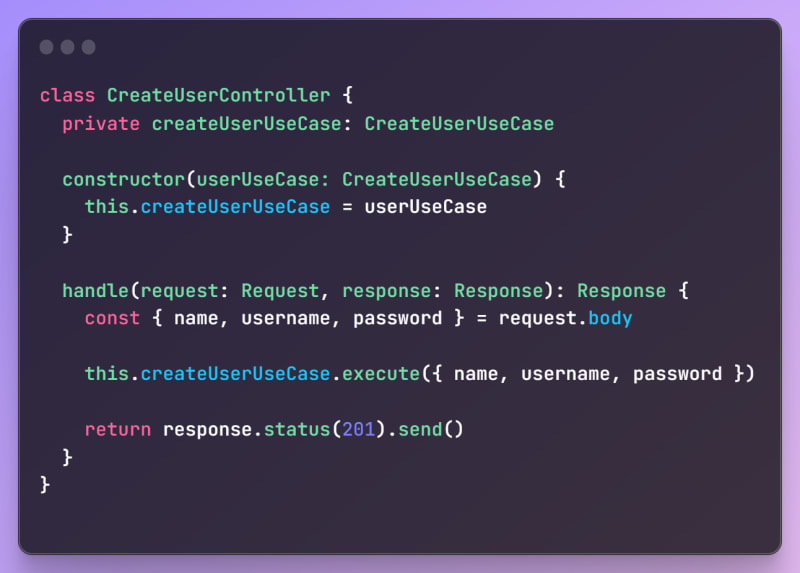
Note that just like the previous class, this one directly depends on the CreateUserUseCase class.
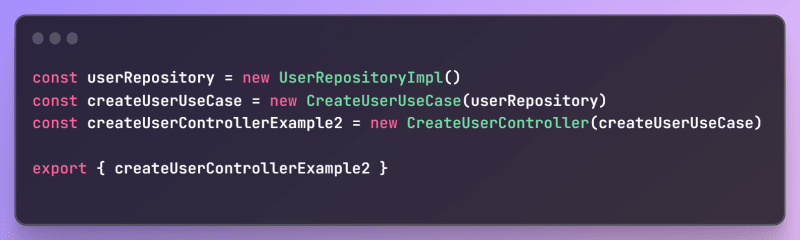
After creating all these classes, we should create an instance of CreateUserController and export it so that we can access it in our routes file. Therefore, in the root of the "example1" folder, let's create a file called "index.ts" where we will create all the necessary instances.

The problem
Okay, we have our routes and endpoints working as expected, but there's a significant issue here. All of our concrete classes are dependent on other concrete classes, and aside from violating the SOLID principles, we might encounter significant difficulties in maintaining this code as the application grows. If we need to modify the implementation of the createUser method within the UserRepository class, we'll have to test all the other classes that depend on it, and we might need to make changes to those as well. Besides maintenance, we'll struggle to write unit tests since we'll have to mock the dependencies. In a scenario where we need to migrate our database service, the situation becomes even worse.
Example 2
In this example, we will use dependency injection to solve one of our problems. We will employ both dependency injection and dependency inversion to decouple our concrete classes from each other to some extent.
First, let's create an interface called IUserRepository with the signature of the createUser() method.

Next, we will create the UserRepositoryImpl file that will extend the previously created interface, and this is where the actual implementation of the createUser() method will reside.

The next step is to modify the CreateUserUseCase class to depend on the interface rather than the concrete class.
Finally, we will modify our index.ts file in the root of the "example2" module to inject the implementation of the interface into the CreateUserUseCase class.
Observations
Now you'll notice that the behavior of the application hasn't changed at all. However, our CreateUserUseCase class no longer depends on an implementation but rather on an interface. Therefore, if we need to modify the functionality of the createUser() method, this change will no longer affect the other classes. We'll be able to write unit tests more easily, and supporting a database change won't be as complex anymore, considering that the new implementations must adhere to the contract defined by the IUserRepository interface.
What we did in the index.ts file is precisely how dependency injection works. On one side, we have our CreateUserUseCase class depending on the IUserRepository interface, and on the other side, the actual implementation of the interface is being injected into its constructor.
In this case, we have also applied the concept of dependency inversion, as can be seen in the diagram below:

As we can see in the diagram above, initially the CreateUserUseCase class was dependent on the UserRepository class. Now, we have the UserRepositoryImpl class depending on the interface.
Conclusion
We quickly saw how manual dependency injection is performed. Remember that it was only possible to inject the implementation into a class's constructor that depended on an interface because the implementation extends the interface. It may seem obvious, but that's precisely where the magic lies.
Bonus
We quickly saw how manual dependency injection is performed. Remember that it was only possible to inject the implementation into a class's constructor that depended on an interface because the implementation extends the interface. It may seem obvious, but that's precisely where the magic lies.
if (you like this.content) {
    Follow me on other social media ||
    Give me a suggestion for the next content
}

Top comments (0)