Appwrite is a self-hosted open-source end-to-end backend server, that provides developers with easy-to-use and integrated REST APIs to manage their core backend needs. Appwrite integrate seamlessly with existing tools and technologies as it is cross-platform and language agnostic.
The Appwrite server is packaged as a set of Docker containers. The Docker approach allows you to install and run Appwrite easily on any operating system (OS) that can run a Docker CLI.
This tutorial will explain why Appwrite is packaged in Docker containers. More importantly, walk you through a 3 step process of creating a local Appwrite instance on your host machine (computer).
Prerequisite
To run Appwrite with Docker, you must have a machine with:
- At least 4GB of RAM.
- 64-bit processor
- An OS that supports Docker - Linux, Windows, or macOS.
Why Docker containers?
Docker is a software platform that allows developers to build, test, and deploy software applications quickly. Docker does this by packaging software applications into standardized units called containers with everything that software needs to run, including code, dependencies, libraries, and runtime.
Appwrite packaging its software in Docker containers saves you time and effort to install libraries, databases, and tools that make Appwrite work, thereby reducing the installation to a single docker run command.
To learn more about how Docker works, check out the Docker documentation.
Next, you will learn how to create a local Appwrite instance in 3 steps.
Step 1: Getting the Docker CLI
The Docker CLI is a command-line tool that lets you talk to the Docker daemon. Though it is possible to install only the Docker CLI on your machine, through the ways suggested in this GitHub issue, you should use Docker Desktop.
Docker Desktop is an easy-to-install application that sets up a complete Docker development environment for your macOS, Windows OS, and Linux OS (experimental build currently only available Ubuntu 21.04, 21.10, and Debian distributions). Docker Desktop includes the Docker Engine, Docker CLI client, Docker Compose, and other Docker tools.
For macOS
To install Docker Desktop on macOS, follow this installation guide on the Docker documentation.
For windows
To install Docker Desktop on Windows OS, follow this installation guide on the Docker documentation.
For Linux
See this documentation to learn how to install Docker on several Linux distributions.
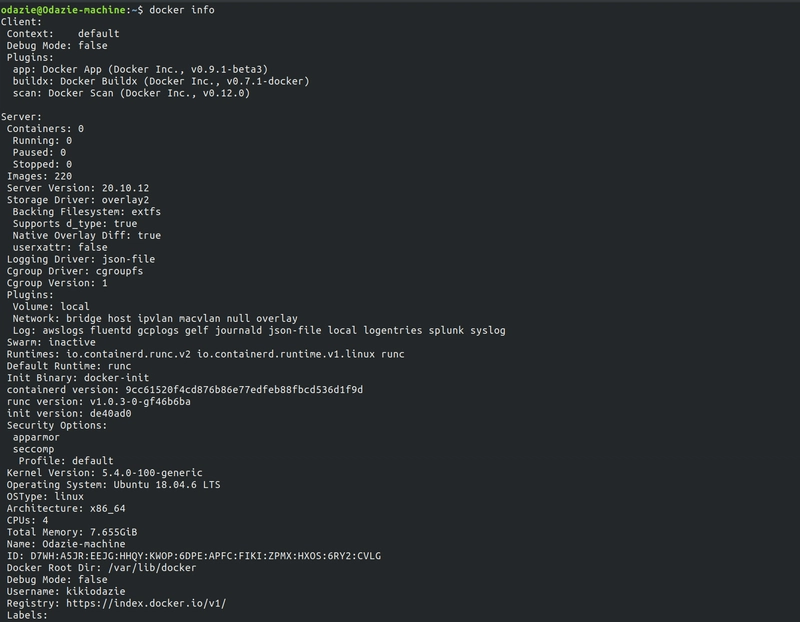
Once you’ve successfully installed Docker on your machine, use the OS-independent way to check if Docker is running using the docker info terminal command.
$ docker info
You should get an output similar to the image below:
Next step, you will create a local Appwrite instance by running the Appwrite Docker installer tool from your terminal.
Step 2: Running the Appwrite Docker installer tool
The Appwrite Docker installer is a CLI tool that takes your input and creates a custom docker-compose.yml file for your Appwrite installation. The docker-compose.yml file defines all the configurations used in managing Appwrite’s set of Docker containers.
You use the Appwrite installation docker run command to run the installer. The command is the same for macOS and Linux OS because they are Unix related and different from the Windows OS.
Unix command (Mac and Linux)
If you are using a macOS or a Linux OS, open up your terminal and run this command:
docker run -it --rm \
    --volume /var/run/docker.sock:/var/run/docker.sock \
    --volume "$(pwd)"/appwrite:/usr/src/code/appwrite:rw \
    --entrypoint="install" \
    appwrite/appwrite:0.13.3
Windows commands
If you are using a Windows OS, the CMD and PowerShell commands are:
CMD:
docker run -it --rm ^
   --volume //var/run/docker.sock:/var/run/docker.sock ^
   --volume "%cd%"/appwrite:/usr/src/code/appwrite:rw ^
   --entrypoint="install" ^
   appwrite/appwrite:0.13.3
PowerShell:
docker run -it --rm ,
    --volume /var/run/docker.sock:/var/run/docker.sock ,
    --volume ${pwd}/appwrite:/usr/src/code/appwrite:rw ,
    --entrypoint="install" ,
    appwrite/appwrite:0.13.3
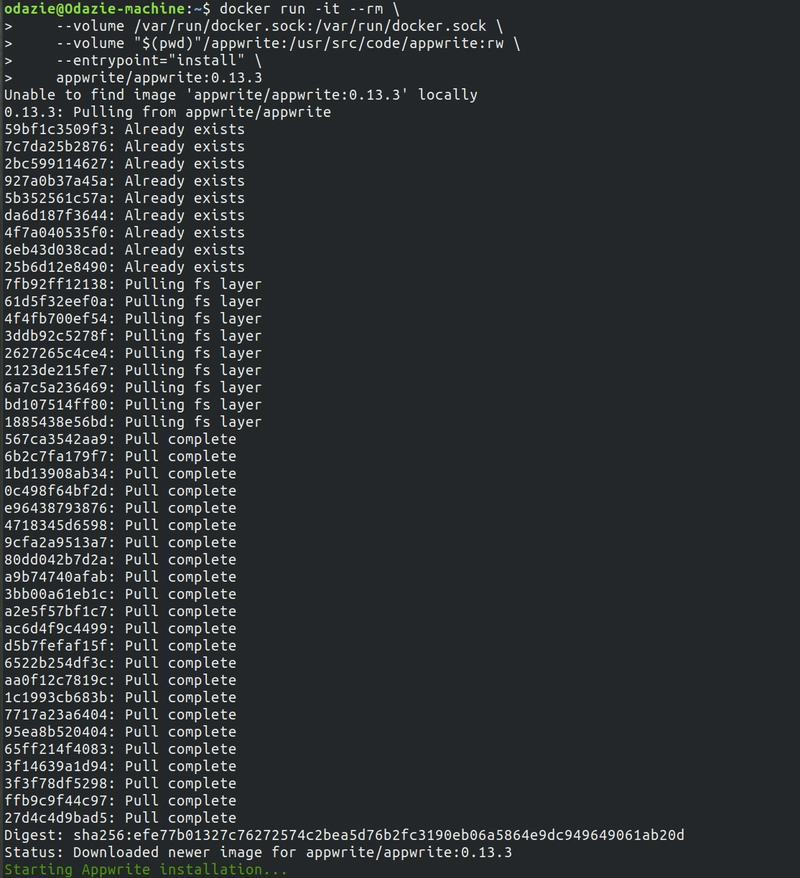
After running your OS suitable Appwrite Docker installer command, it pulls the Appwrite image from Docker Hub. Then it starts the Appwrite installation process, opening up an interactive console to take inputs for the docker-compose.yml file.
Your terminal output will be similar to the image below:
The commands explained in detail
The difference in all three commands is their syntax. \, ^ and , of Unix, Command prompt, and Powershell, respectively, add new lines in typing a multiline command.
For the Docker run references in the command:
- The
-itflag tells the Docker CLI to open an interactive container instance of the image. - The
--rmflag removes the container automatically after you close Docker. - The
--volumeflag mounts a unique volume on your machine to a path in the container. The two paths are separated by:. - The first
--volumeflag bind mounts your machine daemon’s socket (/var/run/docker.sock) with the container’s daemon socket to manage other containers through the Appwrite container. To learn more about the Docker daemon socket, check out this article. - The second
--volumeflag mounts the appwrite folder created in your current working directory to the running container for data persistence. - The
--entrypointflag tells Docker to execute the"install"command when the container starts. - The last line of the command specifies the version of the Appwrite image to pull from Docker Hub. To know the latest or past image releases, check out the Appwrite releases on GitHub.
Next, you will complete the Appwrite installation process.
Step 3: Completing the Appwrite installation process
Once the installation process begins, you will get prompts to input your initial Appwrite configurations.
1st prompt
“Choose your server HTTP port: (default: 80)”. If your host machine’s port 80 is free, press "enter" to add the default port. Else, choose a different port, e.g 98
2nd prompt
Choose your server HTTPS port: (default: 443). If your host machine’s port 443 is free, press "enter" to add the default port. Else, choose a different port, e.g 444
3rd prompt
Choose a secret API key (default: 'your-secret-key'). Whatever API key you choose, make sure to make a backup of your key in a secure location.
4th prompt
Enter your Appwrite hostname (default: 'localhost'). In this case, if you have a domain or subdomain, e.g., appwritetest.com, input it. If not, press "enter" to use the default.
5th prompt
Enter a DNS A record hostname to serve as a CNAME for your custom domains. You can use the same input as your Appwrite hostname with default as localhost.
After all the inputs, the Appwrite installer creates a custom docker-compose.yml file for your Appwrite installation.
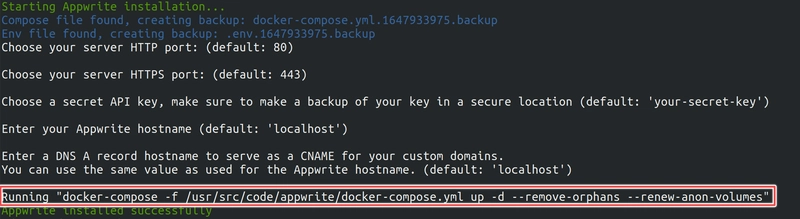
The annotated section on the image above shows that the created docker-compose.yml file is running and setting up the Docker containers that makeup Appwrite.
After some time, depending on your internet speed, you will get an output “Appwrite installed successfully.”
Now that you've installed Appwrite, open your browser and visit the hostname you entered. If default, visit http://localhost, and you should see Appwrite's sign-up page.

Conclusion
In this tutorial, you learned why Appwrite is packaged in Docker containers, the Docker CLI, and, more importantly, how to create an Appwrite local instance.
Resources
To learn more about Appwrite, check out the following resources:

Oldest comments (2)
Hey - I had a query regarding the volumes
Except for the docker-compose.yml and .env there are no files generated in the appwrite directory. Is there someplace where the project configuration is being stored - which is persisted across service restarts?
How do we share the configuration b/w developers/collaborators using git?
I have installed appwrite with docker after that when I am requesting to appwrite getting cors allow origin error can someone please help me.