
You don't need to be an artist to create art. Cloudinary offers a Neural Artwork Style Transfer add-on and extensive image transformation capabilities. The add-on integrates some complex deep learning neural network algorithm that extracts and blends the artistic styles of two images. The add-on offers a very high level of abstraction and makes the process of generating artwork a breeze, which validates the initial claim that you don’t need to be an artist to create art.
Xata is a serverless database that has great compatibility with jam stack applications. With a lot of cool built-in features, Xata runs a database and offers an API that is so easy to work with.
In this post, we’ll build a demo application that utilizes these two technologies. The application should allow users to log in, create, and publish artworks that anyone else can download.
The code sandbox, source code, and demo for the project are available.
Requirements
Knowledge of React and Next.js is required to follow along with this post.
Project setup
Run the following command in a preferred folder from your terminal to bootstrap a Next.js application.
npx create-next-app art-studio-demo
Next, run the command below in succession to change into the newly created folder and install the required dependencies.
    cd art-studio-demo
    yarn add cloudinary multer axios bcrypt js-file-download
These are the dependencies we installed:
- Cloudinary’s Node.js integration library which allows access to its SDK.
-
Multer, to handle and parse image files coming from the client. -
Axios, for making HTTP requests. -
bcrpt, to hash passwords. -
js-file-downloadpackage to handle different origin file downloads from the browser.
Demystifying the application
The application will be made up of three pages:
The home page, where users get prompted to input an email and a password. It checks and logs the user in if there is an existing record for the user, or otherwise creates a new user in the database, while also logging the user in.
A studio page where users can generate artwork based on two selected images, and also have the generated artwork published.
Lastly, an
artworkspage, that lists all the generated artwork alongside a download link.
For the API routes, we’ll have an endpoint to handle authentication, and generation of artwork, and another to add the generated artwork to the Xata database.
Xata setup
Before we can start working with Xata, there are a couple of boxes we need to tick. First, we need to create an account with Xata, after which we also need to create tables and define the schema of the data. Create an account here, or sign in here.
Following a successful onboarding process, we’ll get prompted to create a workspace. A workspace represents an organization and securely classifies our data. Create a workspace with a preferred name, and also in succession, click on the Add a database button, and name it art-studio. We can however give it any name as preferred.
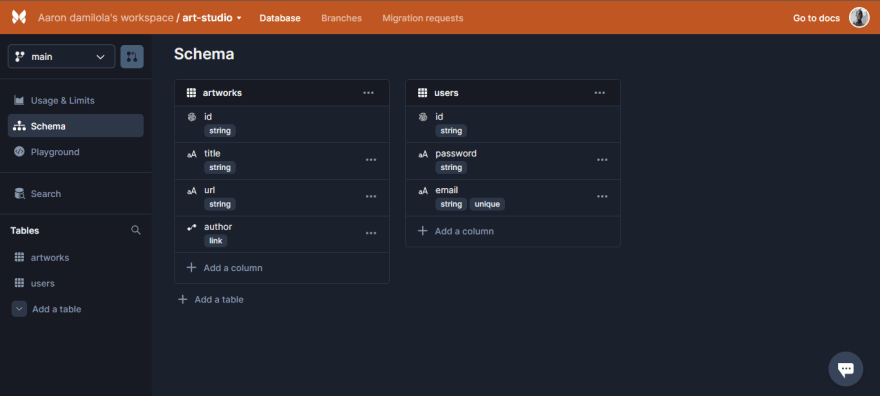
With the database ready, let’s define the schema of our data. We’ll add a users table to handle basic authentication and an artworks table to hold a list of all generated artworks. Click on Schema on the side nav and hit the add a table button. Name the table users and add an email column of type Email, and a password column of type String to the table. We should also see a Xata-generated id also added to the table by default.
Add a new artworks table to the database and give it a title column of type String, and a url column of type String also.
Xata also allows linking between tables in a database. For demo purposes, we can link our artworks table to the user table. Each artwork should then have extra fields that link to a particular user in the users table. To achieve that, in the users table, let’s add a new author field and select the type Link, and also point it to the users table.
Here’s what the data schema should look like:
Don’t worry about initializing the tables with some data. In the subsequent sections, we’ll see how we can create and read records from our Next.js application.
Adding Xata to our application
With the Xata software development kit, we can swiftly get into working with Xata in our application. It abstracts a lot of complexities in connecting the application to Xata. To begin, we need to install the Xata command line interface (CLI) globally to set up the SDK. Run the command below to install the CLI:
npm i -g @xata.io/cli
This gives us access to a xata command that can be used anywhere in the application.
Next, run the command down here to log in to the CLI:
xata auth login
This should provide us with two options either to create a new existing API key by opening a browser or to paste in an existing one. Since this is a new project, let’s just create a new API key. Select the first option and create a new API key in the opened browser window.
The CLI automatically detects the new API key. Next, run the command below to initialize a new project:
xata init
This will prompt a couple of questions that will help us configure the project. Answer the questions, and use code generation.
On completion, the Xata CLI creates a .env file in our project and adds the API key to it.
Run this command:
xata codegen
It automatically creates a src/xata.js file that has all the Xata configuration codes in it. The file exports a XataClient class that can be used to query the database instance.
With that, we can start using Xata in the application.
Cloudinary setup
We access our Cloudinary credentials by signing up or logging in to our Cloudinary account. Open the .env file at the root level of the application and add the credentials to it:
CLD_CLOUD_NAME="YOUR-CLOUD-NAME"
CLD_API_KEY="YOUR-API-KEY"
CLD_API_SECRET="YOUR-API-SECRET"
To use the Neural Artwork Style Transfer add-on, We need to register for the add-on in our account and also select a plan to work with. Since this is just a demo application, we'll use the free plan.
To register:
Click on Add-ons in the header of the console in the dashboard.

The Add-ons page with a list of all available Cloudinary add-ons becomes visible. Then navigate to the Neural artwork style transfer add-on and subscribe to a preferred plan.
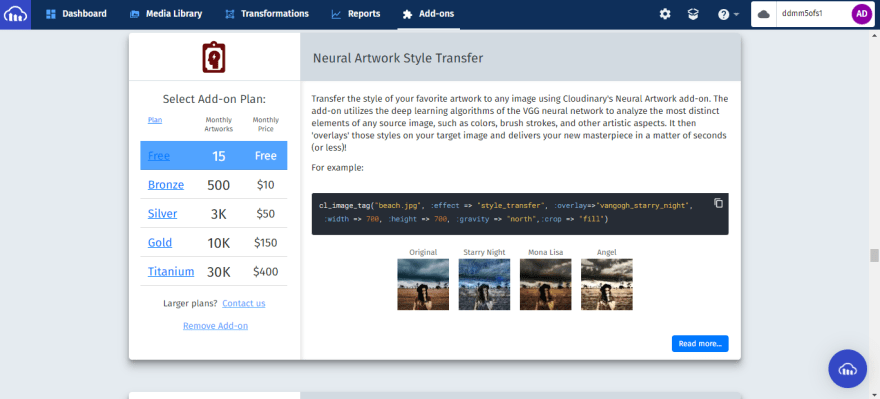
The free plan allows for 15 monthly artwork generations, we can however always go for other plans as preferred.
To start the development server, run the command below:
yarn dev
Implementing basic authentication with Xata
To implement basic authentication in the application, let’s create an API route that handles authentication with Xata. Create a new signin.js file in the pages/api folder and the following:
    import { getXataClient } from "../../src/xata";
    import bcrypt from "bcrypt";
    import { promisify } from "util";

    export default async function handler(req, res) {
      const compare = promisify(bcrypt.compare);
      const hash = promisify(bcrypt.hash);

      const {email, password} = req.body

    //creates the xata instance and extract the user record
        const xata = getXataClient();
        const user = await xata.db.users.filter({ email }).getFirst();

    //create a new user if no user record was found
        if (!user) {
          const newUser = await xata.db.users.create({
            email,
            password: await hash(password, 10),
          });
          return res.status(201).json({
            status: "success",
            id: newUser.id
          })
        }

    // compare passwords if user exist
        const passwordsMatch = await compare(password, user.password);

        if (!passwordsMatch) {
          return res.status(400).json({
            status: "fail",
            message: "Invalid password for the email provided"
          })
        }

        return res.status(200).json({
          status: "success",
          id: user.id
        })
      };
In the code above, we:
- Imported a helper
getXataClientmethod which when called gives access to an instance of theXataClientclass. - Defined the route handler to handle authentication with Xata.
The route expects an email and a password from the request body. It then queries the database instance to check if a user for the given email exists. If no record for the email exists, it creates a new user record in the users table with the given email and a hashed copy of the given password. Then it returns the new user ID as a response.
Else if a user exists already for the given email, it validates the password and returns an error if the passwords don’t match, otherwise, it returns the user ID as a response.
To create the UI that works with this API route, open the pages/index.js file and add replace its content with the code below:
    import { useState } from 'react';
    import { useRouter } from 'next/router'
    import axios from 'axios';
    import styles from '../styles/Home.module.css'

    export default function Home() {
      const [formValues, setFormValues] = useState({})
      const [error, setError] = useState()
      const [reqStatus, setReqStatus] = useState("")

      const router = useRouter()

    //save login details to the formValues state
      const onInputChange = e => {
        setFormValues(prev => ({...prev, [e.target.id]:e.target.value}))
      }

    //handles signing in
      const handleSignIn = async (e) => {
        e.preventDefault()
        setError("")
        setReqStatus("loading...")
        try {
          const response = await axios.post("/api/signin", formValues)
          localStorage.setItem("artify_id", response.data.id);
          router.push('/studio')
        } catch (error) {
          setError(error)
        } finally {
          setReqStatus("")
        }
      }

      return (
        <div className={styles.container}>
          <h3>Sign in to create artworks</h3>
          <form>
            <div className={styles.form_group}>
              <label htmlFor="email">Email</label>
              <input type="email" id="email" onChange={e => onInputChange(e)} required />
            </div>
            <div className={styles.form_group}>
              <label htmlFor="password">Password</label>
              <input type="password" id="password" onChange={e => onInputChange(e)} required />
            </div>
            <button onClick={handleSignIn}>Sign in</button>
          </form>
          {error && <p>{error.response?.data.message || "An error occurred, please try again"}</p>}
          {reqStatus && <p>{reqStatus}</p>}
        </div>
      )
    }
Let’s breakdown the code above:
- We defined a
Homecomponent that renders a form that has an email and password field as well as a button element. - The component holds three state variables for the form values, error, and request status.
- We defined an
onInputChangefunction that set theformValuesstate. - We also defined a
handleSignInfunction which when triggered makes a call to oursigninAPI route. On success, it stores the returned user ID in the browser’s local storage and also routes to a yet-to-be-defined studio page.
In this project, we used a couple of defined styles. I have them prepared already, open the styles/Home.module.css file and replace the styles there with the styles defined in this code sandbox link.
Save the changes and see the progress in your browser.

Handling file selection on the frontend
The first step in creating the studio page is to have a basic layout that allows the selection of two files. At the root level of the application, create a components folder and add an ImagePreview.js file to it. Next, add the code below to the newly created file:
    import { useRef, useState } from "react";
    import styles from "../styles/Home.module.css";

    export default function ImagePreview( {generateArt, reqStatus} ) {
      const [firstFile, setFirstFile] = useState("");
      const [secondFile, setSecondFile] = useState("");

      const firstImageRef = useRef();
      const secondImageRef = useRef();

      const onFileChange = (e) => {
        if(e.target.id === "first") setFirstFile(e.target.files[0]);
        if(e.target.id === "second") setSecondFile(e.target.files[0]);
      };
      return (
        <>
          <div className={styles.studio_images}>
            <div onClick={() => firstImageRef.current.click()}>
              <input
                type="file"
                ref={firstImageRef}
                style={{ display: "none" }}
                onChange={onFileChange}
                id="first"
              />
              {firstFile ? (
                <img
                  src={`${URL.createObjectURL(firstFile)}`}
                  alt="selected image"
                />
              ) : (
                <p>Click to select image</p>
              )}
            </div>
            <div onClick={() => secondImageRef.current.click()}>
              <input
                type="file"
                ref={secondImageRef}
                style={{ display: "none" }}
                onChange={onFileChange}
                id="second"
              />
              {secondFile ? (
                <img
                  src={`${URL.createObjectURL(secondFile)}`}
                  alt="selected image"
                />
              ) : (
                <p>Click to select image</p>
              )}
            </div>
          </div>
          <div className={styles.generate}>
            <button onClick={() => generateArt(firstFile, secondFile)}>Generate Artwork</button>
            {reqStatus && <p className={styles.status}>{reqStatus}</p>}
          </div>
        </>
      )
    }
In the code above, we defined an ImagePreview component and also included the logic for selecting and rendering two image files.
Next, create a studio.js file in the pages/ folder and add the code below to display the ImagePreview component:
    import { useEffect, useState } from "react";
    import { useRouter } from "next/router";
    import ImagePreview from "../components/ImagePreview";
    import styles from "../styles/Home.module.css";

    export default function studio() {
      const [reqStatus, setReqStatus] = useState("")

      const router = useRouter();

     //return to login if id was found
      useEffect(() => {
        if (!localStorage.getItem("artify_id")) {
          router.push("/");
        }
      }, []);

     //handles request to generate the artwork
      const generateArt = async (firstFile, secondFile) => {

      }

      return (
        <section className={styles.studio}>
          <h2>Art studio</h2>
          <p>You don't have to be an artist to create beautiful art designs</p>
          <ImagePreview generateArt={generateArt} reqStatus={reqStatus} />
        </section>
      );
    }
Here, we imported and rendered the ImagePreview component and passed it a generateArt and a reqStatus prop.
generateArt gets triggered from the ImagePreview component and it expects the two image files selected. In a subsequent section, we’ll define it to handle the call to generate the artwork. reqStatus is a state variable that will hold the status of our request.
Save the changes and test the application.
Setting up Multer
Before we send some files from the frontend, we need to define the API route to handle the processing of those files to generate artwork. However, in this section, let’s set up the Multer middleware first to parse the incoming image files, after which we will now define the route to generate the artwork.
Create a helpers folder at the root level of the application. Then include a helpers.js file in it and add the code below to the new file:
    import multer from "multer";
    const storage = multer.memoryStorage();
    const upload = multer({ storage });
    const myUploadMiddleware = upload.array("file");

    function runMiddleware(req, res, fn) {
      return new Promise((resolve, reject) => {
        fn(req, res, (result) => {
          if (result instanceof Error) {
            return reject(result);
          }
          return resolve(result);
        });
      });
    }

    module.exports = {
      myUploadMiddleware,
      runMiddleware,
    };
Here, we:
- set up the Multer middleware and used its memory storage option, rather than having to store files on the server.
- Next, we created a
runMiddlewareutility function to run the Multer middleware. The function provides a promise that either resolves or rejects depending on whether the middleware callback supplied to it runs successfully or fails. - The middleware and utility functions are then both exported from the file.
Generating and previewing artwork
Now let’s work on the API route that utilizes the Cloudinary Neural Artwork Style Transfer add-on to generate artwork based on the given image files. Create a new art.js file in the pages/api/ and add the following code:
    const cloudinary = require("cloudinary").v2;
    const { myUploadMiddleware, runMiddleware } = require("../../helpers/helpers");

    //configure the cloudinary instance
    cloudinary.config({
      cloud_name: process.env.CLD_CLOUD_NAME,
      api_key: process.env.CLD_API_KEY,
      api_secret: process.env.CLD_API_SECRET,
      secure: true,
    });

    export default async function handler(req, res) {
    //run the multer middleware
      await runMiddleware(req, res, myUploadMiddleware);

    //transform the files to its base64 equivalence
      const base64images = req.files.map(file => {
        const b64 = Buffer.from(file.buffer).toString("base64");
        let dataURI = "data:" + file.mimetype + ";base64," + b64;
        return dataURI
      })

    //upload to cloudinary and also apply the add-on
      try {
        await cloudinary.uploader.upload(
          base64images[0], async function (error, result_one) {
            await cloudinary.uploader.upload(base64images[1], async function(error, result_two) {
              const response = await cloudinary.image(`${result_one.public_id}.jpg`, {
                sign_url: true,
                transformation: [
                  { height: 700, width: 700, crop: "fill" },
                  { overlay: result_two.public_id },
                  { effect: "style_transfer", flags: "layer_apply" },
                ],
              });
              res.status(200).json(response);
            })
          }
        );
      } catch (error) {
        res.json(error);
      }
    }

    export const config = {
      api: {
        bodyParser: false,
      },
    };
In the code above, we did the following:
- Imported the Cloudinary instance and then configured it with our credentials.
- Defined the route handler and run the multer middleware using the utility function created in the previous section.
- Transformed the parsed image files to their base64 equivalence.
- The add-on only works with image files that have been uploaded already to Cloudinary, so we requested to upload the two files to Cloudinary sequentially using the upload method of the Cloudinary instance.
- The artwork is then generated in the second callback by passing the public id of the target image as an argument to the traditional Cloudinary image transformation method and also specifying the public ID of the source image as an image overlay, and
style_transferas the overlay effect to apply. In addition to all that, we also added aflagskey with the value oflayer_apply. - set
sign-urlto true to secure the transformation. - The response is then sent to the frontend once a request is made to the API route or an error is returned otherwise.
- Lastly, we exported a config object at the end of the file to disable the default parser and allow multer to handle the body parsing instead.
Click here to learn fully about how the add-on works.
Now let’s update the frontend of our application to reflect this change. Open the pages/studio.js file and update the code as shown below:
    import { useEffect, useState } from "react";
    import { useRouter } from "next/router";
    import axios from "axios";
    import ImagePreview from "../components/ImagePreview";
    import styles from "../styles/Home.module.css";

    export default function studio() {
      const [artworkUrl, setArtworkUrl] = useState("")
      const [reqStatus, setReqStatus] = useState("")

      const router = useRouter();

     //return to login if id was found
      useEffect(() => {
        if (!localStorage.getItem("artify_id")) {
          router.push("/");
        }
      }, []);

     //handles a request to generate the artwork
      const generateArt = async (firstFile, secondFile) => {
        setReqStatus("loading...")

        const formData = new FormData();
        formData.append("file", firstFile);
        formData.append("file", secondFile);
        try {
          const response = await axios.post("/api/art", formData)
          const url = /'(.+)'/.exec(response.data);
          setArtworkUrl(url[1]);
          setReqStatus("Done")
        } catch (error) {
          setReqStatus("failed, try again")
        }
      }

      return (
        <section className={styles.studio}>
          <h2>Art studio</h2>
          <p>You don't have to be an artist to create beautiful art designs</p>
          <ImagePreview generateArt={generateArt} reqStatus={reqStatus} />
          {artworkUrl && (
            <>
              <div className={styles.output}>
                <img src={artworkUrl} alt="" />
              </div>
            </>
          )}
        </section>
      );
    }
Here, we did the following:
- Added a new state variable to hold the URL of the generated artwork.
- Defined the
generateArtfunction to create a form data and attach it to a request made to theartsAPI route defined earlier. - Extracted the artwork URL from the response and set to state.
- Rendered the returned artwork to the page
Save the changes and test the application in the browser.
Uploading the generated artwork to Xata
After the generation of artwork, we also want to be able to publish each artwork to the Xata database. Create a new publishArt.js file in the pages/api/ folder to create an API route that handles that:
    import { XataClient } from "../../src/xata"

    export default async function handler(req, res) {
      const { title, url, id } = req.body

      const author = {
        id: id
      }

      try {
        const xata = new XataClient();
        const response = await xata.db.artworks.create({ title, url, author });
        res.status(200).json(response)
      } catch (error) {
        res.status(500).json(error)
      }
    }
Here we defined the API route to add a new record to the artworks table.
Open the pages/studio.js file and update the code as shown below:
    import { useEffect, useState } from "react";
    import { useRouter } from "next/router";
    import axios from "axios";
    import ImagePreview from "../components/ImagePreview";
    import styles from "../styles/Home.module.css";

    export default function studio() {
      const [artworkUrl, setArtworkUrl] = useState("")
      const [reqStatus, setReqStatus] = useState("")
      const [title, setTitle] = useState("")
      const [publishStatus, setPublishStatus] = useState("")

      const router = useRouter();

     //return to login if id was found
      useEffect(() => {
        if (!localStorage.getItem("artify_id")) {
          router.push("/");
        }
      }, []);

     //handles request to generate the artwork
      const generateArt = async (firstFile, secondFile) => {
        setReqStatus("loading...")

        const formData = new FormData();
        formData.append("file", firstFile);
        formData.append("file", secondFile);
        try {
          const response = await axios.post("/api/art", formData)
          const url = /'(.+)'/.exec(response.data);
          setArtworkUrl(url[1]);
          setReqStatus("Done")
        } catch (error) {
          setReqStatus("failed, try again")
        }
      }

    //handles request to publish a generated artwork
      const onPublish = async () => {
        setPublishStatus("loading...")
        try {
          const id = localStorage.getItem("artify_id");
          const response = await axios.post("/api/publishArt", {title, url: artworkUrl, id})
          setPublishStatus("Done.")
        } catch (error) {
          setPublishStatus("failed, try again")
        }
      }

      return (
        <section className={styles.studio}>
          <h2>Art studio</h2>
          <p>You don't have to be an artist to create beautiful art designs</p>
          <ImagePreview generateArt={generateArt} reqStatus={reqStatus} />
          {artworkUrl && (
            <>
              <div className={styles.output}>
                <img src={artworkUrl} alt="" />
              </div>
              <input type="text" placeholder="Enter a simple title" onChange={e => setTitle(e.target.value)} />
              <button onClick={onPublish} disabled={publishStatus === "loading..."}>Publish</button>
              {publishStatus && <p className={styles.status}>{publishStatus}</p>}
            </>
          )}
        </section>
      );
    }
With the code above, we:
- now get a new input field that let us set a title after each artwork generation.
- also included a button that triggers the
onPublishfunction on click. TheonPublishfunction handles the call to thepublishArtendpoint.
Save the changes and see the update in your browser.
View and download artworks
To conclude the project, let’s have a page that has all the artwork from the database and also a download link that can be used to download each of them.
Create an artworks.js file in the pages/ folder and add the code below:
    import React from "react";
    import Link from "next/link";
    import axios from "axios";
    import { XataClient } from "../src/xata";
    import fileDownload from "js-file-download";
    import styles from "../styles/Home.module.css";

    export default function artworks({ data }) {

    //handle image download
      const handleDownload = (url, filename) => {
        axios
          .get(url, {
            responseType: "blob",
          })
          .then((res) => {
            fileDownload(res.data, filename);
          });
      };

      return (
        <>
          <h3 className={styles.artworks_header}>Artworks</h3>
          <section className={styles.artworks}>
            {data && data.length === 0 && (
              <p>
                No artwork created yet, <Link href="/">Login</Link> to create one.
              </p>
            )}
            {data &&
              data.length !== 0 &&
              data.map((artwork, index) => (
                <React.Fragment key={index}>
                  <div>
                    <div>
                      <img src={artwork.url} alt="" />
                    </div>
                    <h5>{artwork.title}</h5>
                    <button
                      onClick={() =>
                        handleDownload(artwork.url, `${artwork.title}.jpg`)
                      }
                    >
                      download
                    </button>
                  </div>
                  </React.Fragment>
              ))}
          </section>
        </>
      );
    }

    export const getServerSideProps = async (req, res) => {
      const xata = new XataClient();
      const data = await xata.db.artworks.getMany();
      return { props: { data } };
    };
Let’s breakdown the code above:
- we queried the database in a
getServerSidePropsfunction to get a list of all artworks from the database. - The returned array is then passed as a prop to the
artworkscomponent. - The component renders a list of artworks and a download button for each artwork.
- The button when clicked triggers a
handleDownloadfunction. - The function then uses the
fileDownloadfunction imported from thejs-file-downloadlibrary to download the file.
To allow for easy navigation between pages, let’s quickly add a simple header component to the application. Create a Header.js file in the components folder and add the following code:
    import React from 'react'
    import Link from 'next/link'
    import styles from '../styles/Home.module.css'

    export default function Header() {
      return (
        <header className={styles.header}>
          <Link href="/"><h2>ARTIFY</h2></Link>
          <Link href="/artworks">View all artworks</Link>
        </header>
      )
    }
Next, add the Header component to the _app.js file as shown below:
    import Header from '../components/Header'
    import '../styles/globals.css'

    function MyApp({ Component, pageProps }) {
      return (
        <>
          <Header />
          <Component {...pageProps} />
        </>
      )
    }

    export default MyApp
Save the changes and preview the application in your browser.

Conclusion
That was quite a lot. In this article, we’ve worked on a demo application that uses both Xata and Cloudinary. We built an art studio that is dependent on the Cloudinary Neural Artwork Style Transfer add-on. In the build-up, we covered how to set up both Xata and Cloudinary in a Next.js application. How to add basic authentication with Xata, how to set up the Multer middleware, and a lot more.
We are capable of much more with both Xata and Cloudinary. Click on the links below to explore these two technologies.

Top comments (1)
Style transfer results can vary wildly depending on the input images. A tip that helped me get more consistent output was pre-processing the style image to have higher contrast and saturation before sending it through the pipeline. The neural network picks up on those exaggerated features much better and the final blend looks way closer to what you'd actually expect from the style reference.