
Maintaining a safe and welcoming environment is a priority in today's online communities. Regardless of the type of online community we manage, be it a social platform or discussion forum, ensuring the security and protection of users from harmful or inappropriate content is a necessity. With the help of Appwrite Cloud Function template Analyze with PerspectiveAPI, we can build an automated message moderation system that allows community managers and developers to protect their online spaces against hate speech and unhelpful criticism.
In this tutorial, you’ll learn how to create an automated message moderation system to promote a friendlier and more constructive online atmosphere. To do so, we’ll use Appwrite Cloud Functions and integrate the "Analyze with PerspectiveAPI" template. Additionally, we will discuss customization options for how to tailor the message rules better to suit our community's unique needs.
Prerequisites
You’ll need a few things before getting started:
- A Google account.
- A working Appwrite account. Don’t have an account? Create one on the Appwrite website.
- An API key from the PerspectiveAPI website.
Setting up Appwrite Cloud Functions
If you’ve got the prerequisites covered, the next phase involves setting up an Appwrite Cloud Function. However, before we delve into the setup process, let's first take a moment to understand an Appwrite Cloud Function.
Appwrite Functions are serverless functions that empower us to write custom code and perform specific tasks responding to various triggers, such as HTTP requests or scheduled events. Running this code on the server side increases the functionalities of our application. This versatility makes it an effective tool for data processing, integrating third-party services, and automation.
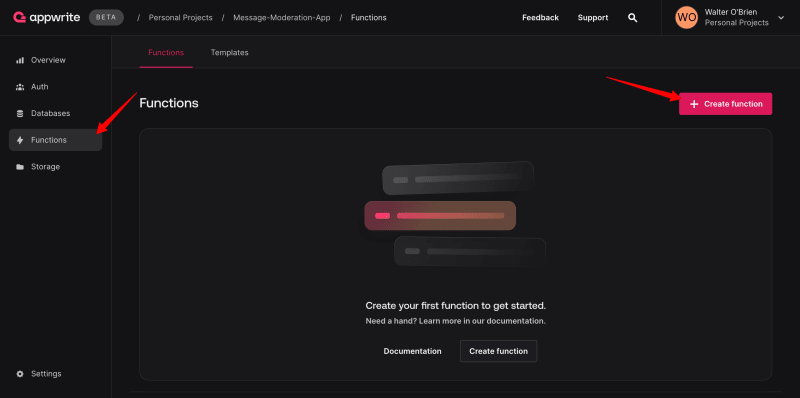
Appwrite Functions give us the power to create almost anything we can think of. Sometimes, it can be hard to figure out where to start — thus, the gift of a function template. Our first step will begin by creating a new Appwrite project. Log in to Appwrite’s cloud console and select Create project. Next let’s create a new project, which will give us access to the Appwrite Function and other services like our Project ID and API key.

Click on the Create button, and the project will be created successfully. The next step is to create our Appwrite Function. To do that, navigate to the side menu and click on Functions. Next, click on the Create function.
When you clicked the Create function button, you likely noticed that Appwrite Functions offered quick-start templates for us to begin with. If we can't find the specific template we need, then we can access additional templates by clicking on the All templates option.
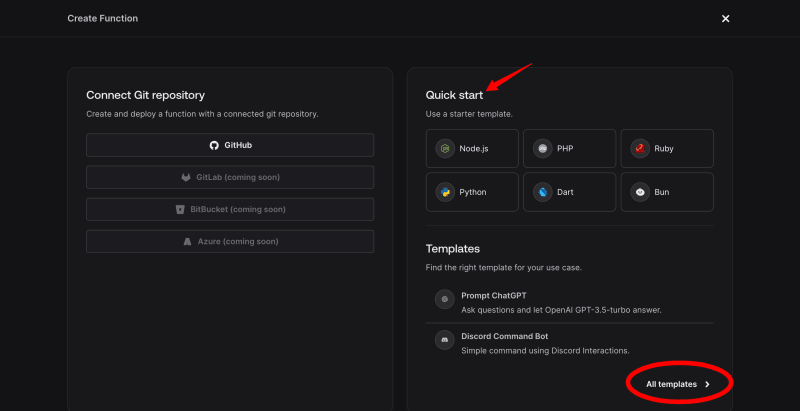
After completing that step, a list of available options will be displayed. From this list, select the desired template, which, in this instance, is Analyze with PerspectiveAPI. There are two methods to access the templates: using the search bar or scrolling to locate the desired template. In this case, we will utilize the search bar. To proceed, search for the template name and click Create function to select it.

Select Node.js - 18.0 as the runtime.

The next part is adding a variable called the PERSPECTIVE_API_KEY. This key is available only from the PerspectiveAPI website. (You’ll remember this from the prequisites.)

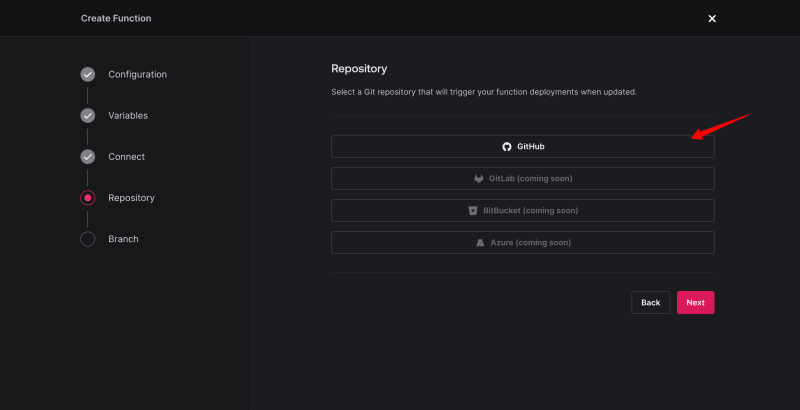
Once we insert our API key, it will take us to the next phase of linking our Function to either a new repository or an existing one in a chosen Git organization. Choose the Create a new repository option.

Next, choose a Git repository to activate our function deployments upon updates. At present, GitHub is the only available Git repository option; others are still in development.
After choosing a Git provider, the next step will prompt us to grant Appwrite permission to access our GitHub account.
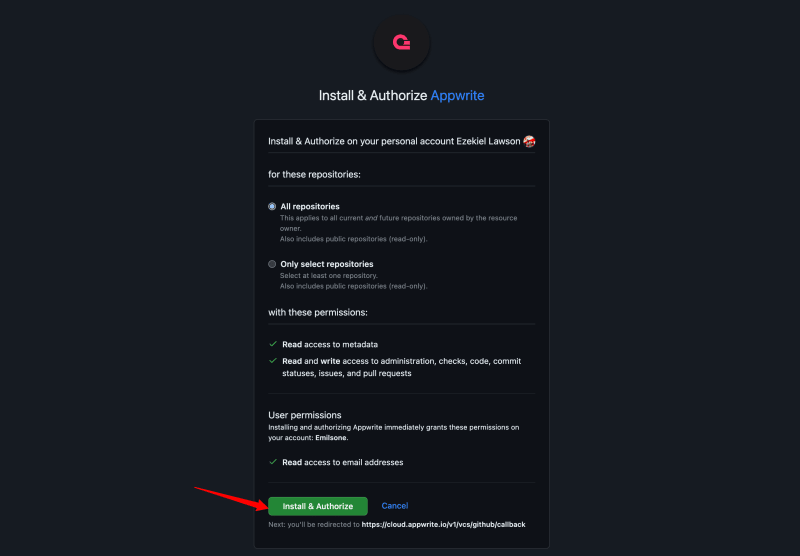
After we have given Appwrite access, it will lead us to Appwrite for further installation. Click on the Repository option, and we will notice an automatically created repository. The repository name can be modified to match your preferences. Remember, we can choose to deselect the Keep repository private checkbox.

The next step is to select our branch name. In this section, we can leave the branch name as the main.

We have effectively created an Appwrite Function. Below is a deployment diagram illustrating the ID, Build time, Size, and Domain.

Demo integration with PerspectiveAPI
We've completed the creation of our Appwrite Function and successfully configured our PerspectiveAPI! Next, let’s take a look at the integration and demonstrate how the PerspectiveAPI filters toxic speech. See the code below of what our Appwrite function code will look like in the main.js file.
   import { fetch } from 'undici';
    import { getStaticFile, throwIfMissing } from './utils.js';

    export default async ({ req, res }) => {
      throwIfMissing(process.env, ['PERSPECTIVE_API_KEY']);

      if (req.method === 'GET') {
        return res.send(getStaticFile('index.html'), 200, {
          'Content-Type': 'text/html; charset=utf-8',
        });
      }

      try {
        throwIfMissing(req.body, ['text']);
      } catch (err) {
        return res.json({ ok: false, error: err.message }, 400);
      }

      const response = await fetch(
        `https://commentanalyzer.googleapis.com/v1alpha1/comments:analyze?key=${process.env.PERSPECTIVE_API_KEY}`,
        {
          method: 'POST',
          headers: {
            'Content-Type': 'application/json',
          },
          body: JSON.stringify({
            comment: {
              text: req.body.text,
              type: 'PLAIN_TEXT',
            },
            languages: ['en'],
            requestedAttributes: {
              TOXICITY: {},
            },
          }),
        }
      );

      if (response.status !== 200) {
        return res.json(
          { ok: false, error: 'Error fetching from perspective API' },
          500
        );
      }

      const data = /** @type {*} */ (await response.json());
      const score = data.attributeScores.TOXICITY.summaryScore.value;
      if (!score) {
        return res.json(
          { ok: false, error: 'Error fetching from perspective API' },
          500
        );
      }
      return res.json({ ok: true, score });
    };
The code above is where we modify our changes. After making changes and committing them to the file, Appwrite will seamlessly redeploy our function automatically, as seen in the diagram below.

To see a live demonstration of our project, navigate to the deployment section in the Appwrite console. You will also find the ID, Build time, and Size there. Click on the generated Domain. This live demonstration highlights PerspectiveAPI's functionality, displaying how it evaluates the toxicity score of the message.
Customization option for message moderation
Appwrite allows us to customize and moderate messages to fit our specific requirements. In this segment, we will create a comment section within the blog. Here, we will adjust the toxicity threshold based on a percentage to effectively filter out toxic comments, enabling us to decide which comments to display and which to withhold from the view. To accomplish this, replace the existing code within the script tag in the index.html file with the provided code below:
        async function onSubmit(text) {
          const response = await fetch('/', {
            method: 'POST',
            body: JSON.stringify({ text }),
            headers: {
              'Content-Type': 'application/json',
            },
          });

          const data = await response.json();

          if (!data.ok || data.error) {
            alert(data.error);
          }

          const percent = Math.round(data.score * 100 * 100) / 100;

          if (percent > 80) {
            return 'Toxic comment hidden';
          } else {
            return `Toxicity of your message is: ${percent}%`;
          }
        }
View the outcome of the customized feature we implemented, designed to conceal toxic comments from public view.
In the preceding section, we implemented a feature for enabling users to add comments to the blog, assessing the comment's toxicity, and concealing it from public view. This functionality has effectively allowed us to filter out toxic comments and hate speech from our platform. The Appwrite Cloud Function templates offer significant advantages by providing pre-built integrations, enabling us to implement additional features. This significantly reduces the burden of building from scratch and speeds up the development process.
Another customization option is to store toxic comments in an Appwrite Cloud Database. This allows us to track the total number of toxic comments from a user and, if needed, implement measures like banning the user from using the platform.
Conclusion
This article elaborated on moderating messages and maintaining online community safety using Appwrite Cloud Functions and its template Analyze with PerspectiveAPI. We also covered customization options and provided an implemented example.

Top comments (0)