
This tutorial was written by Umar Abdullahi and published as part of the Hasura Technical Writer Program - an initiative that supports authors who write guides and tutorials for the open source Hasura GraphQL Engine.
What is 3factor architecture?
3factor architecture design pattern leverages on realtime communication, eventing and serverless computing to allow you build full stack apps quickly and efficiently. The architecture pattern is composed of three factors, obviously :), which are realtime GraphQL, reliable eventing (eg. Hasura event triggers) and async serveless.
Building scalable and high feature velocity apps sounds nice, but when directly dealing with servers and tightly coupled components, achieving scalability and high feature velocity can be quite challenging. With the 3factor architecture, GraphQL and serverless allows you to ship new features very quickly by improving developer experience on the front end and abstracting away the development operations respectively. Serverless also means auto-scaling.
Prerequisites
Before we continue. We are going to use the Hasura GraphQL Engine, Hasura event triggers, and Google cloud functions to satisfy the three factors of the 3factor architecture. A prior knowledge of GraphQL, Go, and React native is needed. As our cloud functions would be written in Go and our mobile app would be written in React native and Expo.
Modelling
Hasura GraphQL engine would automatically generate our GraphQL schemas and resolvers based on our tables and views in Postgres. So we’ll have to model the necessary tables and views for a minimal chat app.
User
We’ll need a user table to store our users.
user (
  id SERIAL PRIMARY KEY
  username TEXT UNIQUE
  push_token TEXT
  last_seen timestamp with time zone
  last_typed timestamp with time zone
  date_created timestamp with time zone DEFAULT now() NOT NULL
)
To create a user, only a username is required for our simple chat app, no passwords and email address. The last_seen and last_typed fields would be used to implement features like typing indicators and user online status.
Room
To be able to categorize discussions we’ll need to store messages of similar topics in a room table.
room (
    id SERIAL NOT NULL PRIMARY KEY
    name TEXT NOT NULL
    room_type TEXT NOT NULL
)
All rooms are public by default i.e any user can join, we won’t be needing fields like is_private to identify private rooms in this example.
Message
Messages sent by users will be stored in the message table.
message (
id SERIAL NOT NULL PRIMARY KEY
"text" TEXT NOT NULL
username INT FOREIGN KEY REFERENCES user(username) NOT NULL
room_id INT FOREIGN KEY REFERENCES room(id) NOT NULL
"timestamp" timestamp with time zone DEFAULT now() NOT NULL
)
The room_id and username would be used to identify which user sent the message and which room it belongs to respectively.
User_rooms
We are creating a user_rooms table to be able to get a list of rooms a user belongs to.
user_rooms (
    id SERIAL NOT NULL PRIMARY KEY
    user_id INT FOREIGN KEY REFERENCES user(username) NOT NULL
    room_id INT FOREIGN KEY REFERENCES room(id) NOT NULL
)
Each single row would represent a user and a room joined. We can easily remove a user from a room by using the delete_user_rooms mutation.
Note: To fetch all users online we’ll need an online_users view. An SQL script would be provided to create all the tables and views necessary.
Setting up Hasura and Postgres
Running the Hasura GraphQL engine requires access to a Postgres database, fortunately, with Heroku free tier you can setup Hasura GraphQL engine with a Postgres database in a few minutes. Alternatively you can run Hasura GraphQL engine and Postgres using Docker.
Deploy Hasura and Postgres on Heroku
Here is how you can setup Hasura GraphQL engine and a Postgres database on Heroku;
- Click this link to deploy to Heroku. If you don’t have an account on Heroku, you’ll need to create one. Once you sign up, you’ll be redirected to Heroku’s app creation page automatically.
- Choose an app name and a region. A free Heroku Postgres add-on would be provided by default. Then Click deploy.
- Once deployment is done, click view. Or head to https:// <YOUR_HEROKU_APP_NAME>.herokuapp.com , you should see the Hasura console.
Apply Schema on Postgres
On the Hasura console you’ll notice that there are no GraphQL queries, this is because we don’t have tables or views in our Postgres database. The models we created above have been combined to form a single SQL script below;
To apply the schema on our Postgres database, select the Data tab in the Hasura console, click on SQL and paste the script above. Make sure you select the track this checkbox before you run.
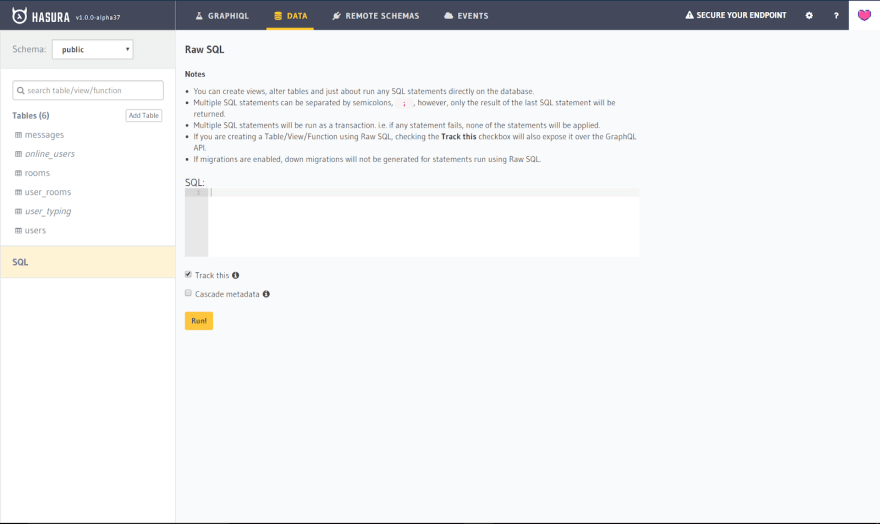
Once SQL is executed successfully, the GraphQL queries, mutations, and subscriptions would appear.
Note : Hasura will detect relationships via foreign keys automatically. Make sure you track all relationships.
Cloud functions
Serverless functions are a crucial part of 3factor architecture. We are going to use Google cloud functions to handle some of our backend functions. Our chat workflow would consist of functions from user registration to sending messages.
Chat workflow : sign up -> add user to rooms -> send message -> send push notification.
Signing up users and sending messages can be performed from the frontend directly using the generated GraphQL API. Whereas we need to write backend logic to add users to defaults rooms and also send push notifications. This backend logic would be composed as cloud functions which would be triggered by Hasura event triggers.
Building and testing locally
Since Google cloud functions execute in runtime environments based on open source languages and frameworks, we can build and test our Go functions locally before deploying them. We won’t go into details on how to set up your Go development environment so let’s begin writing our functions right away.
Google cloud functions expects a http.HandlerFunc to be the entry point of a HTTP function executed in a Go runtime environment
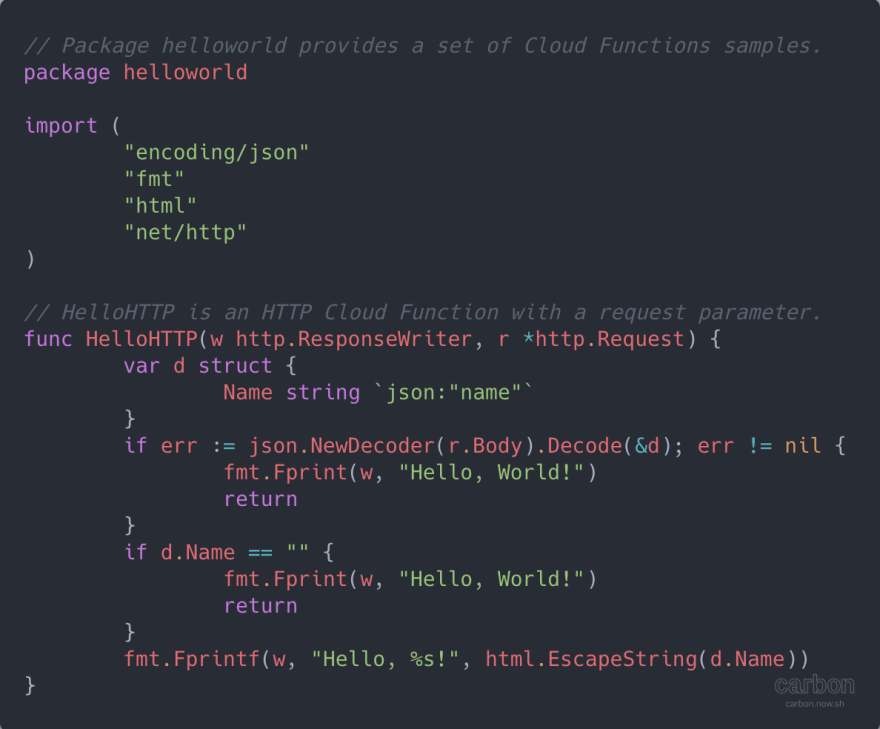
In order to test our function locally we would need a http.HandleFunc to register our handler functions. Create a new directory and paste the following code in your main.go file;
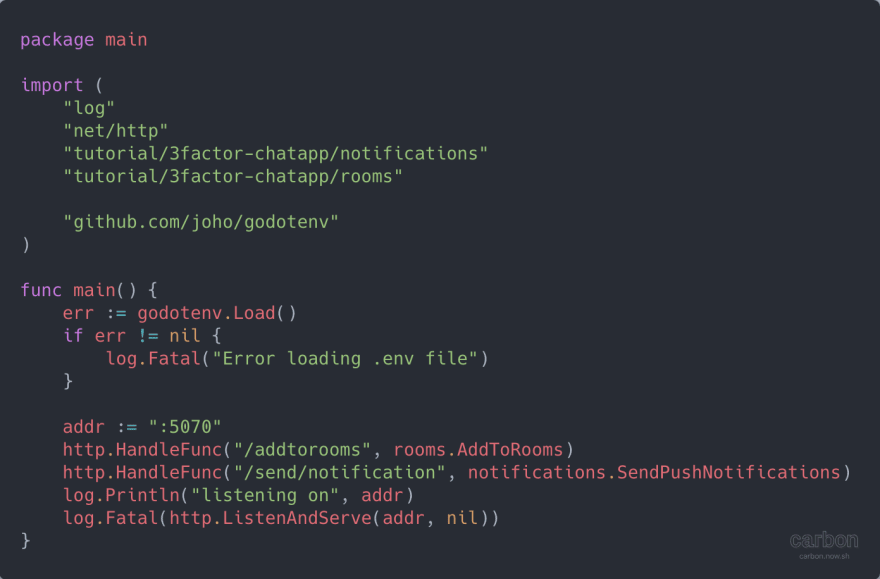
We can’t run our code just yet. We made reference to two handler functions rooms.AddToRooms and notifications.SendPushNotifications which we haven’t created. Each function would be deployed separately so we need to put them in different packages. Let’s create the rooms package first. Create a new directory “rooms” in your root directory. The following code would be in rooms/fn.go;
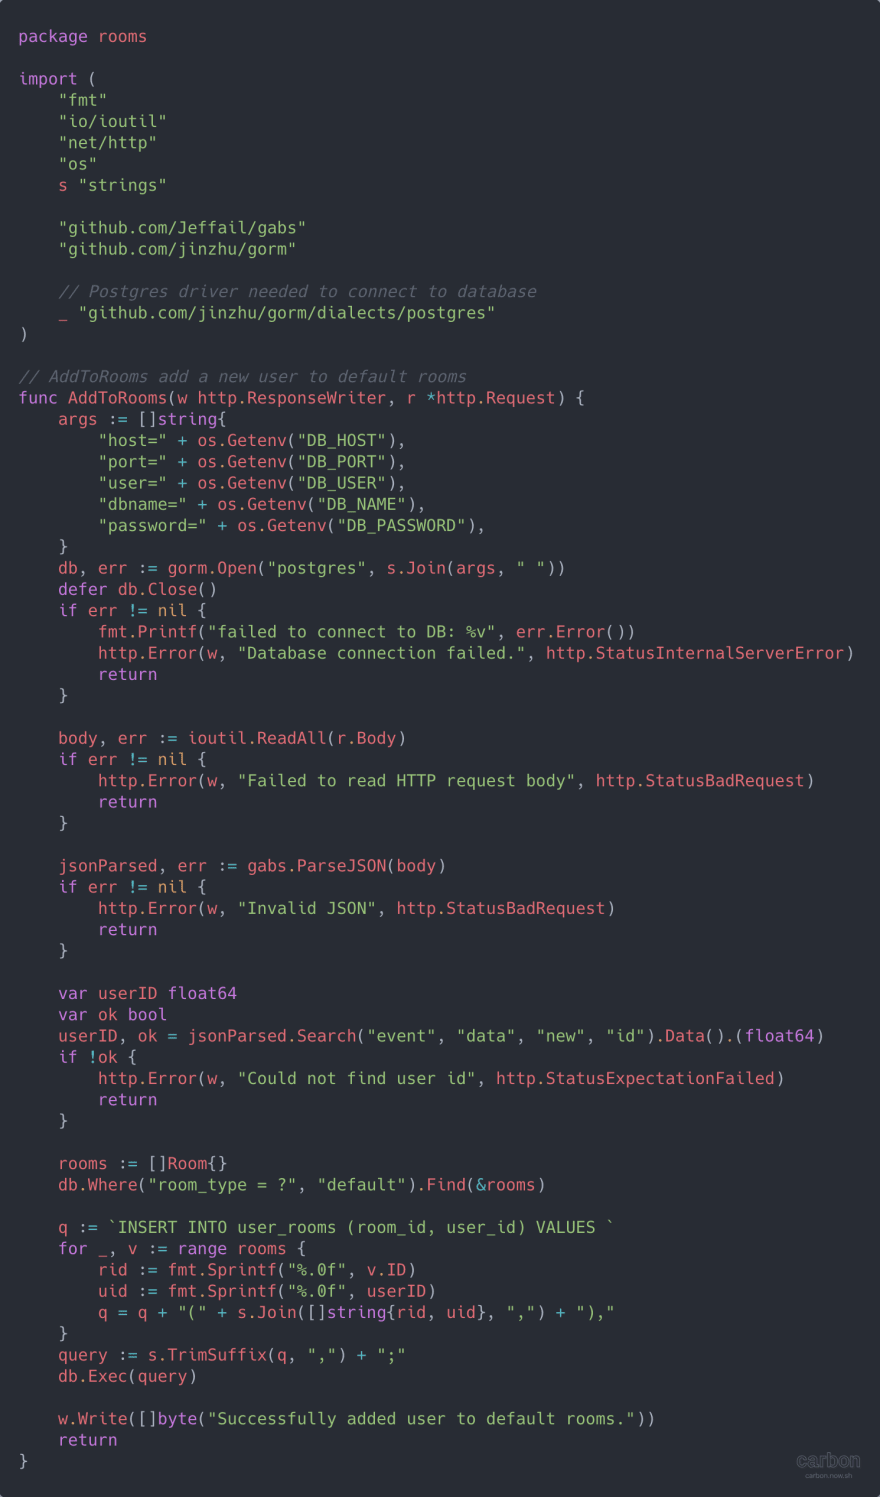
The file above contains our handler function for adding users to default chat rooms. Immediately a user is created, the event trigger is supposed to call this function and the user would be added to the default chat rooms. Notice we are getting our database credentials from the environment variables, since we are testing locally we need to create a .env file in our root directory.
DB_HOST=
DB_PORT=
DB_USER=
DB_NAME=
DB_PASSWORD=
Get your Postgres database credentials from Heroku and place them in the .env file in your root directory.
In order to map objects or data structures to our database tables we need to declare models, we would create our models using Golang structs. Create a file types.go in the rooms directory and paste the following code;

Our rooms package is now complete. We can create the notifications package where our handler function for sending push notification would be. Create a new directory called “notifications” in your root directory;
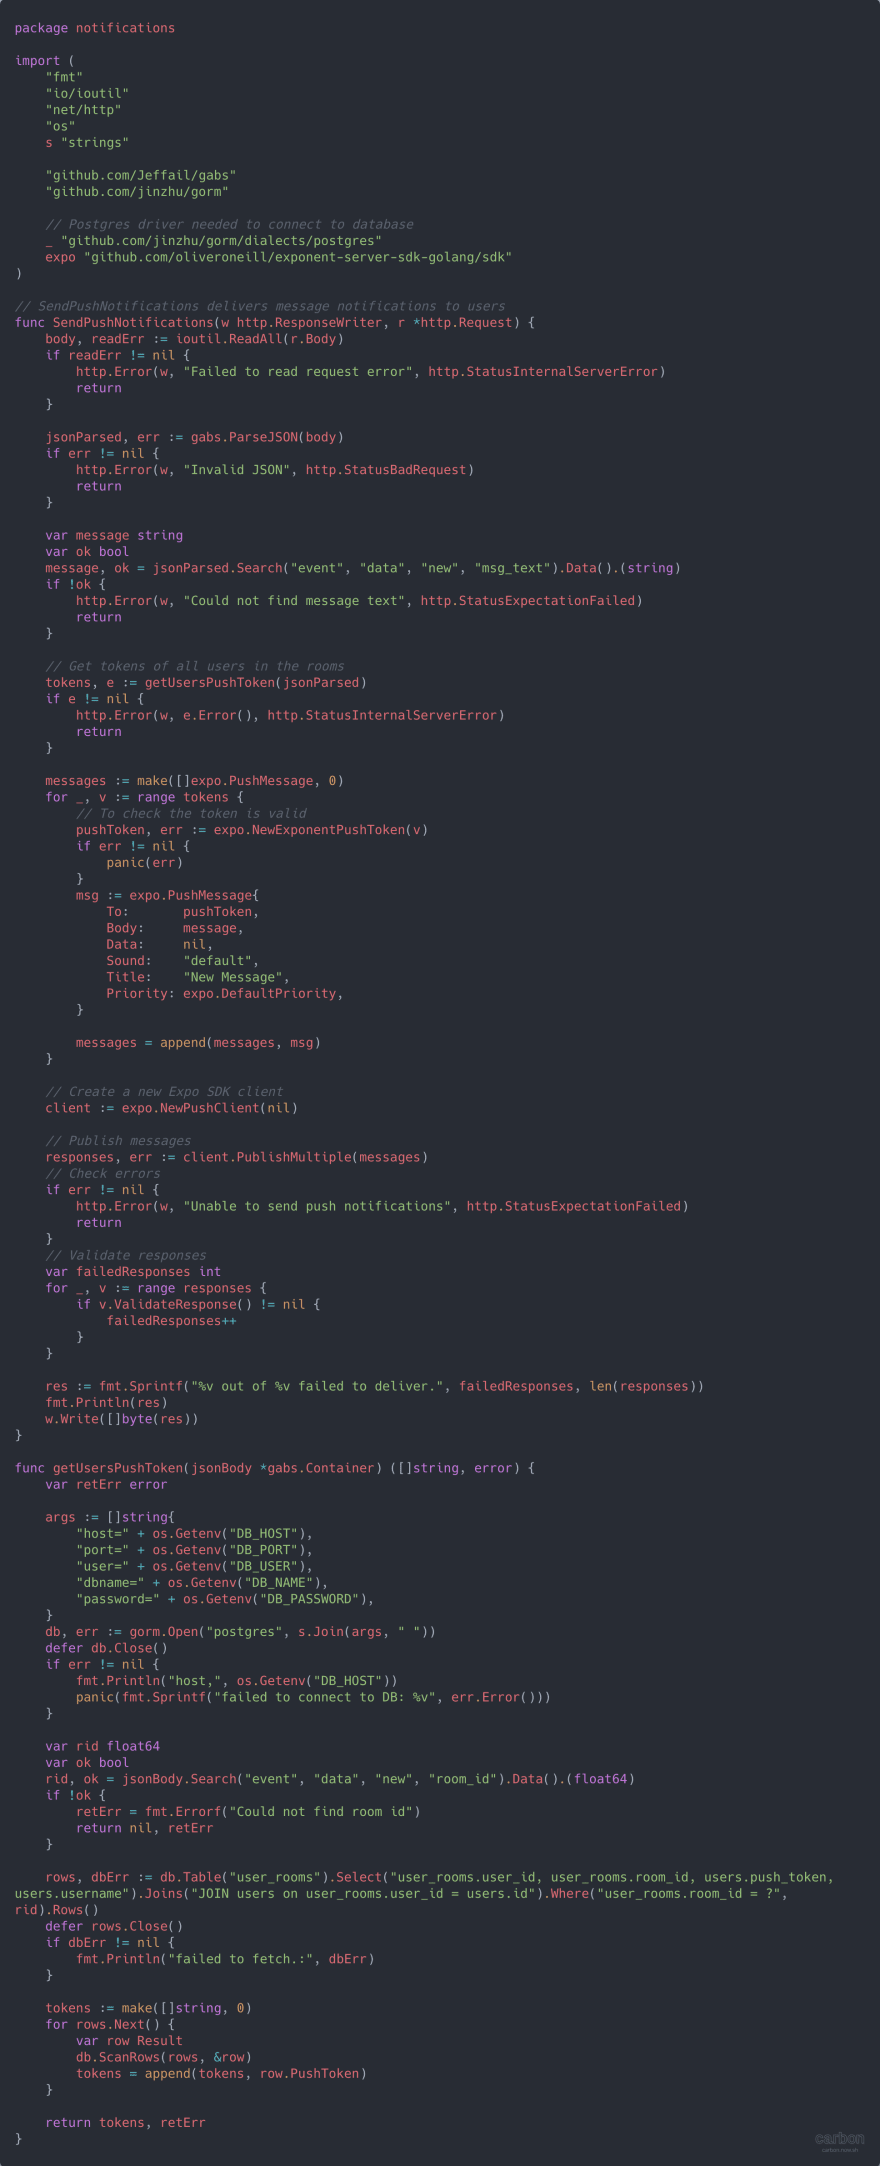
Notice we have two functions in notifications/fn.go, SendPushNotification is the main function triggered by the HTTP request, while getUsersPushToken gets the token of all users that are in that particular chat room.
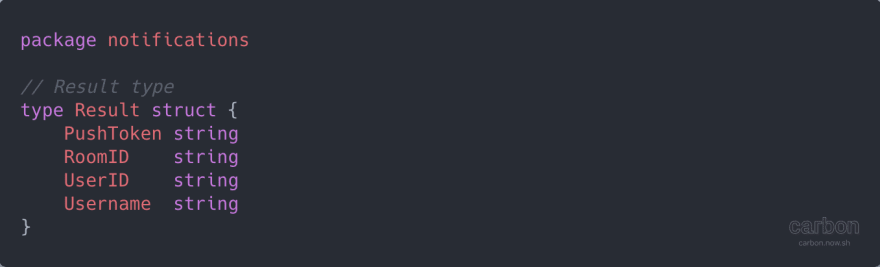
Results of the query performed to get all the user belonging to the specific chat room are mapped to a struct type named Result. We are going to create the struct type in the directory notifications/types.go:
Before we run our functions, first let’s create a Go module at the root of our project directory, open your terminal within the root directory and run go mod init tutorial/3factor-chatapp. This would create a Go module for us. Run go build to ensure all dependencies are downloaded.
Finally run go run main.go. This would start the application. If the application started successfully you can follow the next step, else if you run into an error, ensure you are running a version of Go 1.11 or above and all the dependencies have been downloaded.
Setting up event system
The event system brings together the different parts of the entire application: from the frontend which initiates the events, and our cloud functions that are triggered when events are emitted.
We’ll need to capture events in two cases;
- When a new user signs up; we need an event to trigger our backend function to add the user to the existing default chat rooms.
- When a user posts a message in a room; we need an event to also trigger our backend so that we can notify the users in that room (via push notifications).
We can set up our events system either through the hasura console or through Hasura API. In other to set up these events through Hasura API, create a file event_triggers.json and paste the following code;

Notice the webhook field is not set yet, this is because these triggers would be deployed on our Hasura engine which is running on Heroku and they cannot call our functions that are running on localhost. To solve this we are going to use a tool call ngrok, this would provide us with a public URL to our localhost server. Install ngrok and run the following command;
$ ngrok http 5070
This would expose our functions which are supposed to be running on port 5070 to the public. Once you get the public URL, update your event_triggers.json, replace the <YOUR_NGROK_URL> with the URL provided by ngrok. Next, run the following command to set up the event triggers via Hasura API;
$ curl -d @event_triggers.json -H 'Content-Type: application/json' https://3factor-chatapp.herokuapp.com/v1/query
Once the above command runs successfully, we can now run our first GraphQL query from the Hasura console. Select the GraphiQL tab in the console and run the following query;

You’ll see a new user added in the users table and also added to default rooms by our backend. To confirm that our backend was actually triggered, visit http://localhost:4040 to inspect the traffic of your ngrok public URL.
Deploying cloud functions
Moving away from localhost to production would require us make a few changes to ensure our functions execute well in the production environment. On each function call we attempt to connect to the database because we require a database connection to execute our logic, this is not very efficient because database connections are very costly.
The Golang init functions are defined in a package block and are used for running one time computations and many more. So let’s move away our database connection to an init function;

This ensures that the database connection is attempted once and reduces execution time greatly. The database client is also declared globally so we’ll need to add the following variables in types.go;
var once sync.Once
var db *gorm.DB
Now our cloud function would connect to the database on startup, and wouldn’t have to attempt connection again each time the function is triggered.
Since each package would be deployed as a separate function we have to create a Go module within each package. Run the following command in each package to create a Go module;
$ go mod fn.go
I’ve setup a GitHub (link to be provided) repo so that you can refer to the code.
One of the easiest ways to deploy your Google cloud function is using the gcloud cli tool, it allows your to perform various operations using a few commands.This requires you to have a Google cloud platform account, if you don’t have an account, sign up and create a project.
Once you have the gcloud tool setup. Run the following commands in the rooms and notifications directory respectively (Note: Make sure you replace xxx with the right environment variables value);
$ gcloud functions deploy AddToRooms --region=us-central1 --trigger-http --runtime=go111 --set-env-vars DB_HOST=xxx,DB_PORT=xxxx,DB_USER=xxx,DB_NAME=xxxx,DB_PASSWORD=xxxx --entry-point=AddToRooms

$ gcloud functions deploy SendPushNotifications --region=us-central1 --trigger-http --runtime=go111 --set-env-vars DB_HOST=xxx,DB_PORT=xxxx,DB_USER=xxx,DB_NAME=xxxx,DB_PASSWORD=xxxx --entry-point=SendPushNotifications
Deployment might take a few minutes.
Implementing the front end
We are going to use React native and Expo to develop the frontend that would communicate with our GraphQL backend. You can view and run the final code of the frontend on Expo snack (https://snack.expo.io/@codebyomar/3factor-chatapp).
Setting usernames
Signing up a user would be handled by a single component, SignUp. The code can be found in components/SignUp.js in the Expo snack project.
First let’s create our GraphQL mutation and wrap it in gql;
const SIGNUP = gql`
 mutation SignUpUser($username: String!) {
   insert_users(objects: { username: $username }) {
     returning {
       id
       username
       last_seen
       last_typed
     }
   }
 }`;
Note that the inner mutation, insert_users, is a mutation we are calling from our backend.
The mutation above would be executed on submit of the form and the callback below would be executed once the mutation completes successfully;
async handleResponse(response) {
   let { insert_users } = response;
   let { returning } = insert_users;
   let user = returning[0];
   this.props.navigation.dispatch(
     NavigationActions.navigate({
       routeName: 'Chat',
       action: NavigationActions.navigate({
         params: { ...user },
         routeName: 'Rooms',
       }),
     })
   );
 }
The SignUp component would render a mutation component imported from react-apollo. We would pass the mutation we created above as a prop and the callback to be executed once mutation completes successfully.
render() {
   const { username } = this.state;
   return (
     <Mutation
       mutation={SIGNUP}
       ignoreResults={false}
       onCompleted={data => this.handleResponse(data)}>
       {(signup, { loading }) => {
         return (
           <View style={styles.container}>
             <Text style={styles.leadText}> Sign up </Text>
             <TextInput
               label="Choose a username"
               value={username}
               onChangeText={name => this.setState({ username: name })}
             />
             <View style={{ paddingVertical: 15 }}>
               <Button
                 loading={loading}
                 mode="contained"
                 onPress={() => signup({ variables: { username } })}>
                 Continue
               </Button>
             </View>
           </View>
         );
       }}
     </Mutation>
   );
 }
Creating chat rooms
A list of chat rooms will be listed to users after signing up. We will need to write a mutation to create new chat rooms.
export const ADD_ROOM = gql`
 mutation create_room($room: String!, $type: String){
   insert_rooms(objects: { name: $room, room_type: $type }) {
     returning {
       id
       name
     }
   }
 }`;
We simply retrieve the room name from the input field and pass it as a variable to our mutation to create a new room. In other to get a fresh list of rooms we are polling data every 3000ms by passing a pollInterval prop to the Query component.
<Query query={GET_CREATED_ROOMS} pollInterval={3000}>
  // … other code here
</Query>
Subscribing to chat rooms
We have two separate lists of rooms listed. The first is a list of rooms the user has joined and he can send messages in, the others are rooms he has not joined. We need to subscribe to the user_rooms table so that we can quickly update his list anytime he joins a new room.
export const ROOM_SUBSCRIPTION = gql`
 subscription onUserJoinRoom($offset: Int!, $userId: Int) {
   user_rooms(
     offset: $offset
     where: {
       user_id: {
         _eq: $userId
       }
     }
   ){
     id
     roomsByroomId {
       id
       name
     }
   }
 }
`;
Sending messages
We are using a react native library to render our messages and chat user interface. We will pass a function that would receive the message and user who sent it, then we would call our insert_messages mutation.
export const SEND_MESSAGE = gql`
 mutation send_msg($objs: [messages_insert_input]){
   insert_messages(objects: $objs){
     returning{
       id
       msg_text
       msg_timestamp
       room_id
       usersByusername{
         id
         username
       }
     }
   }
 }
`;
A room_id is also passed to the mutation to identify which room the message belongs to.
Typing Indicator
We update the last_typed field in the user table to the current timestamp anytime the user types in a few characters in the input field.
export const SET_USER_TYPING = gql`
 mutation set_user_typing($uid: Int!) {
   update_users( _set: { last_typed: "now()" }
     where: {
       id: {
         _eq: $uid
       }
     }
   ) {
     affected_rows
     returning {
       id
       last_typed
     }
   }
 }
`;
By updating the last_typed every time a user types, we can subscribe to view the last user that typed. In other not for us to appear in the list we exclude ourselves from the list.
export const SUBSCRIBE_USER_TYPING = gql`
 subscription get_user_typing($myId: Int ) {
   user_typing (
     where: {
       id: {
         _neq: $myId
       }
     },
     limit: 1
     order_by: {
       last_typed: desc
     }
   ){
     last_typed
     username
   }
 }
`;
Subscribing to messages
We first send a query to fetch all the messages in a particular room.
export const GET_MESSAGES = gql`
 query fetch_messages($room_id: Int!) {
   messages(where:{room_id:{ _eq: $room_id }}){
     id
     text
     room_id
     msg_text
     msg_timestamp
     usersByusername{
       id
       username
     }
   }
 }
`;
After the query results arrive, the subscribeToMore function becomes available to us. With the subscribeToMore function we will be notified with the content of the new message any time there is an update. All we need to do is append it to the previous messages.
<Query query={GET_MESSAGES} variables={{ room_id }}>
       {({ subscribeToMore, data, loading, error }) => {
         if (loading) return null;
         const { messages } = data;
         return (
           <MessageList
             messages={this.mapMessages(messages)}
             room_id={room_id}
             user={this.user}
             subscribeToNewMessages={(append) =>
               subscribeToMore({
                 document: MESSAGE_SUBSCRIPTION,
                 variables: { rid: room_id },
                 updateQuery: (prev, { subscriptionData }) => {
                   if (!subscriptionData.data) return prev;
                   const newMessages = this.mapMessages(
                     subscriptionData.data.messages
                   );
                   return append(newMessages);
                 }
               })
             }
           />
         );
       }}
     </Query>
Sending push notifications
To send push notifications we will need the user’s push token to know the device we will be delivering the messages to. We will need the user’s permission to do that. Fortunately Expo provides a solution to do that easily. The function below is called on mount of the component to get the user’s permission;
async registerForPushNotificationsAsync() {
   const { status: existingStatus } = await Permissions.getAsync(
     Permissions.NOTIFICATIONS
   );
   let finalStatus = existingStatus;
   if (existingStatus !== 'granted') {
     const { status } = await Permissions.askAsync(Permissions.NOTIFICATIONS);
     finalStatus = status;
   }
   // Stop here if the user did not grant permissions
   if (finalStatus !== 'granted') {
     return;
   }
   // Get the token that uniquely identifies user's device
   let token = await Notifications.getExpoPushTokenAsync();
   const { navigation } = this.props;
   return this.props
     .saveToken({
       variables: { token, userId: navigation.getParam('id', 'undefined') },
     })
     .then(response => response)
     .catch(err => console.log(err));
 }
After a user grants us permission, we save their token using a mutation, by updating the push_token field in the user table.
export const SAVE_PUSH_TOKEN = gql`
 mutation save_token($token: String!, $userId: Int!) {
   update_users(_set: {push_token: $token}
     where: {
       id: {
         _eq: $userId
       }
     }
   ) {
     returning {
       id
     }
   }
 }
`;
Remember we set an event trigger for everytime a new message is posted in a room, our cloud function gets the push token for all the users in that rooms and notify them.
User online feature
As long as a user is logged in we update their online status every 3 seconds. This help us to identify users that were seen in the last 10 seconds. By simply subscribing to the online_users view we can get realtime update of each user’s online status.
const SUBSCRIBE_ONLINE_USERS = gql`
subscription isUserOnline($userId: Int) {
 online_users (
   where: {
     id: {
       _eq: $userId
     }
   }
 ) {
   id
   username
 }
}
`;
Now when you click a user’s avatar, a dialog would pop up displaying their online status and other details.
Conclusion
We have been able to build a scalable chat application with Hasura graphql engine which generates most of our backend functions, while Hasura event system allowed us to glue other functionalities to the whole application. The structure of the 3factor architecture makes it possible to add new features to our chat app very quickly and also build multiple frontends, you can check out the full project on GitHub https://github.com/CodebyOmar/3factor-chatapp
About the author
Umar Abdullahi is a full stack software engineer based in Abuja, Nigeria. He loves building software products and developing them into startups. He also occasionally writes about JavaScript and Go on his personal blog. He watches football and movies in his spare time. You can reach out to him on Twitter.

Top comments (0)