Pintora 是我最近在折腾的一个开源项目,类似于 Mermaid.js 和 PlantUML,由文字生成图表。
光是有在线编辑器还不太够,花了几天折腾了一个 VSCode 插件 - pintora-vscode,支持语法高亮、实时预览和导出图片。由于有上面两个项目的开源的 VSCode 插件珠玉在前,实现起来不难,也很有趣。
功能实现
语法高亮
pintora 内置了几种类型的图表,语法几乎无相同之处,通过首单词来决定图表类型。 首先熟读官方的代码高亮指南 Syntax Highlight Guide,接着跟着 vscode-mermaid-syntax-highlight 的源码结构照猫画虎。然后和 TextMate 的语法规则搏斗一下就行。
看 package.json 中关于语法的 contributes:
"languages": [
  {
    "id": "pintora",
    "extensions": [
      ".pintora"
    ],
    "configuration": "./language-configuration.json"
  }
],
"grammars": [
  {
    "language": "pintora",
    "scopeName": "source.pintora",
    "path": "./out/pintora.tmLanguage.json"
  },
  {
    "scopeName": "source.pintora",
    "path": "./out/pintora.tmLanguage.json",
    "injectTo": [
      "text.html.markdown"
    ],
    "embeddedLanguages": {
      "meta.embedded.block.pintora": "pintora"
    }
  }
该插件提供了两种情形下的代码高亮
-
pintora语言文件,由 languages 处定义,后缀为.pintora的文件 - markdown 文件中的
pintora块(由embeddedLanguages指定),将其也认为是pintora语言。
由于这个语言不断会有新的图表类型加进来,同时它不是标准的编程语言,而是类似于标记语言的 DSL,匹配规则比较长,因此采用了 yaml 来写语法配置 pintora.tmLanguage.yaml,使用 yaml-import 包来将其转化为最终的 json 文件。
---
fileTypes: []
injectionSelector: L:markup.fenced_code.block.markdown
patterns:
  - include: '#pintora-code-block'
  - include: '#pintora'
repository:
  pintora-code-block:
    begin: (?<=[`~])pintora(\s+[^`~]*)?$
    end: (^|\G)(?=\s*[`~]{3,}\s*$)
    patterns:
      - include: '#pintora'
  pintora:
    patterns: !!import/deep
      - diagrams/
  'component__element': !!import/single repository/component__element.yaml
  'activity__element': !!import/single repository/activity__element.yaml
  'style__clause': !!import/single repository/style__clause.yaml
  'style__part': !!import/single repository/style__part.yaml
scopeName: source.pintora
!!import/deep 和 !!import/single 都是 yaml-import 支持的指令,分别指引入一个目录内所有文件和引入一个文件,这样子不同图表的语法规则可以放在各自的文件里维护,看起来清晰简洁。
以下以组件图 Component Diagram 为例。
- 以
componentDiagram开头的,进入组件图的匹配规则里 -
patterns里只有两个includes,主要是component__element这个在上面配置中的repository中声明的可重用语法规则,是因为组件图的语法支持多层嵌套,嵌套内外的语法相同,这样一个分形的结构,需要在顶层的repository里声明好,才能复用。
- comment: Component Diagram
  begin: \b(componentDiagram)
  beginCaptures:
    '1':
      name: keyword.control.pintora

  patterns:
    - include: '#component__element'
    - include: '#style__clause'

  end: (^|\G)(?=\s*[`~]{3,}\s*$)
下面再给出 component__element.yaml 的局部示意。
patterns:
  - comment: 'package'
    begin: !regex |-
      (package|node|folder|frame|cloud|database|rectangle|component)\s+"([^"]+)"
      \s*({)
    beginCaptures:
      '1':
        name: keyword.control.pintora
      '2':
        name: string
      '3':
        name: punctuation.bracket.open.pintora
    end: '(})'
    endCaptures:
      '1':
        name: punctuation.bracket.close.pintora
    patterns:
      - include: '#component__element'
在 package这个语法规则中,花括号中的内容,会通过 - include: '#component__element' 继续使用此语法规则来解析。
待解析的语言示意如下,详细语法可见 组件图说明
database "MySql" {
  folder "This is my folder" {
    [Folder 3]
  }
  frame "Foo" {
    [Frame 4]
  }
}
在 Webview 中实时预览
当打开一个 .pintora 文件,并执行了 Preview Pintora Diagram command 时,会在右侧新建一个新的 Webview,在里面展示当前文件所生成的图表。

由于 pintora 具有在浏览器环境和 Node.js 环境下执行的能力,比起 PlantUML 这样的 Java 程序,实时预览对 Web 更加友好,在 Webview 中展示,是再合适不过的了。能根据用户对源文件的更改,实时更新右侧预览效果,而且此过程中不会写临时文件到磁盘。
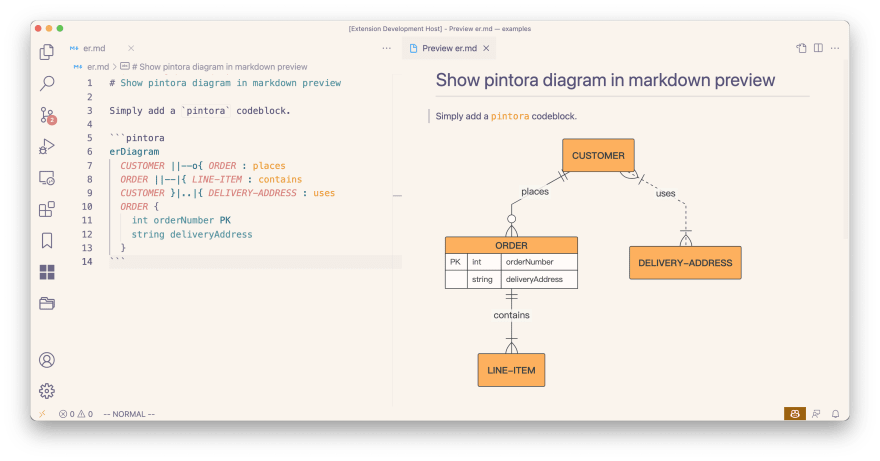
在内置 Markdown 预览内展示 pintora 代码块
参考了 vstirbu/vscode-mermaid-preview 插件才发现 VSCode 的内置 markdown 预览也是能支持扩展的,官方文档在 Markdown Extension,也将 vscode-mermaid-preview 作为一个推荐例子。
下面是 pintora-vscode 预览 markdown 文件的效果。
内置 Markdown 预览界面也是一个 Webview,使用 markdown-it 作为渲染库,因此需要扩展的话,也是基于 markdown-it 的插件来实现的。
contributes 的写法如下:
    "markdown.markdownItPlugins": true,
    "markdown.previewScripts": [
      "./out/markdown-script.js"
    ],
-
markdown.markdownItPlugins,表示 pintora 插件会提供 markdown-it 的插件,在 pintora extension 的隔离环境中运行。通过这种方式提供的插件,可以通过 vscode 接口拿到一些配置,生成 html 的时候可以通过data-属性带上,之后在 Webview 里可以根据这些属性来得到 pintora 主题和渲染器(renderer)等用户设置。注意此时生成的 html 里会保留 pintora DSL 的文本,转成图表的工作需要在 Webview 中进行。 -
markdown.previewScripts,在预览的 Webview 里插入可执行的脚本,这里主要是使用@pintora/standalone处理 pintora 文本,生成 svg 或 canvas 展示在页面上,这个会是最终用户看到的样子。
导出图表图片
这部分就比较简单,就是使用 require('child_process').spawn 新建一个子进程,使用 node 执行 @pintora/cli (pintora 本身提供的 node 命令行程序)即可。
之所以采用子进程而不是在 extension 环境下直接 import { render } from '@pintora/cli' 来渲染,是因为使用 rollup 打包 node-canvas 的时候报错了(其实好像也是能实现的,见 How to pack canvas.node by rollup? · Issue #1504 · Automattic/node-canvas)。之后可以看一下能不能集成进来,目前看起来效果其实也挺好的,而且子进程的方式倒是也有优势,执行不会阻塞插件主线程。
参考
顺藤摸瓜可以看到一些优秀的工具。

Top comments (0)