
Do you have a Gatsbyjs site? Then, you need to start utilizing the power of Gatsby ReactJS and create an instant post-switching so that your users can easily interact with your posts.
As a site owner, providing your audience with the ease to interact with your post is something you’d want to prioritize.
In case you don’t know what this looks like, you can take a look really quick.
If you love the fluidity of the post type switching and think of applying that to your Gatsby site, then this guide is for you.
But instead of the dropdown type of post-filtering as seen on the blog page, we will be creating the filtering button to switch the posts in this tutorial.
This is what we will create at the end of this tutorial.
The approach is the same. You can use your CSS skills to make it a dropdown.
Or simply take a look at my site code on GitHub and see how I created the dropdown.
Prerequisite
To follow this tutorial, make sure you are comfortable creating a Gatsby site. If not, quickly read this Gatsby tutorial guide and come back.
You can as well follow along if you want to apply it in your React application.
We will be writing purely React code!
You just have to understand how it works. You can easily tweak the code to suit your needs.
Enough said. Let’s dive in.
Setting up a Gatsby Starter
Just like every Gatsby site, we will start by installing a Gatsby starter.
Any Gatsby blog starter will do. But in this guide, I’ve provided a Gatsby starter to use.
Install it by running this command from your terminal:
gatsby new gatsby-post-switching https://github.com/Ibaslogic/ibaslogic-gatsby-tutorial
Once you have the project files and folders bootstrapped, switch inside the directory (cd gatsby-post-switching) and run the development server.
C:\Users\Your Name\ gatsby-post-switching > gatsby develop
Now, you should have your default home page at http://localhost:8000

Good.
Before you get started, here is what you need to know.
Irrespective of the Gatsby blog starter you are using,
1. You’d want to use the page query to grab your data from the source (either from the filesystem or Content Management System) instead of the StaticQuery.
The reason for that is because you can easily pass all the query data into a sub-component. So that your blog page file will not be cumbersome.
If you are using the official gatsby blog starter, you are good to go also.
The starter we are using in this tutorial uses the StaticQuery to grab the data.
It was intentional.
This is an avenue for you to learn how to convert static query to page query. And we will start with that.
2. This sub-component will receive data from the blog page component. And inside there, the post switching magic will take place.
Since it will be handling the post switching, we will make use of the state to store the initial data. That means the component will be a class-based.
If this seems complex, it is not!
If you understand the Gatsby React fundamentals, you can easily work with any complex Gatsby theme and tweak the code to suit your needs.
So let’s get started.
We will start by converting the blog page to use the page query.
In the src/pages/blog.js file, cut the static query and paste it outside of the component definition (preferable after the export default at the bottom). Make sure you modify it to use the page query like so:
export const query = graphql`
  query {
    allMarkdownRemark(sort: { fields: frontmatter___date, order: DESC }) {
      edges {
        node {
          frontmatter {
            title
            date(formatString: "DD MMMM, YYYY")
            featured {
              childImageSharp {
                fluid(maxWidth: 750) {
                  ...GatsbyImageSharpFluid
                }
              }
            }
          }
          timeToRead
          excerpt
          id
          fields {
            slug
          }
        }
      }
    }
  }
`
At this point, the result coming from the query is injected into the component through the props. From there, we can access the data like so:
const Blog = ({ data }) => {
And now we can pass it down to a sub-component.
If you save your file, your code will still work!
That’s all for the conversion.
Now, we can create a sub-component where we will pass the query data. From there, we can manage the post switching and render them on the screen.
In the src/components folder, create a file called blogItems.js. Inside this file, add the following starting code:
import React, { Component } from "react"
import { Link } from "gatsby"

import Img from "gatsby-image"
import blogStyles from "../pages/blog.module.scss"

class BlogItems extends Component {
  state = {
    items: this.props.items.allMarkdownRemark.edges,
    blogPostItems: this.props.items.allMarkdownRemark.edges,
  }
  render() {
    return (
      <ul className={blogStyles.posts}>
        {this.state.blogPostItems.map(edge => {
          return (
            <li className={blogStyles.post} key={edge.node.id}>
              <h2>
                <Link to={`/blog/${edge.node.fields.slug}/`}>
                  {edge.node.frontmatter.title}
                </Link>
              </h2>
              <div className={blogStyles.meta}>
                <span>
                  Posted on {edge.node.frontmatter.date} <span> / </span>{" "}
                  {edge.node.timeToRead} min read
                </span>
              </div>
              {edge.node.frontmatter.featured && (
                <Img
                  className={blogStyles.featured}
                  fluid={edge.node.frontmatter.featured.childImageSharp.fluid}
                  alt={edge.node.frontmatter.title}
                />
              )}
              <p className={blogStyles.excerpt}>{edge.node.excerpt}</p>
              <div className={blogStyles.button}>
                <Link to={`/blog/${edge.node.fields.slug}/`}>Read More</Link>
              </div>
            </li>
          )
        })}
      </ul>
    )
  }
}

export default BlogItems
You can start by cutting the post loop from within the return statement of the blog page into the BlogItems component and then modify.
Then, update the src/pages/blog.js file to include a reference to this component.
import React from "react"
import { graphql } from "gatsby"

import Metadata from "../components/metadata"
import Layout from "../components/layout"
import BlogItems from "../components/blogItems"

const Blog = ({ data }) => {
  return (
    <Layout>
      <Metadata
        title="Blog"
        description="This is where I write about my expertice"
      />
      <BlogItems items={data} />
    </Layout>
  )
}

export default Blog

export const query = graphql`
  query {
    allMarkdownRemark(sort: { fields: frontmatter___date, order: DESC }) {
      edges {
        node {
          frontmatter {
            title
            date(formatString: "DD MMMM, YYYY")
            featured {
              childImageSharp {
                fluid(maxWidth: 750) {
                  ...GatsbyImageSharpFluid
                }
              }
            }
          }
          timeToRead
          excerpt
          id
          fields {
            slug
          }
        }
      }
    }
  }
`
At this point, we can start working on the post switching.
Notice we declared two parameters (items and blogPostItems) of the same value in the state. Both of which contains all of the blog posts in the edges array.
However, we are looping through the blogPostItems within the render() method to display the list of posts.
The trick is simple!
If the user clicks on the All Posts button, we will reset the blogPostItems in the state back to the items (which contain also all of the original posts).
Else, if any of the categories buttons is clicked, we will filter the items and pass it to the blogPostItems.
Make sense?
As you just read, we will be using the post categories for switching.
So let’s start by adding the category field to the frontmatter of every post.

In my case, I’ve created another blog post making it three. Then I added “Gatsby” and again “React” to the other two posts.
You will see why I did that in a moment.
Note: If you are getting the content from CMS like Contentful, go there and add the category to the Content model. You can check this guide for easy setup.
Next, update the blog page query to include the category.
export const query = graphql`
  query {
    ...
      frontmatter {
        title
        category
        date(formatString: "DD MMMM, YYYY")
        featured {
          childImageSharp {
            fluid(maxWidth: 750) {
              ...GatsbyImageSharpFluid
            }
          }
        }
      }
    ...
  }
`
Now, we will set up a function that will grab these categories for us.
Above the class component in the blogItems.js file, add the following code:
const getCategories = items => {
  let categoryItems = items.map(item => {
    return item.node.frontmatter.category
  })
  return categoryItems
}
Then call this function within the state.
state = {
  items: this.props.items.allMarkdownRemark.edges,
  blogPostItems: this.props.items.allMarkdownRemark.edges,
  categories: getCategories(this.props.items.allMarkdownRemark.edges),
}
As you have noticed, we are passing the edges array (which contains all of the post data) to the getCategories function, which we then looped through to get the categories.
To see the result through the console, add this line immediately inside the render() method.
console.log(this.state.categories)
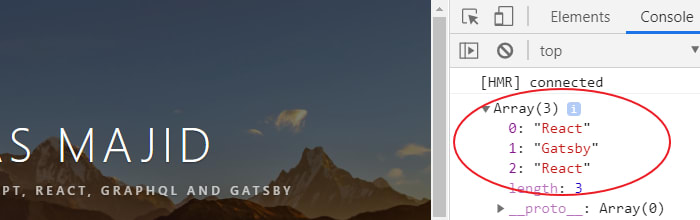
As you can see, we are getting repeated categories. That’s not what we want.
We want unique categories.
This is why I advise adding more post of the same category to show you how things work.
We will use JavaScript Set object to make the repeated category only occur once.
So update the function so you have:
const getCategories = items => {
  let categoryItems = items.map(item => {
    return item.node.frontmatter.category
  })
  let uniqueCategories = new Set(categoryItems)
  return uniqueCategories
}
Refresh the blog page and check the console of your DevTools.

Now, we are getting the unique categories.
However, it is returning an object instead of array (which is easier to work with).
So let’s quickly convert it to an array and then add “all posts” value to the list. This is necessary to create the “all posts” button for the users to view all of the posts.
Go back in your code and update the function so you have:
const getCategories = items => {
  let categoryItems = items.map(item => {
    return item.node.frontmatter.category
  })
  let uniqueCategories = new Set(categoryItems)
  let categories = Array.from(uniqueCategories)
  categories = ["all posts", ...categories]
  return categories
}
Save your file.
Now if you reload the page and check the console once again, the returned data should be an array.

Notice that we used the spread operator (the three dots,
...) to unpack the elements of thecategoriesarray.
Don’t forget to remove the console.log you added earlier.
Moving on…
Let’s display the post-switching buttons.
In your blogItems.js file, add this code just after the <ul> opening tag in the return statement.
<div className={blogStyles.filterButton}>
  {this.state.categories.map((category, index) => {
    return (
      <button type="button" key={index}>
        {category}
      </button>
    )
  })}
</div>
If you are using another Gatsby template, just make sure you add the code in the wrapper element inside the return statement.
Notice we are using the CSS modules to style the component. So adjust if you are using the regular CSS.
Ok.
Add the following CSS styles in the src/pages/blog.module.scss file:
// post filter button

.filterButton {
  display: flex;
  justify-content: center;
  margin-bottom: 40px;
}

.filterButton button {
  padding: 0.5rem 1rem;
  margin-right: 0.5rem;
  margin-bottom: 0.5rem;
  border-radius: 3px;
  background: #e6e6e6;
  border: none;
  color: #040404;
  text-transform: capitalize;
  cursor: pointer;
}

.filterButton button:hover {
  background: #555;
  color: #fff;
}
Save your files and check the blog page. You should have the buttons display.
Great! We are almost there.
Adding functionalities to the Post filtering buttons
I mentioned earlier that anytime the user clicks on the All Posts button, we will reset the blogPostItems in the state back to the items. Else, we will filter the items based on the category clicked and pass it to the blogPostItems.
Let’s see how to achieve this.
We will start by adding an onClick event to the button element.
<button type="button" key={index} onClick={() => this.handleItems(category)}>
  {category}
</button>
Then add the handleItems method above the render() method:
handleItems = category => {
  console.log(category)
}
For the meantime, we are displaying the category that is being clicked in the console.
Save the file.
Open the DevTools console and click any of the filter buttons. You should see its value rendered.
Instead of that, let’s switch the posts based on these categories.
Update the handleItems method so you have:
handleItems = category => {
  if (category === "all posts") {
    this.setState({
      blogPostItems: [...this.state.items],
    })
  } else {
    this.setState({
      blogPostItems: [
        ...this.state.items.filter(edge => {
          return edge.node.frontmatter.category === category
        }),
      ],
    })
  }
}
Save the file and test your work.
And it works!
Good job.
What is happening in the code?
We started by getting a copy of all the post items using the spread operator (…). Then, we are using this copy to reset the rendered posts based on the condition (if-else statement).
Note: With the
filter()method, we are saying that for each of the post items that we are looping through, we want to retain the once that the category matches the one passed in.
Finally, let’s style the active category button for the rendered post.
Start by adding another property, selectedItem to the state object.
selectedItem: getCategories(this.props.items.allMarkdownRemark.edges) && getCategories(this.props.items.allMarkdownRemark.edges)[0],
Here, we are setting the first item of the array to be the default button that will get styled. As you know, it is the “all posts” item.
Then update the button element to include the style prop.
<button
  type="button"
  key={index}
  onClick={() => this.handleItems(category)}
  style={this.state.selectedItem === category ? activeButtonClass : null}
>
  {category}
</button>
Here, we are using the ternary operator (which is an inline if-statement) in the style attribute to dynamically apply a style to the selected button.
And here is the style. Add it outside of the component (either above the class component or just before the export default).
const activeButtonClass = {
  backgroundColor: "#555",
  color: "#fff",
}
Next, update the setState() methods to include this:
selectedItem: category,
You should have:
handleItems = category => {
  if (category === "all posts") {
    this.setState({
      blogPostItems: [...this.state.items],
      selectedItem: category,
    })
  } else {
    this.setState({
      blogPostItems: [
        ...this.state.items.filter(edge => {
          return edge.node.frontmatter.category === category
        }),
      ],
      selectedItem: category,
    })
  }
}
With these additions, if any of the category buttons is clicked, the state will receive the new category value and the CSS style will get applied.
Save your files and check the blog page.

Good job.
Conclusion
With this simple implementation in your site, you will no doubt improve the user's experience by making it easier for them to navigate through your posts.
And the way we set this up, if you add more categories through your posts, more buttons will be displayed.
That’s what we want.
I hope you find this interesting. Should in case you encounter any difficulties, feel free to check the source code on GitHub. And if you want to go further by implementing a dropdown, check my site code as well on GitHub.
Your turn!
Make sure you follow me on Twitter to get the latest updates and endeavour to share this post.

Top comments (0)