Video Chat with Unity3D and AR Foundation — Chapter 2: ScreenSharing
Many of you may have read my previous blog about the simple modification to the demo App to incorporate AR Foundation. If not, you may go back to read the story, and use it for the set up for this new project. The most frequently asked question from the previous tutorial may have been
“How do I share my AR camera screen?”
In this tutorial, we will emphasize how to use external video source to stream the AR camera view to the remote user. To get the best from AR Foundation, we will use the latest stable version of the Unity Editor.
Prerequisites
Unity Editor (Version 2019.2 or above)
2 devices to test on (one to broadcast, one to view)
Broadcast device will be a mobile device to run AR scene: Apple device of iOS 11 or above; Android device with API level Android 7 or above.
Viewing device does not need AR capability: pretty much any device with Windows, Mac, Android, or iOS operating systems will work
A developer account with Agora.io
Getting Started
To start, we will need to integrate the Agora Video SDK for Unity3D into our project by searching for it in the Unity Asset Store or click this link to begin the download. Note the current SDK version is archived here, in case that the future SDK release has a different layout.
 Video SDK on Asset Store
After you finish downloading and importing the SDK into your project, you should be able to see the README files for the different platforms the SDK supports. You should be familiar with the set up for the demo by following the previous tutorials.
Unity AR Packages
On UnityEditor (2019), open Package Manager from the Window tab. Install the following packages:
AR Foundation 3.0.1
ARCore XR Plugin 3.0.1
ARKit XR Plugin 3.0.1
Project Set Up
Please follow this link to download the completed project “ARUnityClient” on Github.
Open the project in Unity Editor. Go to the asset store page to import Agora Video SDK. When importing the Agora Video SDK, unselect “demo” from the list since those file names are modified in the Github repo. Switch to iOS or Android platform and follow the README instruction on how to set up the build environment for AR Foundation.
Open up the SceneHome scene, your project should look like this:
 Home Scene
Again, the project is based on the original demo that comes with the SDK. Scenes and scripts are modified to run the screen sharing. You should fill in your App ID in the field of GameController before running the demo.
Project Architecture
The ARUnityClient consists of three scenes and here are their descriptions:
Home — the entry screen with buttons to open the two screens for different purposes.
HelloVideo — the 1-to-1 chat client, in which the remote user is shown on the big screen while the local user is in the small image box.
ARClient — the big screen will show the real-world environment with AR objects: a sphere for anchoring, and a cube hosts remote user’s video.
This picture shows their relationship:

The application will require two devices to run. There are two scenarios:
Both devices use “1-to-1 Chat”.
One device uses “1-to-1 Chat”, while the other uses “AR Camera”.
=> You may not want to run “AR Camera” on both device.
We will focus on Scenario 2.
Shared Interface
The AR Camera client and the 1-to-1 client both implement the IVideoChatClient interface for the following methods:
TestUnityARClient.cs and TestHelloVideo.cs implement their version of the client on this common interface. User chooses the client on the Home screen to create the instance of the client and load the respective scene.
AR Camera Client
AR Camera client’s join(channel) method is implemented this way:
Notice the following lines are different from what we wrote in previous tutorial:
         //mRtcEngine.EnableLocalVideo(false);
         CameraCapturerConfiguration config = new CameraCapturerConfiguration();
         config.preference =      CAPTURER_OUTPUT_PREFERENCE.CAPTURER_OUTPUT_PREFERENCE_AUTO;
         config.cameraDirection = CAMERA_DIRECTION.CAMERA_REAR;
         mRtcEngine.SetCameraCapturerConfiguration(config);
         mRtcEngine.SetExternalVideoSource(true, false);
The code snippet above does the following:
Set the automatic video quality preference.
Use the rear camera for capturing video
The video sent out from an external video source. What this means is that the stream won’t be taken directly off the camera. Instead, we will encapsulate a source of video raw data manually.
So for the video stream on AR Camera client, there are two steps of work done in continuous fashion:
A. Capture the image from AR camera
B. Send the image raw data to the external video source API
The source code is listed in TestUnityARClient.cs. We will discuss the important parts of the code that addresses these steps.
Step A — AR Foundation Camera Image capture
The Unity documentation provides very insightful help on how to retrieve the data from AR Camera on CPU.
The first thing you will need is the access to the ARCameraManager. Make sure the component is added to the AR Camera instance in the scene, in our example - the ARClient scene. We called the instance of the ARCameraManager “cameraManager” in code.
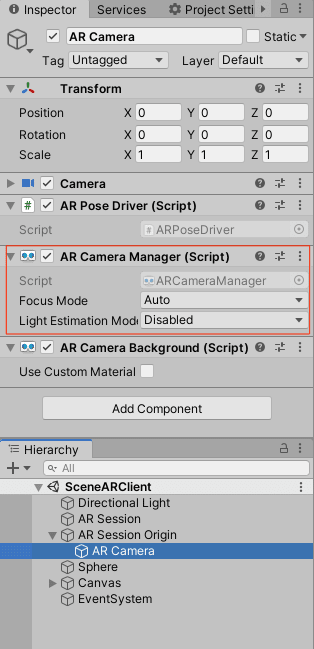 ARCameraManager
Next, you will need to register a delegate to wake a function to collect the raw data from the image on each camera frame.
cameraManager.frameReceived += OnCameraFrameReceived;
On each frame received from the AR camera, we use cameraManager to get the latest image, and extract the raw binary data into a byte array. Lastly send to the external video source. The complete function snippet is following:
Note that line 39, which converts the raw data into binary bytes, is actually accessing a memory pointer for the copy operation. Therefore this is an “unsafe” operation in such context.
image.Convert(conversionParams, new System.IntPtr(buffer.GetUnsafePtr()), buffer.Length);
For this reason, the CaputreARBuffer() function requires an “unsafe” modifier. And it also requires “allow unsafe code” enabled in the project setting. See this picture:
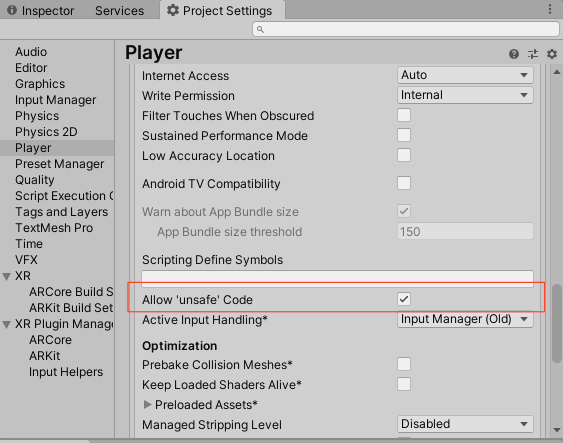 Allow unsafe code
The last line in this function is a call to run PushFrame() as a Coroutine. The PushFrame Coroutine takes the raw image bytes to send it out as the external video source. Note that on the callback delegate (line 46) we dispose the image and buffer to clean up the memory.
Step B — External Video Source
Using external video source is actually a concept you may find in another Agora demo app on screen sharing — How to Broadcast Your Screen with Unity3D and Agora.io.
The code is similar for the most part. Here is the snippet from TestUnityARClient.cs:
In summary, this function serves the purpose: create and populate an instance of the ExternalVideoFrame data structure; then send the data using the API pushVideoFrame().
Testing
Please refer to the previous tutorial or the SDK Readme file for the other project settings for AR applications. You should be able to build the project and run it on your devices without any code changes.
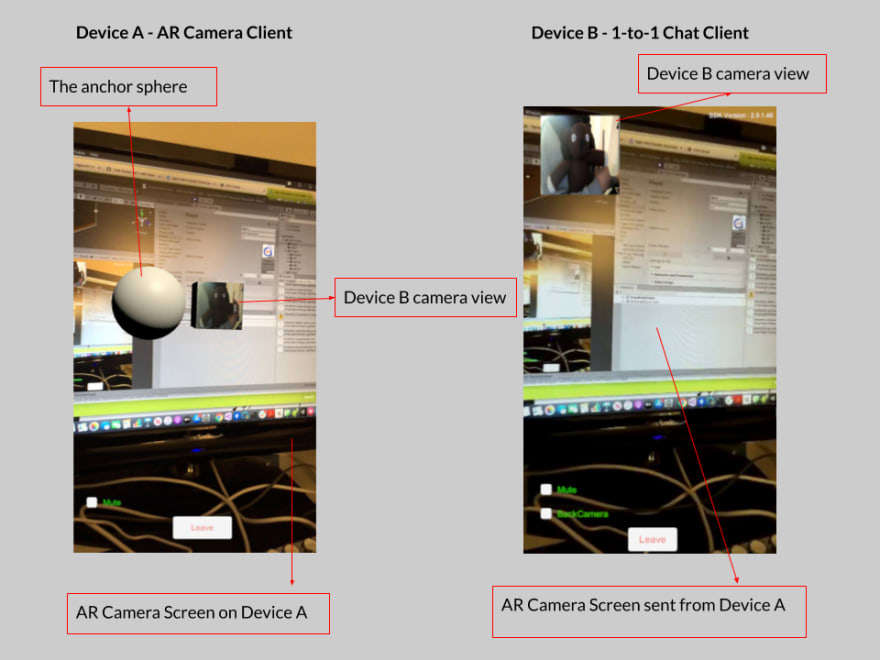
The following picture illustrates the two screens for the test.
All Done!
Thank you for following along. It is very straight-forward, isn’t it? If you have any questions please feel free to leave a comment, DM me, or join our Slack channel agoraiodev.slack.com/messages/unity-help-me. There will be another chapter coming. We will make an even more complex application on AR Foundation. See you next time!
Other Resources
- Next AR Foundation Chapter
- The complete API documentation is available in the Document Center.
- For technical support, submit a ticket using the Agora Dashboard or reach out directly to our Developer Relations team devrel@agora.io

Top comments (0)