
In this article, I will try to provide a brief description of what the Qase test management system looks like. There will be some small marks where there are differences from TestRail, the system we used to use.
A little background
One not-so-great day, we started thinking about moving from TestRail to a different Test Management System (TMS). This is because TestRail had started to produce bugs that we did not like.
It became inevitable that we would have to search for a new system. And we started Googling right away. Most of the articles we found described each system in general terms — this is a TMS, which allows us to store and edit cases. And here is a list of its features. But that wasn’t enough. The upshot of our short search was Qase.
A couple of words on what Qase is all about. It is a cloud-based test management system that helps teams store and organize product test information and organize team work. To put it simply, it is a place where testers hold their test cases and carry out all sorts of manipulations with them.
This article will constitute a short overview of the system. I will briefly touch on the main questions to which our team wanted to find out the answers, and that we received on the demo and during the transition.
General view
At the top, we see a menu that divides the resource into different parts:
 Menu
Menu
- Project — contains projects that we select from the list of projects created. We can create our own project. There is also a list of cases, runs, plans, etc.
- Workspace — workspace setup (users, gender, roles).
- Reports — reports and queries.
- Apps — integrations.
Projects can be presented as a list or as cards:
 Lists
Lists
 Cards
Cards
Here we can create a new project, find it, filter it, and add it to favorites. The latter option allows us to keep the selected projects at the top of the list at all times. We can choose an icon for each project — this is very convenient.
Let’s move on to a more detailed review.
Case Repository
Here’s what this section looks like:
 Repository
We see here:
- Action menu with cases — it appears only if we select several cases. Actions are visible on the buttons.
- List of cases — this contains the automation icon (a hand turning a gear that sets the automation level), case ID and name. At the bottom, there is a button for creating a case quickly. There are 4 buttons next to the name of the suite — creating a suite or case, editing the description, cloning, and deleting.
- View — a way to display cases. All in one long plain-text version, or each folder separately.
- Action menu — exporting and importing cases. There is also a very handy trash can. No case will ever be deleted, but will simply be put in the trash.
- List of suites in the project — contains the name and number of cases in it.
- Case counter — contains the total number of suites and cases. If we apply a filter, it will contain values based on the filters set.
- Adding filters.
A brief word on the advantage of TestRail in this section — there we can add the display of information about additional fields to the list. Unfortunately, this is not yet available in Qase.
Here’s what the case looks like with different opening methods:
 When you tap on the case name, it opens like this
 When you tap on the case ID in the list, a preview opens up
The editing mode is presented in two screenshots:
 Editing №1
 Editing №2
- Above, there are standard system fields, then pre- and post-conditions.
- Tags.
- Custom fields.
- Attachments.
- Parameters. Example of usage — when you enter 2 parameters, there are already 2 identical cases in the run, one for each parameter. There is still only one case in the repository.
For the steps themselves and the objective results, a toolbar is provided; this eliminates the need to keep the markdown in your head (I always struggled with this in TestRail). Font color, type, 2 types of list, links, tables, image, code block, etc.
 Toolbar
Shared Steps
This contains the list of Shared Steps for the project. It is possible to create and edit a shared step, and also to search by the existing ones.
It is convenient that they are not stored in one big heap: each project has its own set. They can be edited easily and created immediately. As we can see, the number of cases in which it is used is displayed:
 Shared Steps
Con: shared steps with the same name can be created. And only here can we make it from two or more steps.
When creating a shared step in the case editing mode, we can create it in just one step:
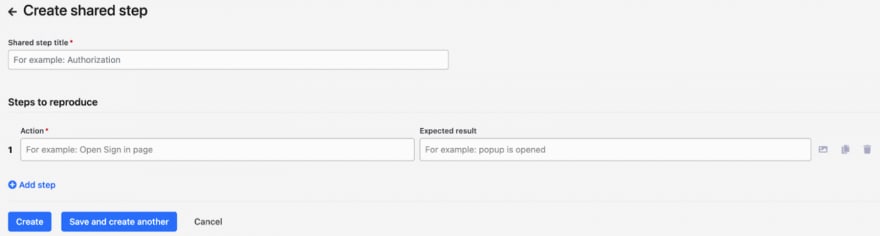 Creating a Shared Step
Milestones
Used to indicate a milestone in development. I could not find any differences between Qase and its fellow product, TestRail. It’s available as part of the project, and this makes good logical sense. We hardly ever use it.
The description of the list contains basic information about it. Unfortunately, there are no filtering options on this screen yet.
A milestone can be selected when creating a run or a case within a project. If you have several teams, and each has its own project, creating a single entry point will not work.
 Milestone
Plan
This is where things get more interesting:
 Plan
Plan
The main difference between Qase and TestRail is that the plan is a template for the future run. In TestRail, it was the entity that enabled runs to be merged.
The plan contains the name and estimated run time — it is formed on the basis of the duration of the cases (if they were run). This is convenient if you want to provide a forecast about the run time.
When creating a plan, you can provide a name and a description, and collect cases by condition. Also, when selecting cases, assign is available for the person selected.
Cons: no dynamic filters. If you collected cases according to a condition, but then they stopped going there, the plan will not change.
 Assigned cases in the plan
Test Runs
Just as in TestRail, this is a set of cases to run within a release or a feature. The peculiarity is that there is a wizard, a kind of interface for performing a run.
Multiple entry points for creating a run:
- Select a plan — create a run based on it.
- Go to the Test Runs section — create a run there.
- Select one or more cases in the repository — use the action bar (Run button) to start them up.
 Test runs
- On the left, there is a list of cases. We can filter them as required.
- On the right, there is the case itself. At the top, there is the result for the case; below each step, there is a specific result.
- The View and Edit buttons open the case in a new window for viewing and editing, respectively. Changes to a case lead to a change in the case in the run after a page refresh.
- Custom fields are displayed in the run, above the steps (we can see the AndroidResult field as an example).
- Case Run History — history of the case. This displays the result of past runs.
_Cons: it is not clear what was written in the comment when the case was run. We need to open the general list of cases in the run (*by closing the wizard) and click on the result label.
And if we do not put in the result for each step of the case, we will not see the steps in the completed case.
It seems to me that TestRail is more convenient, since we can immediately see in the tab what happened in the last run._
 View of the run with a closed wizard
We see a list of cases; when they are selected, several more actions are available. In the side menu, there is a chart of case statuses (when clicked, filtering by the status selected is performed) and some information (who started it and when).
The Team stats tab will show how much has been completed, and by whom:
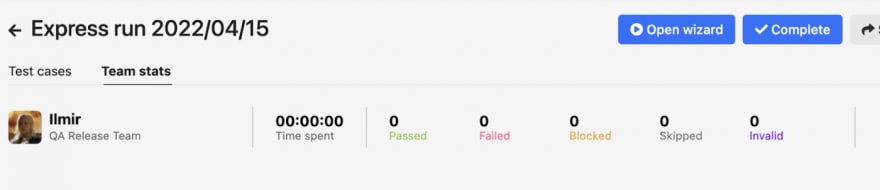 Team stats
Settings
It is logical that it contains the project settings:
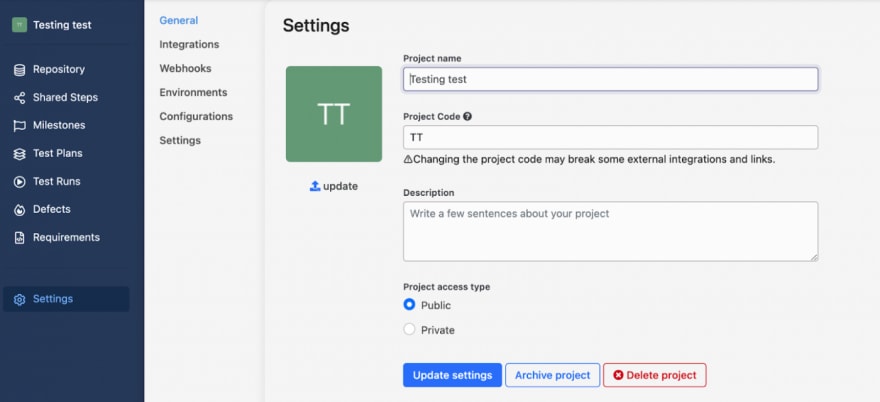 Settings
Name, code (this will be the case ID), description, and type. There are also tabs for integration, webhooks, configuration, and setup.
Of particular interest is the Settings tab — there we can set settings for starting and ending runs, confirming the deletion of a case, and displaying fields in project cases.
Workspace
Here we see the following:
 Workspace
- Members — a list of participants: their role, name and the time of their last activity. This makes it possible to block and unblock users. There are filters by status (active or blocked), role, and type (full or read only).
- Invites. This contains a list of the invites sent. There is an option to revoke an invite on this page.
- Groups — used when a private project is being created. When creating a project whereby access is only given to a specific group.
- Roles — roles in TMS. It regulates the capabilities of a user under a specific role. We can create a role, delete it or edit it.
- Fields — system and custom fields, creating or editing, and also deleting.
- Tags — entity available for a case, a run, and other filtering options.
- Attachments — a complete list of all attachments (photos, etc.). It is possible to conduct a search: we can specify in which project a specific attachment is involved.
- Logs — a complete log of the actions of all users. Various filtering options are available.
Fields and Roles
In the Field tab, we can set up system fields and custom fields. We can create custom ones right there:
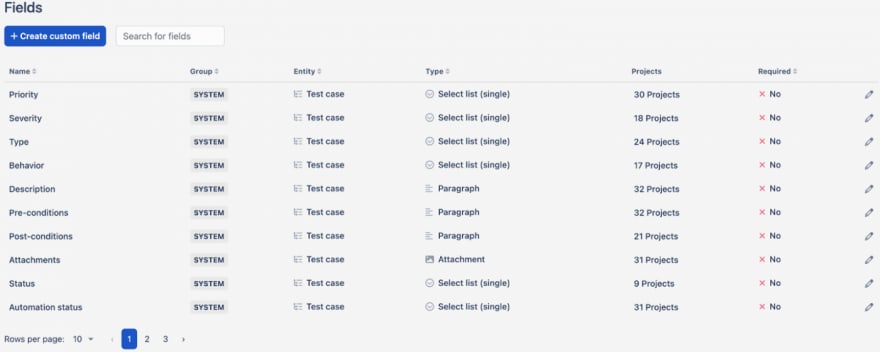 Fields
All the fields are in one place — this is convenient, as we can set up the visibility of a specific project for each field.
Edit a field (a custom one or a system one) — here you are, except for the Automated, isFlaky, and Status system fields. Also, you will not be able to change the field type (from Single List to Multi List, for example). Everything else can be edited quickly and in a convenient way.
 Editing field №1
 Editing field №2
When editing, the name of the fields (though not for system ones), direction (case or run), and type are set. Next, the visibility for the project and the default value are selected.
The values are set on the second tab. For each one, as needed, a color and an icon are selected (for some future feature, I suppose). Values can be deleted, their positions can be swapped, and new ones can be added.
Now let’s talk about the roles:
 Roles
Roles
We see the list of roles, type and whether the field is a default one. The number of users for each role is displayed:
 Creating a role
When creating the role, we set the name, description and choose what is available for it.
Reports
On this page we can create and see:
- Dashboard — information about the project or projects. The dashboard contains some information about cases and other data. One or more widgets are created in order to display information about cases, runs or defects.
 Dashboard
- Query — a QQL query is created (this is similar to the advanced search function in Jira). A search is performed for projects according to conditions (status, project, name, etc.). A QQl memo will open if you click on the question icon in the search bar.
Each query can be edited however you like:
 Queries
- Saved queries — a list of saved queries is stored here:
 Saved queries
- Profile. When we click on it, we will see the following:
 Profile
- Billing — a button for payment. This contains information about the payment for the current subscription, as well as the payment history (access depends on the role).
- Appearance — choice of a theme from among the ones suggested.
- API tokens — creating an API token.
- Profile — setting up a profile, changing the name, password, subscribing to notifications, and adding a photo.
- Help — a help center.
- API docs — API documentation.
- Roadmap — a product roadmap. This shows which features are planned, which are in the works, and which have already been implemented.
- Status — information about incidents, the current state of the product.
- Sign out — exit button.
 Choice of themes
Conclusion
Of course, one article is not enough to review a tool as large as this. I hope, though, that it will help you in choosing a solution. In the future, I will try to write a short piece with some more extensive material on how we migrated from TestRail.
The result of the transition to Qase, for us, is the absence of critical bugs and peace of mind while we work. Yes, this TMS is not perfect, but it is better than TestRail. And our use of it has proven as much.
The important thing is the continuous improvement of it and, even more importantly, the incredible feedback from the Qase developers themselves. It’s nice to get an answer to your questions quickly and to see bugs being fixed even more quickly (incomparably faster than with TestRail, when it took a couple of months for bugs to be fixed).
During the transition to Qase, a lot of questions were asked, and we received a detailed and extended answer to each of them within 1 to 2 hours, at most. The number of questions, as you know, was huge. But the support team answered with all the calmness of a well-fed Tibetan boa constrictor.
P.S. If you are interested in this topic, I am attaching links to the Qase YouTube channel and GitHub, where you can learn more about the system’s capabilities.

Top comments (0)