
The cloud is the default environment of our time. Rented infrastructure helps lower your taxes and risks by moving most of the operations to your cloud provider. Using the cloud lets you focus on your customer’s needs without constantly worrying about database updates or OS maintenance.
But the cloud doesn’t make everything better; it also complicates some parts of the software delivery pipeline, such as testing and debugging. Problems that hit your production environment can cost you customers and, in turn, real money. That’s why testing is essential, and testing cloud-based software means testing in the cloud.
Thundra Foresight can ease the pain of testing on a server in a data center far away. It gives you the insights you need to link all your distributed services in the cloud together while running tests on actual infrastructure.
Today, we are happy to announce the release of Node.js support for Thundra Foresight. This article will dive into a serverless application that we will deploy on AWS infrastructure using AWS Lambda’s Node.js runtime.
Prerequisites
For this example, you’ll need an AWS account and a Thundra account. We’re going to use a serverless application from the CDK patterns library as a base, so you also need a local Node.js, Git, and AWS CLI installation. The fastest way to get this setup is by provisioning an AWS Cloud9 instance.
The Saga Step Function
The example we’re using here comes from the CDK patterns library, a repository of sample applications that follow best practices in using the AWS CDK infrastructure as code framework.
In Figure 1, below, you can see the actual architecture of the application. It comes with an API gateway, a Step Functions state machine, a DynamoDB table, and several Lambda functions.

Figure 1: Architecture of the application
Cloning the Example Repository
The base for our example is “The Saga Step Function” repository of the CDK patterns library on GitHub. This example can be retrieved with the following command:
$ npx cdkp init the-saga-stepfunction
Deploying the Application
The application comes ready to be deployed without any changes. Just type the following command:
$ npm run deploy
The deployment takes a minute or so. After it is finished, you’ll see a URL to the API Gateway endpoint. You’ll need this URL in the next step.
Creating an E2E Test
After the deployment, you are presented with an API Gateway endpoint you can open in the browser. The application is set up to allow calling the URL with a GET request and no parameters.
To test this behavior, create a new file in the test directory called e2e.test.ts with the following content:
import * as https from "https";

const url = "<API_ENDPOINT_URL>";

describe("API Gateway", () => {
  it("can be called without parameters", (done) => {
    https.get(url, (response) => {
      expect(response.statusCode).toEqual(200);
      done();
    });
  });
});
You can also delete all other files in the test directory to speed up the test execution. Replace the API_ENDPOINT_URL with the URL you got in the previous step.
If you didn’t deploy the example in the AWS region us-east-1, your test will likely fail with a 500 HTTP status code. But since you want to debug something, this is a good thing!
Setting Up Thundra Foresight
Thundra Foresight supports different integrations. We will use the manual integration for Jest here. First, you have to install the Thundra client via NPM.
$ npm i dotenv @thundra/core@^2.13 jest-circus@^26.6 -D
Since we had version <27 of the jest package installed, we had to install the jest-circus package with the same version. This might be different for you if the example project gets updated in the future.
Next, update the jest.config.js file:
require("dotenv").config();
module.exports = {
  roots: ["<rootDir>/test"],
  testMatch: ["**/*.test.ts"],
  transform: {
    "^.+\\.tsx?$": "ts-jest",
  },
  testRunner: "jest-circus/runner",
  testEnvironment:
    "@thundra/core/dist/bootstrap/" +
    "foresight/jest/JestDefaultEnvironment.js",
};
We also added dotenv to the mix, which allows us to add an .env file to the project to set the environment variables required by the Thundra client. The content of that file should be the following:
THUNDRA_APIKEY=<YOUR_API_KEY>
THUNDRA_AGENT_TEST_PROJECT_ID=lt;YOUR_PROJECT_ID>
To gather the API key and project ID, open the Thundra Foresight home page and click on “Create Project.” Give the project a name, like “The Saga Step Function.” Then choose manual integration and click “Continue.”
After you create a new project, you can find it in the project list. On the new project, click on the small gear button. You’ll see the credentials needed. Copy them to the .env file.
Finally, you need to initialize your project as a Git repository. The example application was downloaded, but there wasn’t a repository created for you, so you have to do this manually. This way, you can see which commit led to an error in Foresight later.
$ git init
$ git add -A
$ git commit -m "Init"
Running the E2E Test with Foresight
After everything is set up, you can rerun the test with the following command:
$ npm run test
Now, you should see the results of that test run in Foresight. Figure 2, below, shows the test run overview of all your tests. In this case, it’s just one, and it failed.
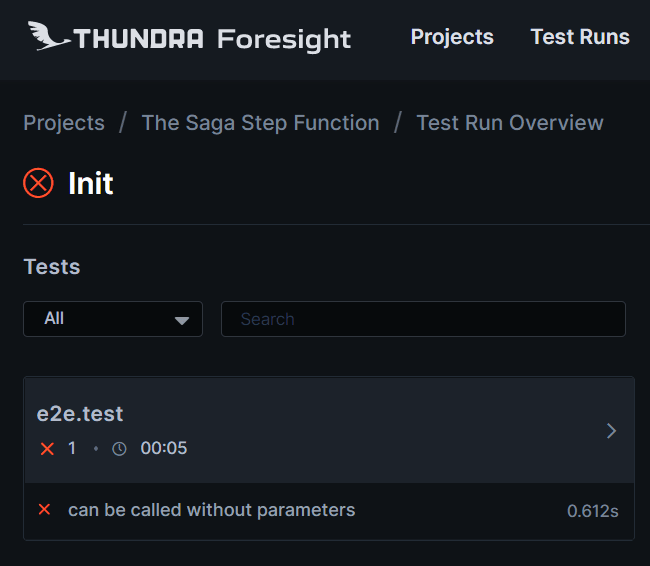
Figure 2: Test run overview
If you click on the failed test, you can get more details, as seen in Figure 3, below.

Figure 3: Test details
For example, you will receive an error message (the server returned a 500 HTTP status code instead of a 200) and a stack trace. In this case, neither is very helpful. The stack trace only shows the file that contained your test, but the 500 tells you that something on the backend is wrong, so it can’t show up in the stack trace.
If you click on “Trace Map,” you will see what was happening on the backend.
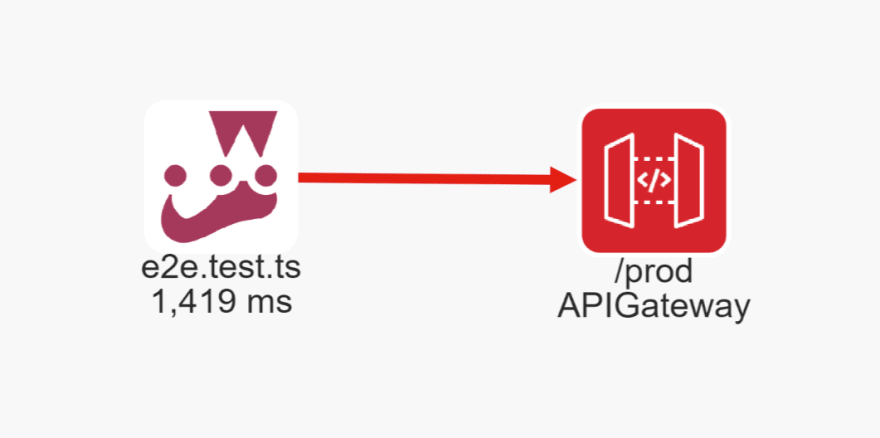
Figure 4: Incomplete trace map
Well, that trace is useless. It only shows that we called the backend. This is because Thundra can only use information from the test runner, received via Foresight. You have to instrument your Lambda functions with the Thundra Lambda extension to get a better trace map!
Instrumenting the Lambda Functions
To instrument your Lambda functions, you have to add the Thundra Lambda layer to them. This can be done in the lib/the-saga-stepfunction-single-table-stack.ts file with the following changes:
First, you’ll need to update the createLambda method of your stack:
createLambda(
    scope: cdk.Stack,
    id: string,
    handler: string,
    table: dynamodb.Table) {
    if (!this.thundraLayer)
      this.thundraLayer = lambda.LayerVersion.fromLayerVersionArn(
        scope,
        "ThundraLayer",
        "arn:aws:lambda:eu-west-1:269863060030:" +
        "layer:thundra-lambda-node-layer-minified:93"
      );

    let fn = new lambda.Function(scope, id, {
      runtime: lambda.Runtime.NODEJS_12_X,
      code: lambda.Code.fromAsset("lambda-fns"),
      handler: "thundra_handler.wrapper",
      layers: [this.thundraLayer],
      environment: {
        TABLE_NAME: table.tableName,
        thundra_apiKey: "<THUNDRA_API_KEY>",
        thundra_agent_lambda_handler: handler,
      },
    });
    // Give our Lambda permissions to read and write data from the passed in DynamoDB table
    table.grantReadWriteData(fn);

    return fn;
  }
The THUNDRA_API_KEY is the same that you used when instrumenting Jest.
You also need to update the Lambda function that API Gateway calls:
const sagaLambda = new lambda.Function(
      this,
      "sagaLambdaHandler", {
      runtime: lambda.Runtime.NODEJS_12_X,
      code: lambda.Code.fromAsset("lambda-fns"),
      handler: "thundra_handler.wrapper",
      layers: [this.thundraLayer],
      environment: {
        statemachine_arn: saga.stateMachineArn,
        thundra_apiKey: "<THUNDRA_API_KEY>",
        thundra_agent_lambda_handler: "sagaLambda.handler",
      },
    });
With these changes in place, run the following commands to deploy the new version:
$ npm run build
$ npm run deploy
Now that Thundra knows the Lambda functions, you can click your test’s “Trace Map” button in the Foresight console and see your trace, like in Figure 5, below.

Figure 5: Instrumented trace
This time, you can see that API Gateway called your sagaLambdaHandler function; your test is marked red because it had an error.
If you click on the function icon, you can see the explanation of Figure 6 on the right.
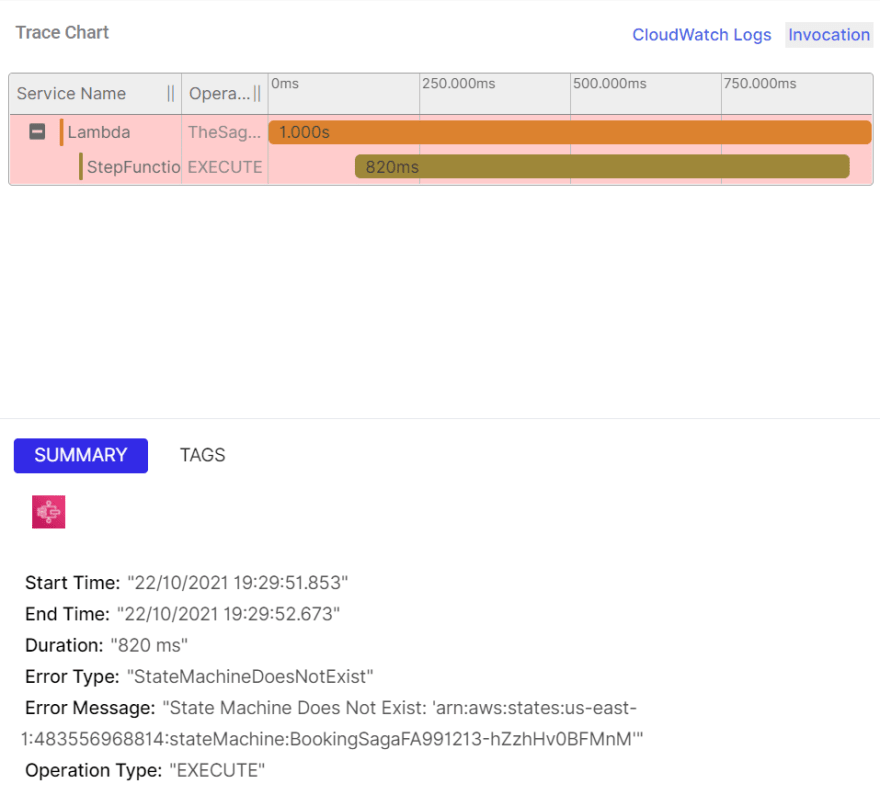
Figure 6: Error details
The state machine does not exist! Why? Because we deployed in eu-west-1 and the Lambda function tried to get it from us-east-1. You can fix that in the sagaLambdaHandler code located in lambda-fns/sagaLambda.ts. At the top, it creates a Step Functions client with the us-east-1 region, which you need to change. We’ll change ours to eu-west-1.
const stepFunctions = new AWS.StepFunctions({
  region: "eu-west-1"
});
Save the file, rebuild, redeploy, and rerun the tests:
$ npm run build
$ npm run deploy
$ npm run test
Finally, the error should be gone, and your tests pass. You can look into the Foresight console and check the trace map of your passing test. Figure 7, below, shows that the trace map is now complete since the state machine has called all of your Lambda functions.

Figure 7: Complete trace
Conclusion
Cloud development in general, and serverless development specifically, come with their unique challenges. Testing such systems can have bugs in different parts, be it deployment configuration or runtime errors. Thundra Foresight helps to locate these errors in the vast number of services you have running in the cloud. Now, Node.js developers can harness its power!
Thundra Foresight supports open source communities by serving forever free for open source projects.
Thundra Foresight supports open source communities by serving as forever free for open source projects. You can sign up, get your free account, and start using Foresight today.

Top comments (0)