It has been a while now since Github released its much-awaited feature Github Action.
This post will cover some basics around what actually are Github Actions and how can it be used in the simplest of ways to automate some mundane tasks.
What is Github Action?
In layman's terms, Github Actions helps in automating software workflows like a PR review, Branch management, Issues tracking, PR labelling, and much more.
Now what is workflow?
Workflow gives you the ability to structure your own set of steps/rules/flow to build your own automation process. It can be just one workflow or multiple ones clubbed together.
For this particular article we will be looking into how can we leverage Github Action to automate the task of PR labelling. I'm very sure anyone who is reading this would've had a difficulty in remembering to label your PR according to the changes done and more often your manager/lead would drop in a comment to remind you about the same.
The good thing is now you can leave that to the Github actions bot. Let's see how.
- First of all, make sure you have created all the necessary labels you want to use for your projects in Github. To do so, navigate to your project repository and click on the pull requests tab.
- Click on "Labels" right next to the filter search bar which will straight away take you to the list of labels available from where you can also create new labels as per your requirements.
Now, Create a
.githubfolder in the root of your project if not already created. This will be the directory where all your future workflow files, as well as some usefulYMLfiles, stay.Withing
.githubfolder create a file with${your-file-name}.yml(I have named itassing-label.yml). Replaceyour-file-namewith whatever you'll like to have and paste the below code in there.
Components:
- any: ['src/components/**/*']

actions:
- any: ['.github/**/*']
The above code is just a yml file that will be used by our workflow to decide which filter should be applied based on any changes.
any and all are two fields defined to match and check for files changed in the paths mentioned against the fields in array respectively.
It basically translates to this:-
If there are ANY changes in the components folder present in the src folder apply the `Components` tag to that PR.

Similarly, if there are ANY changes in the `.github` folder apply the `actions` tag to that PR.
Okay, So far so good.
Now, we will create a workflow that will actually bring everything to life when a PR is actually created.
- Jump to the
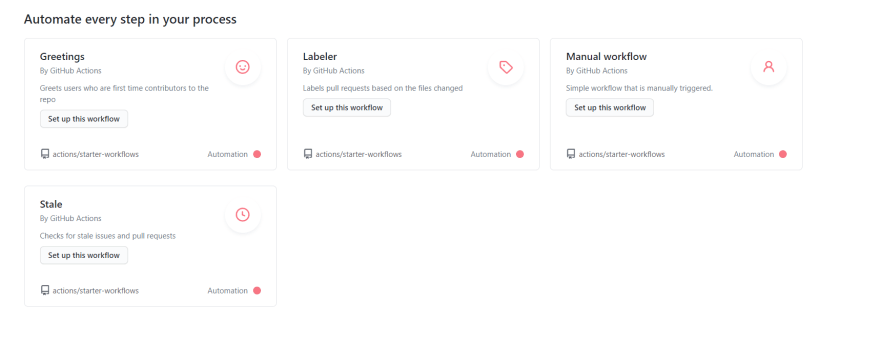
Actionstab and scroll down till you see this.
- Out of the options available, click on the
Setup this workflowbutton of theLabelerCard and soon you'll see a code editor screen with some pre-populated code snippet in it.
You can choose to change the file name which is auto-generated as label.yml. Github will automatically create a workflow folder within the .github folder that we created for our assign-label.yml file.
Paste this simple code snippet in the editor.
# This workflow will triage pull requests and apply a label based on the
# paths that are modified in the pull request.
#
# To use this workflow, you will need to set up a .github/labeler.yml
# file with configuration.  For more information, see:
# https://github.com/actions/labeler

name: Labeler
on: [pull_request]

jobs:
  triage:
    runs-on: ubuntu-latest

    steps:
    - uses: actions/labeler@master
      with:
        repo-token: "${{ secrets.GITHUB_TOKEN }}"
        configuration-path: .github/assign-label.yml # Replace this with your ${your-file-name}.yml that we created earlier.
Let's first understand what the heck is going on in this file.
name: This is just a string which is normally the name of the workflow file.
on: This one is rather the most important one. on basically tells the action to listen to a particular event which in our case is a pull_request. It will listen to any and every change on a pull_request and run this particular action every time something is pushed or changed.
More about events in Github actions
jobs will run your particular job that is triage on the latest ubuntu machine and start completing the steps mentioned. uses will download the external dependency that is actions/label@master and will run the same code with the configuration we wrote in the assign-label.yml file.
A lot of stuff happened, right!? But hang on in there. Once this is done, commit the file either to master directly or create a new Pull Request for the same.
On creating a pull request you'll see Github action in action literally.

You'll notice some new comments saying "Github actions bot added some Tag" and a green tick to signify that your checks ran successfully. In case it fails you'll see a red cross there and luckily you also have access to logs for your actions to debug them in case you need to which I'm sure in the beginning you'll have to. That's how we all learn, right !?
To see logs and the history of actions that were executed earlier you can straight away go to the Actions tab within your repo.
So, if you manage to follow the article successfully you'd have successfully automated your Pull Request labelling process, and even if you get stuck on any of the steps feel free to drop down the errors in the comment section. I'll be happy to help as much as I can.
This is just a very small use case of what Github Actions can do. You might have some other way of doing the same thing too. Feel free to let me know how do you automate your day to day workflows in Github.
If you want to discuss more on this feel free to DM me on Twitter.


Top comments (0)