Introduction:
While Cloud Run offers the undeniable advantages of a serverless and stateless environment, it's important to recognize that it primarily caters to stateless applications. However, there may be instances where the need arises to deploy a stateful application which mandates a storage medium (logs, media assets, and such) within the Cloud Run environment. If you find yourself facing this very scenario, fear not, for this blog post will serve as your comprehensive guide, walking you through the process step by step.
How exactly are we going to do this, you ask? By leveraging a tf module I authored, of course!
A lil' pretext as to why I even came about with the idea to write this was when the only other way I saw around making stateful applications seamlessly work with Cloud Run was to make direct changes (google libs, sdk, etc.) to the codebase in effect, which would unequivocally alter the very substance of the application to render it working ONLY and EXCLUSIVELY on Google Cloud.
No more meddling around with the code, all thanks to this module, all of the apps volume needs are taken care of within the confinement of the Cloud Run service itself!
Prerequisite:
An account with Google Cloud with administrative access or permissions for the essential components constituting the following services - Cloud Run, VPC, API services, Filestore, and Artifact Hub.
Getting Started:
Step 1: Enable APIs
- Initially, you must activate the necessary APIs:
- Cloud Filestore API
- Cloud Run API
- Serverless VPC Access API
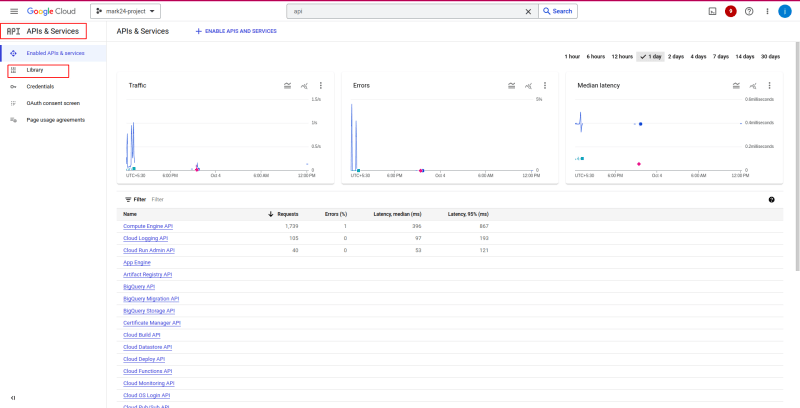
- Navigate to the "APIs & Services" section, proceed to the "Library" section, and search for the specified APIs mentioned above. Afterward, enable them as needed.


Step 2: Create Serverless VPC connector
- To connect to your Filestore instance, your Cloud Run service needs access to the Filestore instance's authorized VPC network.
- Every VPC connector requires its own /28 subnet to place connector instances in. Do note that this IP range must not overlap with any existing IP address reservations in your VPC network
- Goto to
Serverless VPC access, afterware, clickCREATE CONNECTOR, fill the required field

Step 3: Filestore
- Navigate to the "Filestore" section.
- Click
CREATE INSTANCEto create the new filestore. - Fill the required field and click Create.
- Upon it being created, you'll have the "NFS mount point" displayed

Step 4: Build Docker Image
-
Once you've completed the preceding configuration steps, the next task involves adding the following line to your Dockerfile's ENTRYPOINT or CMD:
mount -o nolock FILESTORE_IP_ADDRESS:/FILE_SHARE_NAME MNT_DIR
-
Here's what each argument of this command denotes:
- FILESTORE_IP_ADDRESS:/FILE_SHARE_NAME: You should obtain this value from step #3 labeled "NFS mount point"
-
MNT_DIR: You must specify the target directory where you intend to mount the Filestore.
 FROM ubuntu:latest
 WORKDIR /data
 # If you use entrypoint
 ENTRYPOINT ["mount -o nolock FILESTORE_IP_ADDRESS:/FILE_SHARE_NAME /data", "&&", "npm" , "start"]
 # If you use CMD
 CMD mount -o nolock FILESTORE_IP_ADDRESS:/FILE_SHARE_NAME /data && npm start
- Subsequently, proceed to build your Docker image and push it to the Artifact Hub.
Step 4: Deploy that Image to Cloud Run
- Navigate to "Cloud Run"
- Click on the "Create Service" button.
-
Service Configuration:
- Select the container image you pushed earlier.
- GGive the service a name of your choosing and fill the rest of the information.
-
Container Configuration:
- Give the container a port number to start serving on
- Execution environment : Choose " Second generation"
- Fill the other things.
-
Network Configuration:
- Select " Connect to a VPC for outbound traffic"
- Choose "Use Serverless VPC Access connectors" from the list, next, choose the serverless VPC connector that you have created in Step #2.
- Finally, Click "CREATE".
A no-brainer way to smoke test if the filestore crate is actually mounted, do the following:
- Launch a VM (GCE) in the same network as Filestore and SSH into it
- Install the nfs utility (I'm demo'ing this on Debian:
sudo apt install nfs-common) - Create an example directory, i.e; nfs? filestore?
-
Mount the example directory as a volume in the filesystem.
mount -o nolock FILESTORE_IP_ADDRESS:/FILE_SHARE_NAME <example-directory>
df -hto check if the share is mounted,cdinto the <example-dir>,mvfiles you'd want accessed by the container; later, and as soon as your app begins writing data, you'll naturally find it inside the <example-dir> along with the rest.

Top comments (0)