
If you use Instagram, there's a certain filter I'm sure you've seen.
A question hovers above your head, something like What Friends Character Are You? or What Kind of Dog Are You?. You press, and a series of pictures are shuffled through. Eventually, it stops and you have your result.
In this tutorial, we'll cover how to make this kind of filter with JavaScript and Spark AR, an augmented reality studio created by Facebook. My version of the project is on GitHub here. That said, let's get to it.

Part One: Setup in Spark AR
Adding Textures
After opening a blank project in Spark AR, the first thing we’ll need to do is add our pictures. You will need one picture with your “Which ____ are you?” question, and then however many results you want to include.

On the bottom left, you’ll see a section called Assets. In that section, select Import: From Computer and then choose your image files.
These pictures will be added to your project in a folder called Textures. In Spark AR, you can think of textures like a top-coat of paint. Later on, we will use them to cover an AR material in the Spark AR studio.
Adding a Face Tracker
Above Assets is another menu called Scene. At the bottom right of this menu, select Add Objects, and choose Face Tracker from the popup menu. Our project can now follow the movements of the user’s face.

However, Face Tracker isn’t a ‘physical’ object so we need to right-click faceTracker0 from our Scene hierarchy, select Add, and then choose Add Plane. This will add a checkerboard patterned square in front of the person in the simulator and a plane0 underneath Face Tracker in our Scene hierarchy.
You don’t need to change the name of the plane, but select it and look at the menu on the far right. You will see an option to add a Material, which when selected will add a blank material0 to our Assets hierarchy.
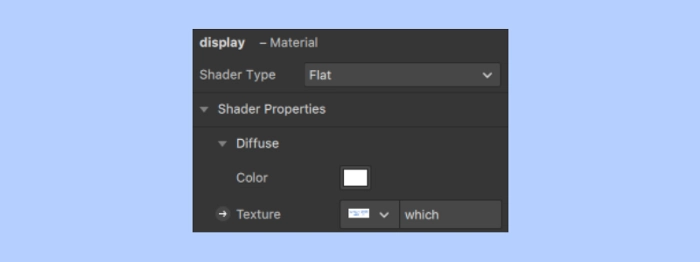
First, rename material0 to display. We will reference this later in our script, so it’s important that the names match. Then, under Shader Type select Flat, and under Texture select the “Which _____ are you?” image file you added before.
You will now see your image displayed in front of the face in the simulator. You can now go back to plane0 and play around with the position and scale until it looks right.
Connecting to the Script
Going back to our Assets menu, select Add Asset, and choose Script. This will create a script directory including a blank script in the hierarchy called script.js. We need to create two patches; an event listener and a reference to our script.
Under View on the very top of the page select Show/Hide Patch Editor. It will be blank for now, but this way we can see things as we add them in a second.

Then, right-click anywhere in the patch editor and select Screen Tap from the popup menu. This will create a patch that will listen for a user’s touch.

Lastly, select script.js and choose the To Script option from the menu on the right. Select Pulse from the dropdown and change its name to tap. When you press the yellow arrow, it will appear as a yellow rectangle in our patch editor. Draw a line between Screen Tap and tap to connect the two patches.
Now our script can communicate with Spark AR and we can get started writing the program.
Part Two: Scripting
Double click on the script.js file and your default code-editor will open (I used VS Code for this project). First, you need to reference the different Spark AR APIs that we’ll need later, and you can do so in a giant chunk like this:
const Time = require('Time');
const Patches = require('Patches');
const Instruction = require('Instruction');
const Diagnostics = require('Diagnostics');
const Materials = require('Materials');
const Textures = require('Textures');
Then, we need to reference our display material (which we labeled before) and create an array to hold all our result pictures, like so:
const display = Materials.get('display');
const pics = ['pic1', 'pic2', 'pic3', 'pic4'];
Next, we just need to establish a few more things before we can really get started.
let randInterval = null;
let status = 'ready';
We’ll use randInterval later to shuffle through the different pictures in our pics object and we’ll use status to keep track of the progress of the program along the way.
Finally, we need to set up an initial instruction for the user to see when they start the filter.
Instruction.bind(true, 'tap_to_start');
Instructions appear in white text at the bottom of the screen. They can be toggled on and off with the booleans true and false and the display text is set using what Spark AR calls a token, which has a string value. The first token we’ll use is 'tap_to_start'.
There are a few different instruction tokens, and you can find them in the main Spark AR studio by selecting Project → Capabilities → Instructions → Custom Instructions. You also need to declare each instruction that you will use within Spark AR by selecting Add Instruction and choosing the complimentary token from the dropdown menu.
Now, we can get to the heart of our program, which looks like this:
Patches.getPulseValue('tap').subscribe(function (e) {
    Instruction.bind(false, 'tap_to_start')
    if (status === 'ready') {
        start();
    }
    else if (status === 'running'){
        return;
    }
    else if (status === 'finished'){
        reset();
    }
});
The first line listens for a screen tap using the tap patch we made earlier. When it “hears” a tap, it turns off the 'tap_to_start' instruction and begins an if-loop to shuffle our pictures.
Since we already set the status to ready, the first step of this loop is to call the function start(). We write this function ourselves, and it looks like this:
function start(){
    status == 'running';

    randInterval = Time.setInterval(function(){
        randomImage();
    }, 100);
    beginCountDown();
};
First, our status is changed to 'running'. If you check back to the main if-loop, you’ll see a solitary return keyword under the else if statement for this status. Essentially, this ignores any additional taps while the pictures are being shuffled.
Next,randInterval is changed from null to an interval which calls a function every set number of milliseconds. In this case, the function we are using is called randomImage(), which we also need to write, and it will randomly choose a picture from our pics object every 100 milliseconds.
That function looks like this:
function randomImage(){
    let randomNumber = randomlyChoose(0, pics.length);
    let pickedImage = pics[randomNumber]
    display.diffuse = Textures.get(pickedImage);
};
In the first line, a number is randomly chosen between 0 and the length of your pics array. Writing a javascript function to choose a number randomly within a range can be found with a simple Google search. (I called mine randomlyChoose, but you can call yours whatever).
In the second line, that number is then used to index the array, choosing a random image. Lastly, display.diffuse is used to change the texture of display to that image.
Next, continuing on with start(), a timer is set on the first interval using beginCountDown(). Here’s that function:
function beginCountDown(){
    Time.setTimeout(function(){
        stop();
    }, 3000);
};
It works similarly to setting an interval. The above function calls stop() once after 3 seconds (3000 milliseconds), giving the user a result.
function stop(){
    Time.clearInterval(randInterval);
    Instruction.bind(true, 'tap_to_reply')
    status = 'finished';
};
This also adds an instruction for the user to restart (using the token 'tap_to_reply'), and changes the program status to 'finished'. This calls the final function in our program, restart().
function reset(){
    Instruction.bind(false, 'tap_to_reply')
    Instruction.bind(true, 'tap_to_start')
    display.diffuse = Textures.get('which');
    status = 'ready';
};
The instructions are reset (tap_to_reply is turned off and tap_to_start is turned on) and the display material is returned to the initial “Which ____ are you?” question picture. The user can tap to use the filter again and again.
Next Steps
Before you submit your filter for review to Instagram and Facebook, there are a lot of additional ways you can play around with it.

In my project, I added a particle emitter, which allows small images to fly upwards from the display, creating a kind of glittery effect. Also, I changed the opacity of the display material to give it a slightly translucent look.
There is a lot you can do! Good luck :)

Top comments (0)