
Want to find out if one onboarding screen is better than another but want to build it yourself?
In this article, Nick Smet & I will show you how you can split your users into A and B variants using only Supabase. This gives you scope to run A/B tests and build features in a more data-driven way.
Notes:
- This is not a production-ready - there are several limitations but it was fun to work on and we hope it gives you some ideas to think about.
- We are assuming you have some familiarity with Supabase. If not, we suggest checking out the quick starts on Supabase and Edge functions.
- We are not covering the analysis part of A/B testing
Step 1 - create a profiles table
The profiles table contains the non-authy side of users. Including their name etc. It’s connected to the auth user by id.
We used the Supabase User Management starter. You can find it within the SQL Editor → Quick Start.
If you run this SQL template, it will automatically create a user in the Profiles table when you create a user in the auth table.

-- Create a table for public profiles
create table profiles (
  id uuid references auth.users on delete cascade not null primary key,
  updated_at timestamp with time zone,
  username text unique,
  full_name text,
  avatar_url text,
  website text,

  constraint username_length check (char_length(username) >= 3)
);
-- Set up Row Level Security (RLS)
-- See https://supabase.com/docs/guides/auth/row-level-security for more details.
alter table profiles
  enable row level security;

create policy "Public profiles are viewable by everyone." on profiles
  for select using (true);

create policy "Users can insert their own profile." on profiles
  for insert with check (auth.uid() = id);

create policy "Users can update own profile." on profiles
  for update using (auth.uid() = id);

-- This trigger automatically creates a profile entry when a new user signs up via Supabase Auth.
-- See https://supabase.com/docs/guides/auth/managing-user-data#using-triggers for more details.
create function public.handle_new_user()
returns trigger as $$
begin
  insert into public.profiles (id, full_name, avatar_url)
  values (new.id, new.raw_user_meta_data->>'full_name', new.raw_user_meta_data->>'avatar_url');
  return new;
end;
$$ language plpgsql security definer;
create trigger on_auth_user_created
  after insert on auth.users
  for each row execute procedure public.handle_new_user();

-- Set up Storage!
insert into storage.buckets (id, name)
  values ('avatars', 'avatars');

-- Set up access controls for storage.
-- See https://supabase.com/docs/guides/storage#policy-examples for more details.
create policy "Avatar images are publicly accessible." on storage.objects
  for select using (bucket_id = 'avatars');

create policy "Anyone can upload an avatar." on storage.objects
  for insert with check (bucket_id = 'avatars');
Step 2 - create an experiments table in your Supabase database
We’ll want to run more than one experiment so we’re going to create an experiments table.
For instance we might first want to test a new screen on our onboarding flow. Then we might want to test our upsell page.
create table experiments (
  id uuid not null primary key DEFAULT uuid_generate_v1(),
  updated_at timestamp with time zone,
  inserted_at   timestamp with time zone default timezone('utc'::text, now()) not null,
  exp_number integer,
  title text,
  description text
);
An example experiment could be an onboarding improvement.
We can run this code snippet in Supabase’s SQL editor to insert an experiment.
INSERT INTO experiments(exp_number, title, description)
VALUES (1, 'Onboarding revamp', 'nicer design in the onboarding');
Step 3 - Create a table that links experiments, users and variants
We need a way to link a user with a variant for each experiment i.e. A or B.
Example: For experiment with exp_number == 1 (our onboarding revamp), we want to show user with id == e486cb46-283e-41bb-b65c-95dab7a39ed4 (jack) the variant of B (the new designed screen)
To do this we create a table that links user and experiment:
create table user_experiments (
  id uuid not null primary key DEFAULT uuid_generate_v1(),
  experiment_id uuid references experiments on delete cascade not null,
  user_id uuid references profiles,
  updated_at timestamp with time zone,
  inserted_at   timestamp with time zone default timezone('utc'::text, now()) not null,
  variant experiment_variants not null
);
Notice that experiment_id and user_id are foreign keys.
Variant in our case is always either A or B. We can lock this in with an enum
create type experiment_variants as enum ('A', 'B');
Step 4 - Setup Supabase Edge Functions
Now it’s time to play with Supabase’s Edge Functions. They are serverless functions and run Deno(a node variant).
Here is a basic template for a function
import { serve } from "https://deno.land/std@0.168.0/http/server.ts"
import { createClient, SupabaseClient } from "https://esm.sh/@supabase/supabase-js@2"

serve(async (req) => {
  const supabaseClient = createClient(
    // Supabase API URL - env var exported by default.
    Deno.env.get('SUPABASE_URL') ?? '',
      // Supabase API ANON KEY - env var exported by default.
    Deno.env.get('SUPABASE_ANON_KEY') ?? '',
  );

  // If you want to use Authentication
  // const {
  //   data: { user },
  // } = await supabaseClient.auth.getUser()

  const body = await req.json()

  return new Response(
    JSON.stringify({
      'TODO'
    }),
    { headers: { "Content-Type": "application/json" } },
  )
})
First off we create our client using the environment credentials.
Then we parse our body for later use and have an empty return statement to fill out later with the variant.
Step 5 - Fetch the experiment using the experiment number
async function getExpId(supabaseClient: SupabaseClient, expNumber: number) {
  const { data, error } = await supabaseClient
    .from('experiments')
    .select('id')
    .eq('exp_number', expNumber)
    .limit(1)
    .maybeSingle();

  if (error) throw error
  return  data
}
In the app we will do an API call with exp_number as a param. Why use the exp_number because it is easier to read than a UUID. But feel free to use your experiment ID if you want to.
Step 6 - Get the number of variants assigned to our users to determine which version this user should get
async function getCountsForExperimentNumber(supabaseClient: SupabaseClient, expId: string) {
  const variantA = await supabaseClient
    .from('user_experiments')
    .select('experiment_id,variant', { count: 'exact', head: true})
    .eq('experiment_id', expId)
    .eq('variant', 'A')
  const variantB = await supabaseClient
    .from('user_experiments')
    .select('experiment_id,variant', { count: 'exact', head: true})
    .eq('experiment_id', expId)
    .eq('variant', 'B')

  if (variantA.error || variantB.error) throw variantA.error || variantB.error;

  return {
    A: variantA.count || 0,
    B: variantB.count || 0,
  };
}
In this case, we have two variants for each experiment.
We do a simple count on both versions and return one object to our parent function containing both counts.
Step 7 - Call our variants counter function and store the users version
async function getUserVariant(supabaseClient: SupabaseClient, expId: string, userId: string) {
  let expVariantCounts = await getCountsForExperimentNumber(supabaseClient, expId);
  variant = expVariantCounts.A >= expVariantCounts.B ? 'B' : 'A'
  await storeUserVariant(supabaseClient, expId, userId, variant);
  return variant;
}

async function storeUserVariant(supabaseClient: SupabaseClient, expId: string, userId: string, variant: string) {
  await supabaseClient
    .from('user_experiments')
    .insert({
      experiment_id: expId,
      user_id: userId,
      variant
    })
}
Now we can use our getCountsForExperimentNumber function ****to work out which variant should be allocated to our user.
If version A’s count is greater than or equal to version B’s count → we allocate version B, otherwise we allocate version A.
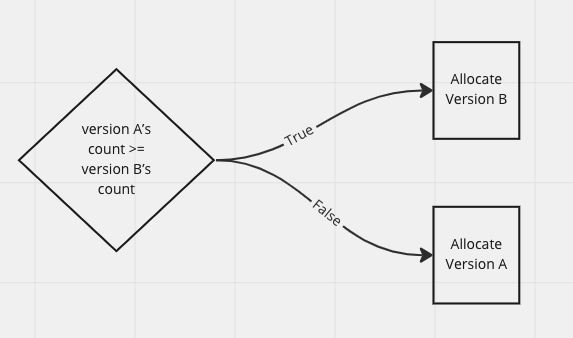
Then once we have our users requested experiment variant, save it to our database.
Step 8 - Optional
async function getUserVariant(supabaseClient: SupabaseClient, expId: string, userId: string) {
  // OPTIONAL - you can use an extra call to see if the user has already been given a variant. But you could save the variant locally so you don't need to fetch it everytime
  let variant = await getUserStoredVariant(supabaseClient, expId, userId);

  if (variant) return variant;

  let expVariantCounts = await getCountsForExperimentNumber(supabaseClient, expId);
  variant = expVariantCounts.A >= expVariantCounts.B ? 'B' : 'A'
  await storeUserVariant(supabaseClient, expId, userId, variant);
  return variant;
}

async function getUserStoredVariant(supabaseClient: SupabaseClient, expId: string, userId: string) {
  const { data, error } = await supabaseClient
    .from('user_experiments')
    .select('variant')
    .eq('experiment_id', expId)
    .eq('user_id', userId)
    .limit(1)
    .maybeSingle();

    if (error) throw error
    return  data?.variant
}
It is good practice to check if a user already made this request for an experiment version.
If they did → return the original variant, if not → assign a new one.
Why is this optional?
On the device you could easily store what version the user was given before and not perform the same call again.
Step 9 - Update your main function
serve(async (req) => {
  const supabaseClient = createClient(
    // Supabase API URL - env var exported by default.
    Deno.env.get('SUPABASE_URL') ?? '',
      // Supabase API ANON KEY - env var exported by default.
    Deno.env.get('SUPABASE_ANON_KEY') ?? '',
  );

  // If you want to use Authentication
  // const {
  //   data: { user },
  // } = await supabaseClient.auth.getUser()

  const body = await req.json()
  const experiment = await getExpId(supabaseClient, body.exp_number);
  const variant = await getUserVariant(supabaseClient, experiment.id, body.user_id);

  return new Response(
    JSON.stringify({
      variant
    }),
    { headers: { "Content-Type": "application/json" } },
  )
})
Now tie it all together. You get the existing experiment ID based on the experiment number sent in the API call from the users device.
Then we request a variant for that user and return it in our Response for our user to store on their device.
Step 10 - Deploy
Refer to https://supabase.com/docs/guides/functions/quickstart on how deploy edge functions.
Step 11 - Make the request

Not covered - Success metrics
In this tutorial, we are constrained on time so we are not going to cover analysis in too much detail.
But to analyse how well each experiment variation performs, you would want to trigger success events that know which variant of the app the user has.
If you are doing this in Supabase you might have a table that looks something like this
create table events (
  id uuid not null primary key DEFAULT uuid_generate_v1(),
  user_id uuid references profiles on delete cascade,
  title text,
  inserted_at timestamp with time zone default timezone('utc'::text, now()) not null
);
From here you could decide what constitutes a success, for example a sign_up event or.
Then you could count how many sign_up you get for the A variant and B variant.
Combining this with some calculations that take into account statistical significance (here’s a calculator), you should be able to work out whether A or B performed better (or if there is no significant difference)
If there’s interest, we’ll to add more detail on this in a future post.
Limitations:
- This code doesn’t work with authentication out of the box, although there is some boilerplate code in the serve function for you to try out
- Not randomly allocating A or B - it’s rotating (maybe a limitation)
- Only supports 2 variants
Full code
// Follow this setup guide to integrate the Deno language server with your editor:
// https://deno.land/manual/getting_started/setup_your_environment
// This enables autocomplete, go to definition, etc.
import { serve } from "https://deno.land/std@0.168.0/http/server.ts"
import { createClient, SupabaseClient } from "https://esm.sh/@supabase/supabase-js@2"

serve(async (req) => {
  const supabaseClient = createClient(
    // Supabase API URL - env var exported by default.
    Deno.env.get('SUPABASE_URL') ?? '',
      // Supabase API ANON KEY - env var exported by default.
    Deno.env.get('SUPABASE_ANON_KEY') ?? '',
  );

  // If you want to use Authentication
  // const {
  //   data: { user },
  // } = await supabaseClient.auth.getUser()

  const body = await req.json()
  const experiment = await getExpId(supabaseClient, body.exp_number);
  const variant = await getUserVariant(supabaseClient, experiment.id, body.user_id);

  return new Response(
    JSON.stringify({
      variant
    }),
    { headers: { "Content-Type": "application/json" } },
  )
})

async function storeUserVariant(supabaseClient: SupabaseClient, expId: string, userId: string, variant: string) {
  await supabaseClient
    .from('user_experiments')
    .insert({
      experiment_id: expId,
      user_id: userId,
      variant
    })
}

async function getExpId(supabaseClient: SupabaseClient, expNumber: number) {
  const { data, error } = await supabaseClient
    .from('experiments')
    .select('id')
    .eq('exp_number', expNumber)
    .limit(1)
    .maybeSingle();

  if (error) throw error
  return  data
}

async function getUserVariant(supabaseClient: SupabaseClient, expId: string, userId: string) {
  // OPTIONAL - you can use an extra call to see if the user has already been given a variant. But you could save the variant locally so you don't need to fetch it everytime
  let variant = await getUserStoredVariant(supabaseClient, expId, userId);

  if (variant) return variant;

  let expVariantCounts = await getCountsForExperimentNumber(supabaseClient, expId);
  variant = expVariantCounts.A >= expVariantCounts.B ? 'B' : 'A'
  await storeUserVariant(supabaseClient, expId, userId, variant);
  return variant;
}

async function getUserStoredVariant(supabaseClient: SupabaseClient, expId: string, userId: string) {
  const { data, error } = await supabaseClient
    .from('user_experiments')
    .select('variant')
    .eq('experiment_id', expId)
    .eq('user_id', userId)
    .limit(1)
    .maybeSingle();

    if (error) throw error
    return  data?.variant
}

async function getCountsForExperimentNumber(supabaseClient: SupabaseClient, expId: string) {
  const variantA = await supabaseClient
    .from('user_experiments')
    .select('experiment_id,variant', { count: 'exact', head: true})
    .eq('experiment_id', expId)
    .eq('variant', 'A')
  const variantB = await supabaseClient
    .from('user_experiments')
    .select('experiment_id,variant', { count: 'exact', head: true})
    .eq('experiment_id', expId)
    .eq('variant', 'B')

  if (variantA.error || variantB.error) throw variantA.error || variantB.error;

  return {
    A: variantA.count || 0,
    B: variantB.count || 0,
  };
}
This was written by Jack Bridger & Nick Smet
If you like this article, I also host a podcast on developer tools.

Top comments (0)