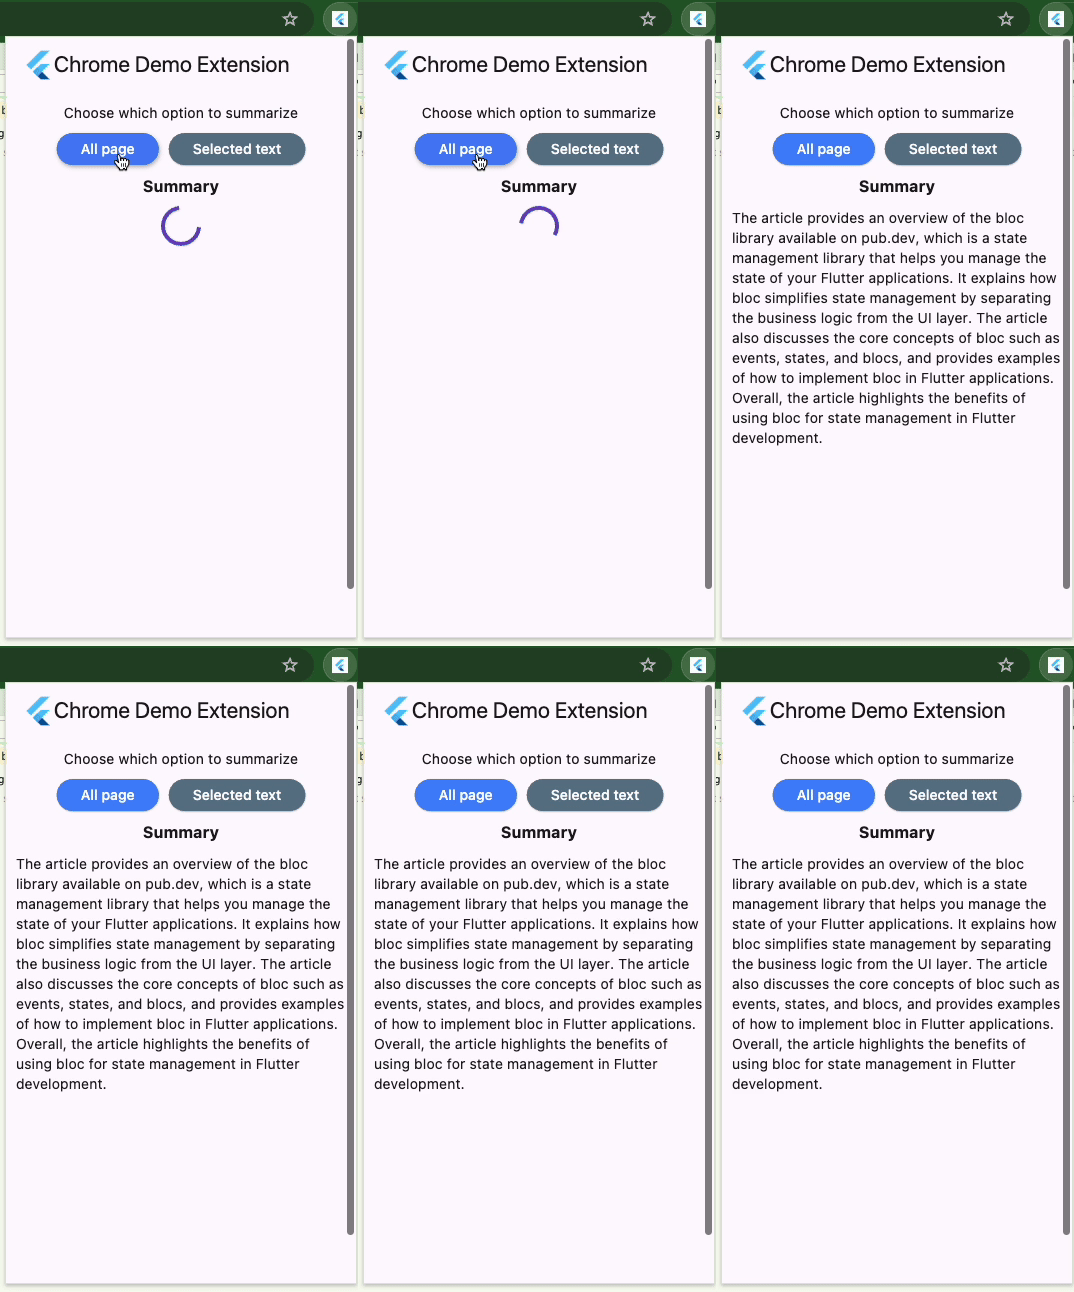
The post will provide a comprehensive exploration of how to create a Chrome Extension Flutter; covering fundamental concepts.
The true power of Flutter is its ability to create cross-platform applications allowing it to expand to the web and Chrome extension, but some important questions about creating more powerful extensions continue as a mystery for me; for that reason, this post is the beginning of the journey for me to understand how to do it.
Part 2: Link
Goal of the post
Before you start we need to choose the goal of the extension; in this case, we are going to create a Chrome Extension that summarizes the text of the current page using ChatGPT.
In order to achieve this goal, we need to understand the following concepts:
- Basic setup for a Flutter Chrome Extension;
- How to communicate between the extension and the background script;
- How to inject HTML and CSS into the current page;
Create the Extension: Basic Setup
- manifest.json
1) Create a new Flutter project;
2) In the web folder, update the manifest.json with the following content:
{
    "name": "flutter_chrome_extension_demo",
    "short_name": "flutter_chrome_extension_demo",
    "start_url": ".",
    "display": "standalone",
    "background_color": "#0175C2",
    "theme_color": "#0175C2",
    "description": "A new Flutter project.",
    "orientation": "portrait-primary",
    "prefer_related_applications": false,
    "content_security_policy": {
        "extension_pages": "script-src 'self' ; object-src 'self'"
    },
    "action": {
        "default_popup": "index.html",
        "default_icon": "/icons/Icon-192.png"
    },
    "manifest_version": 3
}
If you want to know more about the manifest.json file, you can check the official documentation.
- index.html
3) Update the width and height on index.html
<!DOCTYPE html>
<html style="height: 650px; width: 350px;">

<head>
  <base href="$FLUTTER_BASE_HREF">

  <meta charset="UTF-8">
  <title>flutter_chrome_extension_demo</title>
  <link rel="manifest" href="manifest.json">

  <!-- This script adds the flutter initialization JS code -->
  <script src="flutter.js" defer></script>
</head>

<body>
  <script src="main.dart.js" type="application/javascript"></script>
</body>
</html>
4) Run the extension with the following command to ensure that the extension is working properly:
flutter build web --web-renderer html --csp
5) Update Chrome dev tools to load the extension, and then load the extension from the build/web folder.
6) Current result:
How does a Chrome Extension work?
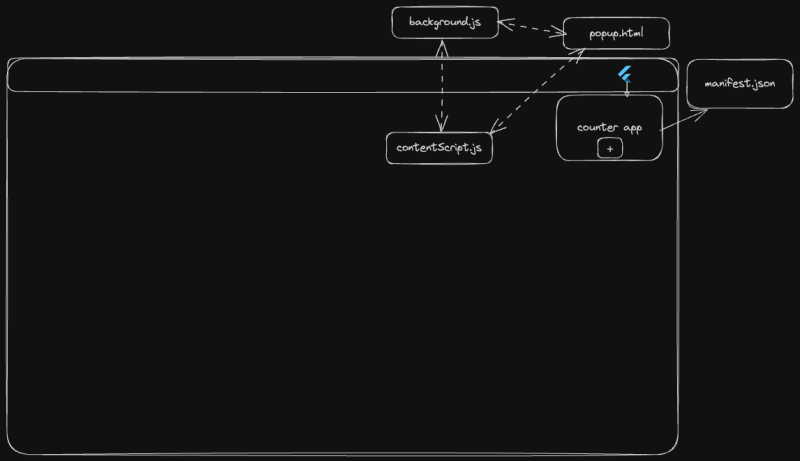
Before we continue, let's understand how a Chrome Extension works and the different parts that make up an extension.
A Chrome Extension consists of several parts that work together to provide the desired functionality.
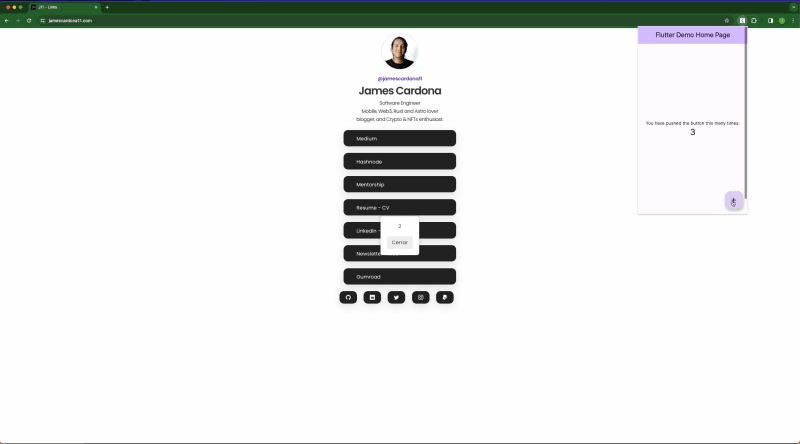
We are going to update the basic project to launch a popup when the counter action is clicked; in order to do that we need to update the manifest.json file.
  {
    "background": {
        "service_worker": "background.js"
    },
    "content_scripts": [
        {
            "matches": [
                "<all_urls>"
            ],
            "js": [
                "contentScript.js"
            ]
        }
    ],
  }
Background Script:
- Always running, handles long-term tasks (listeners, API calls).
- Limited access to webpage (no direct interaction).
- Communicates with content script for webpage actions.
chrome.tabs.onUpdated.addListener(
  (tabId, changeInfo, tab) => {
    console.log('Updated to URL:', tab.url)
  }
)
Content Script:
- Injects into webpages.
- Directly controls content (add, remove, modify).
- Runs user-facing tweaks.
How to communicate Extension components?
The previous image is a good representation of how the extension components communicate with each other, but you can follow the official documentation to have the full picture.
Also, these two posts in StackOverflow help me to understand how to communicate between the extension components:
Steps to launch the popup
We need to communicate using the sendMessage function; in order for that work, we need to create a listener to receive the message.
Add permissions to the manifest.json file:
"permissions": [
  "tabs",
  "activeTab"
],
1) Create a new file background.js inside the web folder with the following content:
function sendMessage(message) {
  chrome.windows.getCurrent(w => {
    chrome.tabs.query({ active: true, windowId: w.id }, tabs => {
      const tabId = tabs[0].id;
      chrome.tabs.sendMessage(tabId, { "type": "notifications", "data": message });
    });
  });
}
2) Create a new file contentScript.js inside the web folder with the following content:
chrome.runtime.onMessage.addListener(function (message, sender, sendResponse) {
  if (message.type == "notifications") {
    create_popup(message.data);
  }
});
Also, we need to create the create_popup function to show the popup.
You can check the create_popup code in the official repository
1) Finally, we need to update the main.dart file to call the sendMessage function when the counter is clicked.
In order to do that, we need to add the js package; as the description says: "Annotations to create static Dart interfaces for JavaScript APIs.
Create a file called: chrome_api.dart inside the lib folder with the following content:
@JS('chrome')
library main; // library name can be whatever you want

import 'package:js/js.dart';

@JS('runtime.sendMessage')
external sendMessage(ParameterSendMessage parameterSendMessage);

@JS()
@anonymous
class ParameterSendMessage {
  external String get type;
  external String get data;

  external factory ParameterSendMessage({String type, String data});
}
Then, update the main.dart file with the following content:
void _incrementCounter() {
    sendMessage(ParameterSendMessage(type: "counter", data: _counter.toString()));
    setState(() {
      _counter++;
    });
  }
Result:
With this you can see how the popup is launched when the counter is clicked; and how the components communicate with each other.
This is the basic setup and how to communicate between components.
Start summary Extension
1) Create a ChatGPT request to summarize the text of the current page.
import 'package:projectile/projectile.dart';

import 'config/env.dart';

class GPTClient {
  final projectile = Projectile(client: HttpClient(config: const BaseConfig(enableLog: false)));

  Future<String?> getPageSummary(String url) async {
    final response = await projectile
        .request(
          ProjectileRequest(
            method: Method.POST,
            target: 'https://api.openai.com/v1/chat/completions',
            headers: {
              HeadersKeys.authorization: 'Bearer ${Env.openAIKey}',
              HeadersKeys.contentType: ContentType.json,
            },
            body: {
              'model': 'gpt-3.5-turbo',
              'messages': [
                {
                  'role': 'system',
                  'content': 'You are text summarizer tool',
                },
                {
                  'role': 'user',
                  'content': 'Please summarize this article: $url',
                }
              ]
            },
          ),
        )
        .fire();

    if (response.isFailure) {
      return null;
    }

    final json = response.data as Map<String, dynamic>;
    final completions = json['choices'] as List<dynamic>;

    return completions[0]['message']['content'] as String;
  }
}
2) Create the UI to show the summary:
class _ChromePopupState extends State<ChromeHomePage> {
  bool isLoading = false;
  final GPTClient summaryApiClient = GPTClient();

  String? summary;

  @override
  Widget build(BuildContext context) {
    return Scaffold(
      appBar: AppBar(
        centerTitle: true,
        title: const Row(
          children: [
            FlutterLogo(size: 32),
            Text('Chrome Demo Extension'),
          ],
        ),
      ),
      body: Padding(
        padding: const EdgeInsets.all(10),
        child: Column(
          children: [
            const Text('Choose which option to summarize'),
            const SizedBox(height: 10),
            Row(
              mainAxisAlignment: MainAxisAlignment.center,
              children: [
                ElevatedButton(
                  style: ElevatedButton.styleFrom(
                    backgroundColor: Colors.blueAccent,
                  ),
                  onPressed: _summaryAllPage,
                  child: const Text(
                    "All page",
                    style: TextStyle(
                      fontSize: 14,
                      color: Colors.white,
                    ),
                  ),
                ),
                const SizedBox(width: 10),
                ElevatedButton(
                  style: ElevatedButton.styleFrom(
                    backgroundColor: Colors.blueGrey,
                  ),
                  onPressed: _summarySelectedText,
                  child: const Text(
                    "Selected text",
                    style: TextStyle(
                      fontSize: 14,
                      color: Colors.white,
                    ),
                  ),
                ),
              ],
            ),
            const SizedBox(height: 10),
            const Text(
              'Summary',
              style: TextStyle(
                fontSize: 16,
                fontWeight: FontWeight.bold,
              ),
            ),
            const SizedBox(height: 10),
            Expanded(
              child: SingleChildScrollView(
                child: Container(
                  margin: const EdgeInsets.only(bottom: 20),
                  child: isLoading ? const Center(child: CircularProgressIndicator()) : Text(summary ?? ''),
                ),
              ),
            ),
          ],
        ),
      ),
    );
  }

  Future<void> _summarySelectedText() async {}

  Future<void> _summaryAllPage() async {
    print('Summary all page');
    String url = await selectUrl();

    setState(() {
      isLoading = true;
    });

    summary = await summaryApiClient.getPageSummary(url) ?? 'Error fetching summary';

    setState(() {
      isLoading = false;
    });
  }

  Future<String> selectUrl() async {
    List tab = await promiseToFuture(
      query(ParameterQueryTabs(active: true, lastFocusedWindow: true)),
    );
    return tab[0].url;
  }
}
What's next?
In this post, we have covered the basic setup for a Flutter Chrome Extension, how to communicate between the extension components, and how to inject HTML and CSS into the current page.
Additionally, we see how to use Flutter to call the ChatGPT API to summarize the text of the current page.
Summarizing the selected text needs to be added; in the next post, we'll cover how to do that. I tried to do it in this post but needed some help with the interaction of some current JS APIs; also communicating the background/contentScript with the Extension is a challenge with Flutter.
Conclusion
For me creating a Chrome Extension with Flutter is a challenge; but I think that is a good way to learn more about the Flutter framework and how to use it in different scenarios.
If you are thinking of creating a Chrome Extension that uses a lot of interaction with JS API; I recommend not using Flutter; in that case, it is better to use another framework.
If you plan to create an extension that uses the Flutter UI; I recommend you to use Flutter; which is a good way to create a cross-platform extension.
Official Github Repository: Link
Thank you for reading this far. Consider giving it a like, sharing it, and staying tuned for future articles. Feel free to contact me via LinkedIn.
References
- https://zfinix.medium.com/building-a-chrome-extension-with-flutter-751e0674df09
- https://github.com/tmedanovic/XAI/tree/main
- https://medium.com/@joffrey.jougon/how-to-build-a-chrome-extension-on-flutter-and-use-the-chrome-api-62798f73c16f
- https://blog.langchaindart.com/langchain-dart-101-developing-an-llm-powered-summarizer-browser-extension-%EF%B8%8F-8b6cab84db69
- https://blog.stackademic.com/utilizing-js-library-for-flutter-web-c683c590927f
- https://medium.com/flutter-community/building-a-chrome-extension-using-flutter-aeb100a6d6c
- https://www.dhiwise.com/post/how-to-implement-flutter-js-package-in-your-flutter-apps
- https://stackoverflow.com/questions/41273787/getting-an-arbitrary-property-from-a-javascript-object-in-dart
- https://liewjuntung.medium.com/use-javascript-in-flutter-web-a6eed3efb9a0


Top comments (2)
Flutter web is too Heavy for mobile browsers already ....
the same could happen for a browser extension
its cute to see a flutter app of that size : )
You are right; in this case the extension is very basic but in a large application this is another problem.